Setting up Wireguard on VPS
Introduction
You have some service running on a VPS somewhere. Because the VPS is sitting on the Internet with a public IP, the easiest way to access it is by exposing a port on that VPS where the service is running. This, however, opens up a load of possible security issues. Because now anyone on the internet can access the service just like you. This is perfectly fine in most cases, I mean, all websites that you browse work this way – they are exposed so that people can access them. If you don't want anyone else to access services on your VPS, you can leverage the power of VPN technology.
Setup Plan
Currently, all services on the VPS are binded to its public IP, which is the only network interface together with localhost. Here's what we will do:
- Install and setup Wireguard interface on the server
- Setup clients
- Stop all services and bind them only to the Wireguard interface
- Adjust firewall rules according to our new setup
This guide assumes that you will access these services only from a few devices. If, for example, you would like to provide your whole home network with access to the services running on your VPS, you will have to do it a bit differently.
|‾‾‾‾‾‾‾‾‾‾‾‾‾‾‾‾‾‾‾‾‾‾‾‾‾‾‾‾‾‾‾‾‾‾‾‾‾‾‾‾‾‾‾‾‾‾‾‾‾‾‾|				|‾‾‾‾‾‾‾‾‾‾‾‾‾‾‾‾‾‾‾‾‾‾‾‾‾‾‾‾‾‾‾‾‾‾‾‾‾‾‾‾‾‾‾‾‾‾‾‾‾‾‾|
|						HOME						|				|						VPS							|
|Android Device------------------------------------->---WG tunnel--->													|
|[Interface]										|				|													|
|eth0: 192.168.20.55 (private IP from DHCP at home)	|				|		Server  									|
|WG IP: 10.20.20.2									|				|		[Interface]									|
|WG public key: 16f5das48wa1f684g1a489awg5a			|				|		eth0: 78.97.52.14 (example public IP)		|
|WG private key: gzf74894ger89a46sd14g84r8esg		|				|		WG IP: 10.20.20.1							|
|													|				|		WG public key: 6t57489hgnufjfiosdjjfp98h	|
|Windows Device------------------------------------->---WG tunnel--->		WG private key: 4gfd89a7g1fd56g848g4fdg41fd	|
|[Interface]										|				|													|
|eth0: 192.168.20.56 (private IP from DHCP at home)	|				|													|
|WG IP: 10.20.20.3									|				|													|
|WG public key: fgd489fdsg84168e46g1514ge5g			|				|													|
|WG private key: iyut789tr496516sh416g4164h6h		|				|													|
|___________________________________________________|				|___________________________________________________|
*note: don't worry, the public and private keys are just random placeholder values in the diagram
Installation on the VPS
Since we are running Debian, we can get Wireguard from the official repository. I usually prefer building software from source, but for the sake of this guide, I will go the easier route and simply use the repo version.
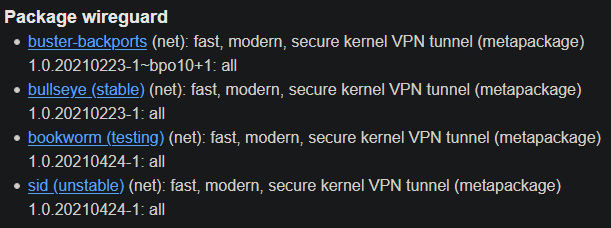
Note that since it's Debian, tha packages are sometimes a bit outdated. At the time of writing, the tools weren't available in the newest version – even in the unstable repo. The default stable repo has even older packages.
The situation around Debian and Wireguard is a bit confusing. Debian is known to be stable but has older packages. If you don't want to worry about anything, just install it from the stable repo:
$ sudo apt install wireguardHowever, if you are on Debian 10, Wireguard still isn't integrated into the 4.19 kernel, which means the installation will bring the wireguard-dkms (Dynamic Kernel Module Support) package as well. On Debian 11, this should not be necessary, because Wireguard is already natively in the 5.10 kernel (which is default for Debian 11). I have it a bit more complicated. I am in fact running Debian 11, but with the 5.4 kernel (backported from Debian 10), which also doesn't have Wireguard natively, but that's just a side note. You can see the version status of the Wireguard package here:
Enable testing in Debian
If we want to have the latest Wireguard versions available on Debian, we have to enable not backports, but unstable or testing. Adding backports is easy, it's just another line in /etc/apt/sources.list. Unfortunately, it is not as simple as that with testing or unstable. For these to work properly (and not change all packages to unstable), we need to play a bit with repository priorities.
We need to use something called Apt-Pinning, which you can read more about in the Debian Handbook.
Create apt preferences file (if it doesn't exist already) and open it with your favorite file editor.
$ sudo vi /etc/apt/preferencesNow add the following content into it:
Package: *
Pin: release a=stable
Pin-Priority: 900

Package: *
Pin: release o=Debian
Pin-Priority: -10
This should give the stable repository high enough priority that all packages will be installed and upgraded from stable by default. To install package from other repo (testing or unstable), it has to be explicitly specified with -t option of apt.
Enable backports in Debian
Open /etc/apt/sources.list in your favorite editor.
$ sudo vi /etc/apt/sources.listAdd a line containing the following:
deb http://deb.debian.org/debian bullseye-backports mainUpdate apt configuration
$ sudo apt updateCheck apt pritority configuration and make sure the backports repo has lower priority than the other repositories.
$ apt-cache policy

Package files:
 100 /var/lib/dpkg/status
     release a=now
 500 https://nginx.org/packages/mainline/debian bullseye/nginx amd64 Packages
     release v=11.0,o=nginx,a=stable,n=bullseye,l=nginx,c=nginx,b=amd64
     origin nginx.org
 100 http://deb.debian.org/debian bullseye-backports/main amd64 Packages
     release o=Debian Backports,a=bullseye-backports,n=bullseye-backports,l=Debian Backports,c=main,b=amd64
     origin deb.debian.org
 500 http://security.debian.org/debian-security bullseye-security/main amd64 Packages
     release v=11,o=Debian,a=stable-security,n=bullseye-security,l=Debian-Security,c=main,b=amd64
     origin security.debian.org
 500 http://deb.debian.org/debian bullseye/main amd64 Packages
     release v=11.0,o=Debian,a=stable,n=bullseye,l=Debian,c=main,b=amd64
     origin deb.debian.org
Pinned packages:
As you can see, the backported repo has lower number than the rest. It is a bit more complicated than that (you can check apt's man page), but for the purposes of this, let's just say that lower means lower priority.
Setting up the clients
Moving network services to WG interface
Adjusting Firewall rules


