Wireguard VPN
WireGuard® is an extremely simple yet fast and modern VPN that utilizes state-of-the-art cryptography. It aims to be faster, simpler, leaner, and more useful than IPsec, while avoiding the massive headache. It intends to be considerably more performant than OpenVPN. WireGuard is designed as a general purpose VPN for running on embedded interfaces and super computers alike, fit for many different circumstances.
- Setting up Wireguard on a VPS
- Part 1 – Installation and server configuration
- Part 2 – Clients setup (Windows & Android)
- Part 3 – Migrating services on VPS
- Part 4 – DNS server setup for clients
- Part 5 – Adjusting Firewall (iptables)
- Part 6 – Final troubleshooting
- Part 7 – Migrating SSH access
- (FULL) Setting up Wireguard on VPS
- SSH over VPN
- Wireguard OpenBSD client
Setting up Wireguard on a VPS
Access services running on your VPS privately from trusted clients only. It's choped up into individual parts to seem less daunting, the whole thing together is the page.
Part 1 – Installation and server configuration
Introduction
You have one or more services running on a VPS somewhere. Because the VPS is sitting on the internet with a public IP, the easiest way to access it is by exposing a port on that VPS where the service is running. This, however, opens up a load of possible security issues. Because now anyone on the internet can access the service just like you. This is perfectly fine in most cases, I mean, all websites that you browse work this way – they are exposed so that people can access them. You may have some form of 2FA or other application-level security method setup, but that doesn't help mitigate vulnerabilities in the application itself. By limiting access to your application in the first place, you covering a large part of the attack surface. All of this by leveraging the power of VPN technology.
Setup Plan
Currently, all services on my VPS are listening on the server's public IP, which is the only network interface together with localhost. Here's what we will do:
- Install and setup Wireguard interface on the server
- Setup clients
- Stop all services and bind them only to the Wireguard interface
- Adjust firewall rules according to our new setup
This guide assumes that you will access these services only from a few devices. If, for example, you would like to provide your whole home network with access to the services running on your VPS, you will have to do it a bit differently.
|‾‾‾‾‾‾‾‾‾‾‾‾‾‾‾‾‾‾‾‾‾‾‾‾‾‾‾‾‾‾‾‾‾‾‾‾‾‾‾‾‾‾‾‾‾‾‾‾‾‾‾|				|‾‾‾‾‾‾‾‾‾‾‾‾‾‾‾‾‾‾‾‾‾‾‾‾‾‾‾‾‾‾‾‾‾‾‾‾‾‾‾‾‾‾‾|
|						HOME						|				|					VPS						|
|Android Device------------------------------------->---WG tunnel--->											|
|[Interface]										|				|											|
|eth0: 192.168.20.55 (private IP from DHCP at home)	|				|Server  									|
|WG IP: 10.20.20.2/29								|				|[Interface]								|
|WG public key: 16f5das48wa1f684g1a489awg5a			|				|eth0: 78.97.52.14 (example public IP)		|
|WG private key: gzf74894ger89a46sd14g84r8esg		|				|WG IP: 10.20.20.1/29						|
|													|				|WG public key: 6t57489hgnufjfiosdjjfp98h	|
|Windows Device------------------------------------->---WG tunnel--->WG private key: 4gfd89a7g1fd56g848g4fdg41fd|
|[Interface]										|				|											|
|eth0: 192.168.20.56 (private IP from DHCP at home)	|				|											|
|WG IP: 10.20.20.3/29								|				|											|
|WG public key: fgd489fdsg84168e46g1514ge5g			|				|											|
|WG private key: iyut789tr496516sh416g4164h6h		|				|											|
|___________________________________________________|				|___________________________________________|
*note: don't worry, the public and private keys in the diagram are just random placeholder values
Installation on the VPS
Since we are running Debian, we can get Wireguard from the official repository. I usually prefer building software from source, but for the sake of this guide, I will go the easier route and simply use the repo version.
Note that since it's Debian, the packages are sometimes a bit outdated. At the time of writing, the tools weren't available in the newest version – even in the unstable repo. The default stable repo has even older packages.

The situation around Debian and Wireguard is a bit confusing. Debian is known to be stable but has older packages. If you don't want to worry about anything, just install it from the stable repo:
$ sudo apt install wireguardHowever, if you are on Debian 10, Wireguard still isn't integrated into the 4.19 kernel, which means the installation will bring the wireguard-dkms (Dynamic Kernel Module Support) package as well. On Debian 11, this should not be necessary, because Wireguard is already natively in the 5.10 kernel (which is default for Debian 11). I have it a bit more complicated. I am in fact running Debian 11, but with the 5.4 kernel (backported from Debian 10), which also doesn't have Wireguard natively, but that's just a side note. You can see the version status of the Wireguard package here:
To find out how to add testing or unstable to Debian 11, check out my guide over here.
Configure Wireguard on the server
The main configuration folder is located in /etc/wireguard. This directory will contain both configuration and private/public key, therefore it is only accessible with root by default. To get to this directory, you need to elevate privileges.
$ sudo su
(root)$ cd /etc/wireguard/
Create configuration file for the Wireguard interface
Create a new file in /etc/wireguard. The name of the file will also be the name of the interface (like eth0,lo,etc.) + .conf file extension. I like the default naming, so I will use name it wg0.conf. Before creating the file, change umask to 077, so that the file is readable only by root. Umask controlls what permissions will newly created files and directories have. The default umask is 022. When we use the umask command with a different number, all new files and directories will be created under permissions we have set. This modifies the default umask value only for the current sub-shell. To go back to the default umask, just logout/login. You can also make the changes permanent if you want. You can read more about umask here.
(root)$ umask 077

(root)/etc/wireguard$ touch wg0.conf
Prepare wg0.conf
Open wg0.conf with your favorite editor.
(root)$ vi /etc/wireguard/wg0.confWe can slowly start preparing the config file, step by step. Right now, add the [Interface] block, which will define properties of the server's Wireguard interface.
Address– The local IP of the server within the Wireguard tunnel and subnet mask in CIDR notation. I know I will only have 3 clients, therefore I picked a small subnet/29with only 6 usable hosts. (Basic subnetting knowledge is required).ListenPort– The port on the server Wireguard will use to communicate with other peers. After everything is set up, this will be the only port exposed to the open internet. If left unspecified, default is51820.PrivateKey– The private key of the server that will be generated in a moment. This key should never be shared or leave the server. We will only send out the public key (as the name suggests).
Always keep private keys on devices where they were created. They should never be moved accross network or even accross devices.
The wg0.conf file should look like this right now:
[Interface]
Address = 10.20.20.1/29
ListenPort = 51895
PrivateKey =
Generate server public/private keys
Wireguard is built around the public and private key pairs structure. There is technically no such a thing as client or server in Wireguard, because everything is a peer. We use the client/server terminology to help our mind imagine the setup better. Each peer will generate its own private and public key. The private key will never leave the device where it originated from and should be kept well secured. The public key will be copied over to the other peers. In my case, the VPS will become a peer to both the Android and Windows device (clients). However, Android nor Windows will even know about each other, they will only be aware of the VPS, which will be their only peer. Reason for this is that they only need to talk to the VPS, not to each other.
Still as root, with umask set to 0077 (check by typing umask in the terminal) and in the /etc/wireguard directory, create a new subdirectory for the public/private keys and preshared keys (will explain in a second).
(root)$ mkdir keys psk(root)$ cd keys
(root)$ wg genkey | tee wg0_private.key | wg pubkey > wg0_public.keyThe wg genkey command generates a random private key in base64 and prints it to standard output (terminal). The output is instead redirected to tee, which both prints it to stdout (terminal), but also saves it into a file wg0_private.key. The private key printed to stdout is then piped (| symbol) to wg pubkey, which calculates the public key and prints it in base64 to stdout from a corresponding private key (the one we redirected to it with the pipe), lastly redirect the public key from stdout to a file wg0_public.key
Now we have two files in the keys directory:
(root)$ ls
wg0_private.key wg0_public.keyGenerate preshared keys
This option adds an additional layer of symmetric-key cryptography to be mixed into the already existing public-key cryptography, for post-quantum resistance (for paranoid people like me).
From the Wireguard whitepaper:
In order to mitigate any future advances in quantum computing, WireGuard also supports a mode in which any pair of peers might additionally pre-share a single 256-bit symmetric encryption key between themselves, in order to add an additional layer of symmetric encryption. The attack model here is that adversaries may be recording encrypted traffic on a long term basis, in hopes of someday being able to break Curve25519 and decrypt past traffic. While pre-sharing symmetric encryption keys is usually troublesome from a key management perspective and might be more likely stolen, the idea is that by the time quantum computing advances to break Curve25519, this pre-shared symmetric key has been long forgotten. And, more importantly, in the shorter term, if the pre-shared symmetric key is compromised, the Curve25519 keys still provide more than sufficient protection. In lieu of using a completely post-quantum crypto system, which as of writing are not practical for use here, this optional hybrid approach of a pre-shared symmetric key to complement the elliptic curve cryptography provides a sound and acceptable trade-off for the extremely paranoid. Furthermore, it allows for building on top of WireGuard sophisticated key-rotation schemes, in order to achieve varying types of post-compromise security.
Move to the psk directory and generate preshared keys for each of the clients. The preshared key will then be part of both the server and client configuration file.
(root)$ cd /etc/wireguard/psk
(root)$ wg genpsk > android_client.psk
(root)$ wg genpsk > windows10_client.pskAgain, there should be 2 files in the directory, one for each client.
(root)$ ls
android_client.psk windows10_client.pskEdit wg0.conf
Open the config file again and fill in some of the remaining information:
[Interface]
Address = 10.20.20.1/29
ListenPort = 51895
PrivateKey = your_private_key
[Peer]
PublicKey =
PresharedKey = your_preshared_key_for_this_client
AllowedIPs = 10.20.20.2/32
[Peer]
PublicKey =
PresharedKey = your_preshared_key_for_this_client
AllowedIPs = 10.20.20.3/32Open two terminals – one with wg0.conf in editor and the other in /etc/wireguard/ directory. Now use cat to print contents of your newly generated key files to the terminal and simply copy and paste them to the editor.
AllowedIPs – IP address within the Wireguard tunnel for each peer in CIDR notation. Wireguard will accept only packets coming from these specific IP ranges or from a single IP of the client when used with /32.
This is it for now, we will come back to the config file in a moment.
Remember which peer is which. The first one is for the Android device, while the second one is for the Windows client.
Part 2 – Clients setup (Windows & Android)
Setting up the clients
1. Windows
Download and install Wireguard
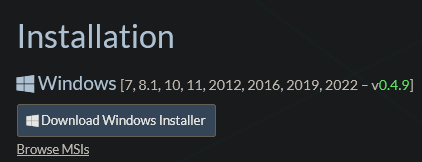
Download the Windows Installer from the official Wireguard website.
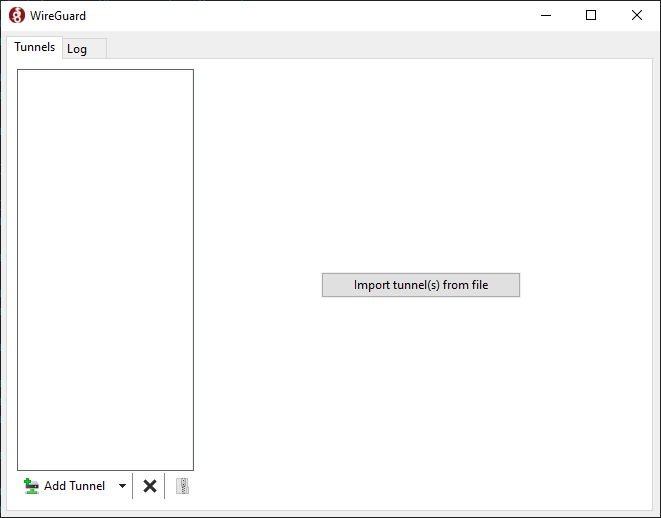
Run the wireguard-installer.exe and after a few moments, this window should appear:
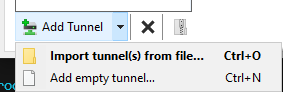
Click the arrow next to Add Tunnel and select Add empty tunnel...
Wireguard will automatically generate a private and public key for this client.
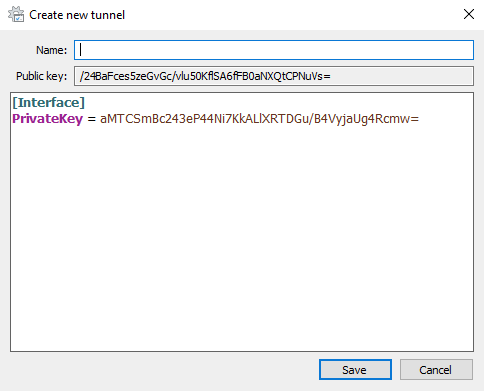
*note: all keys shown will be destroyed afterwards and are only used for demonstration purposes
Pick a name for the new tunnel, can be anything without spaces. Fill in the client config like I did:
[Interface]
PrivateKey = your_private_key
Address = 10.20.20.3/29
[Peer]
PublicKey = public_key_of_the_server
PresharedKey = preshared_key_from_server
AllowedIPs = 10.20.20.1/32
Endpoint = public_server_ip:51895PrivateKey– Private key of the client that it just generatedAddress– Client's IP within the Wireguard tunnel[Peer]– Configuration block with information about the VPS (the other end of the Wireguard tunnel)PublicKey– The public key of the server. Use cat to print the file/etc/wireguard/keys/wg0_public.keyto the terminal and copy & paste it here.PresharedKey– Preshared key generated on the server to thepskdirectory, namedwindows10_client.psk.AllowedIPs– Only traffic destined for the10.20.20.1/32network will go through the Wireguard tunnel (32 is only 1 host). To make all traffic go through the tunnel, put0.0.0.0/0to the same field.Endpoint– The public IP address and port on your Wireguard server. Runip aon the server to get it.
Add Windows client public key to the server config
Copy this public key and paste it into wg0.conf on the server to the PublicKey line in the corresponding (second) [Peer] block.

Server /etc/wireguard/wg0.conf
[Interface]
Address = 10.20.20.1/29
ListenPort = 51895
PrivateKey = your_private_key
[Peer]
PublicKey =
PresharedKey = your_preshared_key_for_this_client
AllowedIPs = 10.20.20.2/32
[Peer]
PublicKey = public_key_from_the_windows_client
PresharedKey = your_preshared_key_for_this_client
AllowedIPs = 10.20.20.3/32Windows client should now be set up, before testing, make sure you have completed the following:
- On the Windows client:
Addressin the[Interface]block is correct and same asAllowedIPsin[Peer]block on the server (expect the number after /, that can be different)PublicKeyis filled with the key from/etc/wireguard/keys/wg0_public.keyfrom the server.PresharedKeyis filled with the key from/etc/wireguard/psk/windows10_client.psk.AllowedIPsis set to the Wireguard local IP of the server with/32subnet mask.Endpointhas the public IP of the server with the correct port.
- On the server:
PublicKeyin the[Peer]block is copied from the Windows client.PresharedKeyis the same as on the client.AllowedIPscorresponds to theAddressfield on the client (expect the number after /, that can be different).
Test the Windows–Server connection
Make sure the firewall is set to allow communication on port 51895 on the server and comment out the other peer in wg0.conf like this:
[Interface]
Address = 10.20.20.1/29
ListenPort = 51895
PrivateKey = your_private_key
# [Peer]
# PublicKey =
# PresharedKey = your_preshared_key_for_this_client
# AllowedIPs = 10.20.20.2/32
[Peer]
PublicKey = public_key_from_the_windows_client
PresharedKey = your_preshared_key_for_this_client
AllowedIPs = 10.20.20.3/32Start Wireguard interface on the server:
$ wg-quick up wg0
[#] ip link add wg0 type wireguard
[#] wg setconf wg0 /dev/fd/63
[#] ip -4 address add 10.20.20.1/29 dev wg0
[#] ip link set mtu 8920 up dev wg0Start Wireguard tunnel on the Windows client by clicking Activate:
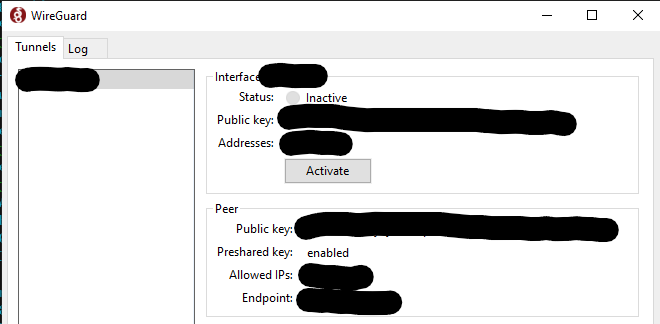
The tunnel is now established, use ping from both devices to test connectivity.
2. Android
Leave the Windows client for a while, we will come back to it later to finish some things.
Install Wireguard for Android
Wireguard can be installed from Google Play Store or preferably from F-Droid. Use option which suits you the best.
|
|
|


Wireguard allows you to create tunnels in 3 ways – import from file, scan QR code or create from scratch. The first two options are more convenient, however they require additional setup that we will leave for another blog post. I will use the third option now.
Configure Wireguard tunnel
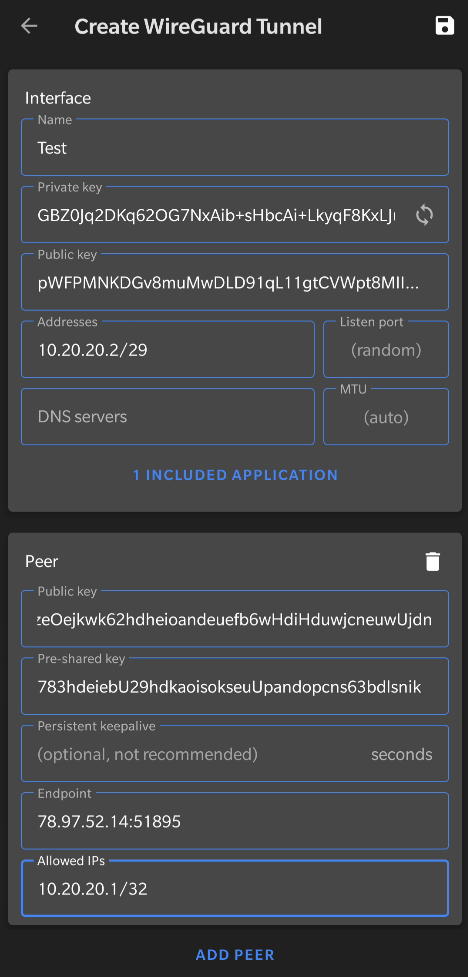 |
Interface
Name– Name for the interfacePrivate key– Will be generated on the device and hidden by default, keep it secretPublic key– Derived from the Private key, will be shared with the serverAddresses– IP address of this device within the Wireguard tunnel in/29subnet
Peer
Public key– Public key of the server (/etc/wireguard/keys/wg0_public.key)Pre-shared key– Pre-shared key generated on the server (/etc/wireguard/psk/android_client.psk)Endpoint– Public IP address of the server with appropriate port (look into/etc/wireguard/wg0.conf, value ofListenPort)Allowed IPs– Wireguard IP of the server in/32subnet (only that IP), checkAddressfield inwg0.confon the server. To route everything through the VPN, use0.0.0.0/0
Additionally, if you want to restrict some apps from using the Wireguard interface, you can do so by clicking All Applications and either excluding or including some apps. I will only be using my web browser with the Wireguard tunnel to access my websites, therefore I include Bromite only (one of the best Android web browsers).
Click the save icon in the top right corner and you should see the name of the interface in the main menu. Toggle it on by clicking the button next to it or edit by clicking on the name.
Add Android client to the server config
The Android client should be fully set up for now. Go back to the server and fill appropriate part of wg0.conf. Focus on the part we have commented out while testing the Windows client:
# [Peer]
# PublicKey =
# PresharedKey = your_android_preshared_key
# AllowedIPs = 10.20.20.2/32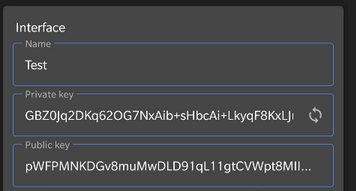
Either come up with a way to copy the public key over to the server or just carefully type it in manually.
Restart server interface
After editing the config, bring the Wireguard interface down and up again to reload the configuration.
$ sudo wg-quick down wg0
[#] ip link delete dev wg0
$ sudo wg-quick up wg0
[#] ip link add wg0 type wireguard
[#] wg setconf wg0 /dev/fd/63
[#] ip -4 address add 10.20.20.1/29 dev wg0
[#] ip link set mtu 8920 up dev wg0Test the Android–Server connection
Make sure the server Wireguard interface is up and click the button next to the name of the Wireguard interface on Android. Android might ask you to confirm starting a VPN service and a little key icon will appear in the notification bar.
Try accessing 10.20.20.1 in you Android browser or ping it with Termux or other application.
If you've done everything correctly, you should be able to ping the server from your client. For troubleshooting, try removing the pre-shared keys or check if you have copied all the keys correctly or if the firewall is not preventing communication on the Wireguard port.
Android – restricting apps
When configuring the Android client, we have restricted all apps, except for our web browser, from accessing the Wireguard tunnel. Therefore we aren't able to use ping in app like Termux to test connecitivity to the server. You can temporarily include all apps and save the configuration or navigate to 10.20.20.1 in the browser to perform a handshake with the server.
Wireguard and NAT
Wireguard is by design a very quiet protocol. If there's nothing to talk about then there's no data going through the tunnel. Communication only takes place when peers have some data to send. When there's no real data exchange happening, it seems like there is no tunnel at all. This works perfectly fine in configurations where all peers are reachable through a public IP address, because they can be reached at any moment by anyone. Peer 1 wants to talk to Peer 2? No problem. After 5 minutes, Peer 2 suddently wants to send something to Peer 1? Totally okay, they can all reach each other.
But what if Peer 2 was instead hidden behind NAT? This is very common in consumer-grade internet connections or in mobile networks. They don't have public IPv4 addresses, simply because they don't need them. Now Peer 1 wants to talk to Peer 2, but how to get to it? There's no public IPv4 address and the firewalls between Peer 1 and Peer 2 have already forgot any previously established connections. You can test this yourself and see what happens. First of all, turn off all tunnels and wait a few moments.
Pinging server and clients
$ sudo wg-quick down wg0
[#] ip link delete dev wg0
Now bring both peers up again:
$ sudo wg-quick up wg0
[#] ip link add wg0 type wireguard
[#] wg setconf wg0 /dev/fd/63
[#] ip -4 address add 10.20.20.1/29 dev wg0
[#] ip link set mtu 8920 up dev wg0Click Activate in Windows.
First of all, try pinging the client from the server. The server is 10.20.20.1 and client 10.20.20.3
$ ping 10.20.20.3
PING 10.20.20.3 (10.20.20.3) 56(84) bytes of data.
From 10.20.20.3 icmp_seq=1 Destination Host Unreachable
ping: sendmsg: Destination address required
From 10.20.20.3 icmp_seq=2 Destination Host Unreachable
ping: sendmsg: Destination address required
From 10.20.20.3 icmp_seq=3 Destination Host Unreachable
ping: sendmsg: Destination address required
From 10.20.20.3 icmp_seq=4 Destination Host Unreachable
ping: sendmsg: Destination address required
From 10.20.20.3 icmp_seq=5 Destination Host Unreachable
ping: sendmsg: Destination address requiredWait...why? Both clients are running and have the Wireguard interface active, right? Well, because the client (10.20.20.3) is behind NAT and it hasn't contacted the server yet, the server doesn't know where to send the data.
Now ping the server (10.20.20.1) from the client (10.20.20.3). This works because the server (10.20.20.1) has a public IP and we can route the data to it this way.
PS C:\Users\Marek> ping 10.20.20.1
Pinging 10.20.20.1 with 32 bytes of data:
Reply from 10.20.20.1: bytes=32 time=87ms TTL=64
Reply from 10.20.20.1: bytes=32 time=42ms TTL=64
Reply from 10.20.20.1: bytes=32 time=42ms TTL=64
Reply from 10.20.20.1: bytes=32 time=42ms TTL=64
Ping statistics for 10.20.20.1:
Packets: Sent = 4, Received = 4, Lost = 0 (0% loss),
Approximate round trip times in milli-seconds:
Minimum = 42ms, Maximum = 87ms, Average = 53msQuickly go back to the server and ping the client (10.20.20.3) again:
$ ping 10.20.20.3
PING 10.20.20.3 (10.20.20.3) 56(84) bytes of data.
64 bytes from 10.20.20.3: icmp_seq=1 ttl=128 time=42.7 ms
64 bytes from 10.20.20.3: icmp_seq=2 ttl=128 time=42.8 ms
64 bytes from 10.20.20.3: icmp_seq=3 ttl=128 time=42.5 msWhy is it working now? It is because the client established the connection first and now for a while, the server will be able to reach the client until this connection gets lost. There are two ways to prevent this behavior (client having to send data first)
- Setup Persistent keepalive to keep the connection alive behind NAT or stateful firewalls, disabled by default.
- Always initiate connection from the client first.
In our case (connecting to a web server to access a service), the server doesn't need to communicate with us unless we want it to. When accessing a website on the server, we know that we (the client) will always initiate the connection first. However, if it causes issues within your setup, configure Persistent keepalive.
Part 3 – Migrating services on VPS
Moving network services to the WG interface
In order to move our network services to another interface, we first need to find out what exactly is running on the server. We are interested in services and their listening ports. There are a few commands to achieve this, e.g netstat, lsof, ss and nmap. Pick the one that works on your server, so you don't have to install anything additional just for one command.
$ netstat -tulpnI will run netstat with a couple of flags grouped together, definitely easier than writing netstat -t -u -l -p -n
-tlists TCP-ulists UDP-lshows only listening ports (omitted by default)-pshows what program/service is running on each port-ndoesn't resolve IPs and hosts
$ sudo netstat -tulpn
Active Internet connections (only servers)
Proto Recv-Q Send-Q Local Address Foreign Address State PID/Program name
tcp 0 0 127.0.0.53:53 0.0.0.0:* LISTEN 72/systemd-resolved
tcp 0 0 127.0.0.1:8888 0.0.0.0:* LISTEN 205/uwsgi
tcp 0 0 0.0.0.0:443 0.0.0.0:* LISTEN 98/nginx: master pr
tcp 0 0 127.0.0.1:4004 0.0.0.0:* LISTEN 82/filtron
tcp 0 0 127.0.0.1:4005 0.0.0.0:* LISTEN 82/filtron
tcp 0 0 127.0.0.1:5000 0.0.0.0:* LISTEN 77/python3
tcp 0 0 78.97.52.14:7985 0.0.0.0:* LISTEN 107/sshd: /usr/sbin
tcp 0 0 0.0.0.0:80 0.0.0.0:* LISTEN 98/nginx: master pr
udp 0 0 127.0.0.53:53 0.0.0.0:* 72/systemd-resolved
udp 0 0 0.0.0.0:51895 0.0.0.0:* -
udp6 0 0 :::51895 :::* -We can see a few services running on localhost (127.0.0.1), systemd-resolve localhost address (127.0.0.53), example public IP (78.97.52.14) or on all interfaces (0.0.0.0). The only one that we will care about now are 0.0.0.0 and 78.97.52.14. From now on, everything will be very setup specific, so I might even change the way I write, from we to me.
Binding Nginx to wg0 interface
The main service I want to move is Nginx. It runs all my websites on this server, so it would make sense to migrate it first. Right now, it binds itself to all interfaces (0.0.0.0), so the websites should technically be already accessible on the Wireguard IP of the server (10.20.20.1), but I want them to be ONLY accessible on that interface.
Edit /etc/nginx/conf.d/name_of_config.conf and add the Wireguard IP address in front of ports in server config block on the listen line, like this:
server {
listen 443 ssl http2;
server_name youwebsite.com
...
...
to
server {
listen 10.20.20.1:443 ssl http2;
server_name youwebsite.com
...
...
Before reloading or restarting Nginx, make sure Wireguard is running and the interface is up, otherwise you will run into errors.
$ sudo wg-quick up wg0Reload Nginx to cause least interruption to the service.
$ sudo systemctl reload nginxRun netstat again to check if Nginx rebinded like I wanted:
$ sudo netstat -tulpn
Active Internet connections (only servers)
Proto Recv-Q Send-Q Local Address Foreign Address State PID/Program name
tcp 0 0 127.0.0.53:53 0.0.0.0:* LISTEN 72/systemd-resolved
tcp 0 0 127.0.0.1:8888 0.0.0.0:* LISTEN 205/uwsgi
tcp 0 0 10.20.20.1:443 0.0.0.0:* LISTEN 23281/nginx: master
tcp 0 0 127.0.0.1:4004 0.0.0.0:* LISTEN 82/filtron
tcp 0 0 127.0.0.1:4005 0.0.0.0:* LISTEN 82/filtron
tcp 0 0 127.0.0.1:5000 0.0.0.0:* LISTEN 77/python3
tcp 0 0 78.97.52.14:7985 0.0.0.0:* LISTEN 107/sshd: /usr/sbin
tcp 0 0 10.20.20.1:80 0.0.0.0:* LISTEN 23281/nginx: master
udp 0 0 127.0.0.53:53 0.0.0.0:* 72/systemd-resolved
udp 0 0 0.0.0.0:51895 0.0.0.0:* -
udp6 0 0 :::51895 :::* -When I try to access my websites now, it....doesn't work. But at least I perfectly know why and how to fix it. Before, when I wanted to access mysite.com, I typed in mysite.com into the browser address bar and my device requested a DNS record for mysite.com, which turned out to be a public IP address of my server, or something else (depending on what I had set on my domain's registrar website.) The DNS records still points to the public IP of my server, but Nginx isn't serving the websites on that public IP anymore, but on the Wireguard one. How do I fix this?
Remove old DNS records
First of all, I will remove the old DNS A records with my registrar so that I don't forget. This varies vastly from registrar to registrar, so you will have to figure it our on your own.
Point new DNS records to Wireguard
The problem is that I cannot just create new A records with the Wireguard IP (10.20.20.1), because that's a reserved private IP, it wouldn't route anywhere. There are couple of ways to solve this:
- Fill in the
DNS Serverfield on both clients with a DNS server that will be able to provide resolution for the private IP10.20.20.1. It could even be the10.20.20.1server itself, but that means I would have to setup a DNS service on the server - Point clients (using the
DNS Serverfield) to your local DNS server on your home network and create the A records there. This method, however, will not work for roaming clients if they connect to a different network (like mobile data). - Since it's just one server with two websites and two clients (this method wouldn't make sense in larger deployments), I could just edit local DNS entries (hosts file) to avoid having to configure a whole new DNS server, just for this single purpose.
I might look into a more sophisticated solution for DNS with split tunnel VPN later on, but for now I will use the third method.
Editing hosts file on Windows
10.20.20.1 mysite.com
10.20.20.1 mysite2.comYou might need to flush your DNS cache, but after saving the file, those two sites should now resolve correctly, because Windows checks the local hosts file first by default.
Editing hosts file on Android
With Android, it's a little more complicated. Since its a mobile operating system designed to keep the user away from all advanced configuration (but still better than iPhone in this regard), we cannot simply open the hosts file and edit it. On a rooted phone you can, but on a regular one you can't. We have basically two options
-
Use a pseudo-VPN app to re-route all traffic locally through a filter that allows you to add custom DNS entries (I think Blokada can do that, apart from other things), except we can't, because
There can be only one VPN connection running at the same time. The existing interface is deactivated when a new one is created.– developer.android.com Judging by one comment on Reddit "I'm not entirely sure if this is how it works but using wireguard on a rooted phone and a compatible kernel let's wireguard interact directly through the kernel. It doesn't show up as an active VPN through android. So it may be possible to use that and a conventional VPN approach to have two at once?" If this actually works, it should theoretically be possible, but you need a rooted phone and it's probably in early stages. - Use the VPN server as a DNS server, since it's a roaming device anyway.
- Use
adbto pull the hosts file to PC, edit it and push it back to your Android device. That's what I'll do.
How to get abd up and running is outside of this guide, there might be a guide for that on this site at some point, but until then, refer to the internet.
Enable USB debugging in Android settings and connect it using a cable to you PC. Allow USB debugging for this specific device and check that it's recongnized.
$ .\adb.exe devices
List of devices attached
215e29da deviceTransfer the hosts file from Android to your device:
.\adb.exe pull /system/etc/hosts C:\Users\Marek\DesktopOpen it with Notepad and add new lines containing IP and hostname in this format:
10.20.20.1 mysite.com
10.20.20.1 mysite2.comNope, this didn't work because pushing the file to a read-only file system doesn't work. Christ, I have to root my phone as soon as I can...
Part 4 – DNS server setup for clients
Setup basic DNS server on Linux
So I will eventually have to setup a DNS server on the Wireguard server, but just a simple one. No need to use bind, but simply DNSmasq.
Install DNSmasq
$ sudo apt install dnsmasq
Unpacking dnsmasq-base (2.85-1) ...
Selecting previously unselected package dnsmasq.
Preparing to unpack .../dnsmasq_2.85-1_all.deb ...
Unpacking dnsmasq (2.85-1) ...
Setting up dnsmasq-base (2.85-1) ...
Setting up dns-root-data (2021011101) ...
Setting up dnsmasq (2.85-1) ...
Created symlink /etc/systemd/system/multi-user.target.wants/dnsmasq.service → /lib/systemd/system/dnsmasq.service.
Job for dnsmasq.service failed because the control process exited with error code.
See "systemctl status dnsmasq.service" and "journalctl -xe" for details.
invoke-rc.d: initscript dnsmasq, action "start" failed.
● dnsmasq.service - dnsmasq - A lightweight DHCP and caching DNS server
Loaded: loaded (/lib/systemd/system/dnsmasq.service; enabled; vendor preset: enabled)
Active: failed (Result: exit-code) since Mon 2021-09-20 00:43:35 CEST; 18ms ago
Process: 23908 ExecStartPre=/etc/init.d/dnsmasq checkconfig (code=exited, status=0/SUCCESS)
Process: 23915 ExecStart=/etc/init.d/dnsmasq systemd-exec (code=exited, status=2)
CPU: 55ms
Sep 20 00:43:35 hostname systemd[1]: Starting dnsmasq - A lightweight DHCP and caching DNS server...
Sep 20 00:43:35 hostname dnsmasq[23915]: dnsmasq: failed to create listening socket for port 53: Address already in use
Sep 20 00:43:35 hostname dnsmasq[23915]: failed to create listening socket for port 53: Address already in use
Sep 20 00:43:35 hostname systemd[1]: dnsmasq.service: Control process exited, code=exited, status=2/INVALIDARGUMENT
Sep 20 00:43:35 hostname dnsmasq[23915]: FAILED to start up
Sep 20 00:43:35 hostname systemd[1]: dnsmasq.service: Failed with result 'exit-code'.
Sep 20 00:43:35 hostname systemd[1]: Failed to start dnsmasq - A lightweight DHCP and caching DNS server.
Processing triggers for dbus (1.12.20-2) ...Run DNSmasq at startup:
$ sudo systemctl enable dnsmasqThe problem is that DNSmasq tries to bind to port 53, which on my system is already occupied by systemd-resolved. I need to figure out how to make these two work together or disable systemd-resolved.
Heads up – Skip to Final configuration for server to see the final configuration files. The following is mostly me trying to figure out how to do this properly. If you enjoy reading about others suffering, go ahead.
Edit /etc/systemd/resolved.conf
DNS configuration is usually managed by /etc/resolv.conf file, however, if you open the file, it states the following – # This file is managed by man:systemd-resolved(8). Do not edit.
Therefore use /etc/systemd/resolved.conf to perform any configuration regarding DNS. We are interested mainly in the DNSStubListener line, which we have to uncomment and set to no. That disables systemd-resolved from binding to 127.0.0.53:53. I would also advise to disable LLMNR and MulticastDNS, do some research about these two yourself to figure if you need them. The file should now look like this:
[Resolve]
DNS=your_DNS_server
#FallbackDNS=
#Domains=
LLMNR=no
MulticastDNS=no
#DNSSEC=allow-downgrade
#DNSOverTLS=no
#Cache=yes
DNSStubListener=no
#ReadEtcHosts=yesRestart systemd-resolved. Be aware that you might lose DNS connectivity until you start DNSmasq. I won't do that right now, because I still need to change a few things:
$ sudo systemctl restart systemd-resolvedRunning systemd-resolve to check it's status reveals that some settings aren't still how I wanted. I have managed to change the Global configuration, but not settings for individual interfaces.
$ sudo systemd-resolve --status
Global
Protocols: -LLMNR -mDNS -DNSOverTLS DNSSEC=no/unsupported
resolv.conf mode: uplink
DNS Servers: my_prefered_DNS_server
Link 15 (wg0)
Current Scopes: none
Protocols: -DefaultRoute +LLMNR -mDNS -DNSOverTLS DNSSEC=no/unsupported
Link 19 (eth0)
Current Scopes: DNS
Protocols: +DefaultRoute +LLMNR -mDNS -DNSOverTLS DNSSEC=no/unsupported
DNS Servers: DNS_server_i_dont_likeI haven't find another config file to add these values into, so just change them using the systemd-resolve command.
$ sudo systemd-resolve --interface eth0 --set-dns my_prefered_DNS_server
$ sudo systemd-resolve --interface eth0 --set-llmnr no
$ sudo systemd-resolve --interface wg0 --set-llmnr noAgain, confirm that everything is set to your liking with systemd-resolve --status
$ systemd-resolve --status
Global
Protocols: -LLMNR -mDNS -DNSOverTLS DNSSEC=no/unsupported
resolv.conf mode: uplink
Current DNS Server: my_prefered_DNS_server
DNS Servers: my_prefered_DNS_server
Link 15 (wg0)
Current Scopes: none
Protocols: -DefaultRoute -LLMNR -mDNS -DNSOverTLS DNSSEC=no/unsupported
Link 19 (eth0)
Current Scopes: DNS
Protocols: +DefaultRoute -LLMNR -mDNS -DNSOverTLS DNSSEC=no/unsupported
Current DNS Server: my_prefered_DNS_server
DNS Servers: my_prefered_DNS_serverEdit /etc/dnsmasq.d
By default, the file is full of commented out lines with all kinds of configuration settings. In fact, it's so long that it's better to back it up and write just the options you want into an empty one.
$ sudo cp /etc/dnsmasq.conf /etc/dnsmasq.conf.defaultDelete everything in /etc/dnsmasq.conf with vi and 1000dd.
$ sudo vi /etc/dnsmasq.confAdd the following lines to the config:
interface=lo,wg0
bind-interfacesRestart DNSmasq and check if it binded to the right interfaces (localhost and Wireguard)
$ sudo systemctl restart dnsmasq
$ sudo netstat -tulpn | grep 53
tcp 0 0 127.0.0.1:53 0.0.0.0:* LISTEN 25764/dnsmasq
tcp 0 0 10.20.20.1:53 0.0.0.0:* LISTEN 25764/dnsmasq
udp 0 0 127.0.0.1:53 0.0.0.0:* 25764/dnsmasq
udp 0 0 10.20.20.1:53 0.0.0.0:* 25764/dnsmasqAll looks great, however, trying multiple pings to common websites reveal random DNS issues:
$ ping google.com
ping: google.com: Temporary failure in name resolutionAt this point, I have spent a few hours researching how name resolution works on Linux machines. It got a little more complicated with systemd-resolved. I won't explain the whole proccess or what I did, just show you the final configuration files and try to explain how the name resolution works as of now.
Previous plan
I'm currently trying to figure out how to get DNS resolution working on the server itself (so that the server can resolve names with DNSmasq and systemd-resolved combined). My previous plan was:
- Disable
systemd-resolvedbinding to127.0.0.53withDNSStubListener=noin/etc/systemd/resolved.conf - Set DNS on all interfaces with systemd-resolved to
127.0.0.1(this also changes nameserver in/etc/resolv.confto127.0.0.1) - Run DNSmasq on
127.0.0.1(for the server itelf) and on10.20.20.1(for the Android Wireguard client). - Set DNS server in DNSmasq (
/etc/dnsmasq.conf) to a public DNS of choice for regular name resolution.
Thanks to this, when the server wants to perform a DNS query, this happens (as far as I understand, don't @ me and kindly let me know if I'm wrong):
- It first looks into
/etc/nsswitch.confand looks onto thehostsline, which saysfiles dns. - Because of
files, it looks into/etc/hostsfirst, to see if the address isn't hard-coded this way. - Then because of
dns, it looks into/etc/resolv.conf, which is managed by systemd-resolved. This file will only contain127.0.0.1, which points to DNSmasq running on that interface on port53. The reason why it points to127.0.0.1is because we have set DNS to127.0.0.1globally in/etc/systemd/resolved.conf. - DNSmasq will take that query and forward it to our prefered public DNS server configured in
/etc/dnsmasq.confwith theserverline.
Unfortunately, this does not work, or at least I was unable to make it work this way. The outcome of this is a broken name resolution that sometimes works and sometimes doesn't.
Current plan
To fix my server's DNS resolution, I came up with a reversed setup plan. Instead of everything pointing to DNSmasq for name resolution, I will point DNSmasq to the other side, which is systemd-resolved – this turned out to produce the same behavior.
After thorough examination, I decided to completely throw systemd-resolved out the window by stopping the service and disabling it.
$ sudo systemctl stop systemd-resolved
$ sudo systemctl disable systemd-resolvedTry the good old way of editing /etc/resolv.conf and add your DNS server. After adding different upstream DNS servers, I'm slowly starting to realize that the entire issue might have been actually caused by the upstream server and not my local configuration. The DNS I used before is extremely fast (+-2 ms response times), but sometimes just stops responding completely. It might have something to do with reverse lookup and I might somehow fix it later, but for now, I have decided to opt for the slower, but more reliable upstream DNS server.
Final configuration for server
There might actually be a way to do it! Go back to my reversed setup plan, because this time it works.
Enable and start systemd-resolved again:
$ sudo systemctl enable systemd-resolved
$ sudo sytemctl start systemd-resolvedLook into /etc/resolv.conf. Because we have started systemd-resolved, it had already probably overwrote /etc/resolv.conf with the following, which is alright:
nameserver 127.0.0.53
options edns0 trust-ad
search .Open /etc/systemd/resolve.conf and make it look like this:
[Resolve]
DNS=my_prefered_DNS_server
FallbackDNS=secondary_DNS_server
#Domains=
LLMNR=no
MulticastDNS=no
#DNSSEC=allow-downgrade
#DNSOverTLS=no
#Cache=yes
DNSStubListener=yes
#ReadEtcHosts=yesCheck status of systemd-resolve and edit DNS server for eth0 if it still has a wrong value
$ systemd-resolve --status
Global
Protocols: -LLMNR -mDNS -DNSOverTLS DNSSEC=no/unsupported
resolv.conf mode: stub
Current DNS Server: my_prefered_DNS_server
DNS Servers: my_prefered_DNS_server
Fallback DNS Servers: secondary_DNS_server
Link 15 (wg0)
Current Scopes: none
Protocols: -DefaultRoute -LLMNR -mDNS -DNSOverTLS DNSSEC=no/unsupported
Link 19 (eth0)
Current Scopes: DNS
Protocols: +DefaultRoute -LLMNR -mDNS -DNSOverTLS DNSSEC=no/unsupported
Current DNS Server: my_prefered_DNS_server
DNS Servers: my_prefered_DNS_serverYour /etc/dnsmasq.conf should look like this. We want to run DNSmasq only on the Wireguard interface, but interface also automatically adds loopback to the list. Use except-interface to disable binding to localhost.
interface=wg0
except-interface=lo
bind-interfaces
server=127.0.0.53Start DNSmasq
# sudo systemctl start dnsmasqYou can tell by the output of systemctl status dnsmasq, that it's using 127.0.0.53 as it's DNS server.
...
using nameserver 127.0.0.53#53
reading /etc/resolv.conf
...Recap what we know about name resolution on the server now. When the server makes a DNS query, this happens (probably):
- Debian consults
/etc/nsswitch.conf, reads/etc/hostsdue tofilesoption specified at thehosts:line, then goes for the DNS server. - DNS server in
/etc/resolv.confpoints to127.0.0.53, which issystemd-resolv DNSStubListener. systemd-resolvedis set up to use a prefered public DNS server.
Now onto the main reason why I did this whole thing. Provide a simple DNS server for my Android client.
Setup DNS for client name resolution
Edit /etc/hosts
Add the websites you want to resolve to /etc/hosts. That way, when clients queries DNSmasq listening on 10.20.20.1, it forwards the query to 127.0.0.53, which also reads /etc/hosts, resolving the IP correctly.
10.20.20.1 mysite.com
10.20.20.1 mysite2.comAdd DNS to Android config
Edit the config by adding 10.20.20.1 to DNS servers.
Adjust Firewall for testing
In order for the Android device to be able to use the DNS server on 10.20.20.1, I need to adjust iptables to allow traffic on port 53 on the Wireguard interface. Add this to your iptables configuration file and apply with iptables-restore.
# Allow DNS queries on the Wireguard interface
-A INPUT -p udp -m udp --dport 53 -i wg0 -j ACCEPT$ sudo iptables-restore /etc/iptables/rules.v4Now access your websites from the Android client and it should resolve correctly to the server's Wireguard IP.
The only "problem" right now is that the Android client will most likely use the Wireguard server IP 10.20.20.1 for all name resolution while it's connected to the VPN. This is not a huge deal since the queries are pretty fast, but might be a deal breaker for some.
Part 5 – Adjusting Firewall (iptables)
Adjusting Firewall rules
Everything regarding the Wireguard VPN should be configured:
- Wireguard tunnel between a server and 2 peers (clients)
- Services running on the Wireguard interface only (Nginx)
- Correct DNS resolving for both the server and Android client
Now it's time to fix the Firewall, so what are our goals here?
- DROP everything except:
- HTTP/S and DNS on Wireguard interface
- Ping on all interfaces
- SSH on Wireguard interface only (later, since SSH is our only access to the VPS and breaking it would cause immense headache)
I am using very powerful iptables with iptables-restore utility to write my rules to a config file instead to the command line. The config file is located in /etc/iptables/rules.v4 (may be different in your case).
Open the file and edit it. Everything will be explained in the following code block behind #. For easier reading, I have divided it into parts:
Setup the 3 main chains – INPUT, OUTPUT and FORWARD. It is recommended to always set INPUT as implicit DENY and only whitelist approved services and ports.
*filter
# CONFIGURE INPUT, OUTPUT AND FORWARD CHAINS
# Drop forwarded traffic, we don't need that since we are not acting as a router
:FORWARD DROP [0:0]
# Accept all outgoing connections
:OUTPUT ACCEPT [0:0]
# Block all incoming traffic (default DENY)
:INPUT DROP [0:0]When everything is blocked by default, these rules have to exist to allow communication on localhost and any established connections (when you initiace connection from the server)
# BASIC RULES FOR THINGS TO WORK WITH DEFAULT DENY ON INPUT CHAIN
# Do not block localhost traffic to itself
-A INPUT -i lo -j ACCEPT
# Allow established and related incoming connections
-A INPUT -m conntrack --ctstate ESTABLISHED,RELATED -j ACCEPTRules to allow devices within the Wireguard tunnel to access web services (ports 80 and 443) + 53 for DNS.
# WIREGUARD INTERFACE CONFIG
# Allow web traffic for my search engine (only on the Wireguard interface)
-A INPUT -p tcp -m tcp --dport 80 -i wg0 -j ACCEPT
-A INPUT -p tcp -m tcp --dport 443 -i wg0 -j ACCEPT
# Allow DNS queries on the Wireguard interface
-A INPUT -p udp -m udp --dport 53 -i wg0 -j ACCEPTRules for the public IP of the server. The only thing that needs to be open is the Wireguard port. You can also configure the server to accept ICMP ping requests for easier troubleshooting. Without this rule, the server won't be "pingable" even if it's up.
# PUBLIC IP RULES
# Allow ICMP pings on all interfaces (for easier troubleshooting)
-A INPUT -p icmp --icmp-type echo-request -j ACCEPT
# Allow Wireguard on the public IP
-A INPUT -p udp -m udp --dport 51895 -i eth0 -j ACCEPTSSH is the most critical service and therefore will still be available on all interface and I will move it to the Wireguard interface after testing.
# SSH
# Allow SSH on the port that it's running on
-A INPUT -p tcp -m tcp --dport 7985 -j ACCEPT
# Commit rules
COMMITThe entire config looks like this:
*filter
# CONFIGURE INPUT, OUTPUT AND FORWARD CHAINS
# Drop forwarded traffic, we don't need that since we are not acting as a router
:FORWARD DROP [0:0]
# Accept all outgoing connections
:OUTPUT ACCEPT [0:0]
# Block all incoming traffic (default DENY)
:INPUT DROP [0:0]
# BASIC RULES FOR THINGS TO WORK WITH DEFAULT DENY ON INPUT CHAIN
# Do not block localhost traffic to itself
-A INPUT -i lo -j ACCEPT
# Allow established and related incoming connections
-A INPUT -m conntrack --ctstate ESTABLISHED,RELATED -j ACCEPT
# WIREGUARD INTERFACE CONFIG
# Allow web traffic for my websites (only on the Wireguard interface)
-A INPUT -p tcp -m tcp --dport 80 -i wg0 -j ACCEPT
-A INPUT -p tcp -m tcp --dport 443 -i wg0 -j ACCEPT
# Allow DNS queries on the Wireguard interface
-A INPUT -p udp -m udp --dport 53 -i wg0 -j ACCEPT
# PUBLIC IP RULES
# Allow ICMP pings on all interfaces (for easier troubleshooting)
-A INPUT -p icmp --icmp-type echo-request -j ACCEPT
# Allow Wireguard on the public IP
-A INPUT -p udp -m udp --dport 51895 -j ACCEPT
# SSH
# Allow SSH on the port that it's running on
-A INPUT -p tcp -m tcp --dport 7985 -j ACCEPT
# Commit rules
COMMITApply the configuration with iptables-restore. First make sure all rules make sense to you.
$ sudo iptables-restore /etc/iptables/rules.v4List and check the rules (-n to not resolve DNS and -v for verbose output)
$ sudo iptables -L -nv
Chain INPUT (policy DROP 32 packets, 1941 bytes)
pkts bytes target prot opt in out source destination
0 0 ACCEPT all -- lo * 0.0.0.0/0 0.0.0.0/0
47 2876 ACCEPT all -- * * 0.0.0.0/0 0.0.0.0/0 ctstate RELATED,ESTABLISHED
0 0 ACCEPT tcp -- wg0 * 0.0.0.0/0 0.0.0.0/0 tcp dpt:80
0 0 ACCEPT tcp -- wg0 * 0.0.0.0/0 0.0.0.0/0 tcp dpt:443
0 0 ACCEPT udp -- wg0 * 0.0.0.0/0 0.0.0.0/0 udp dpt:53
2 168 ACCEPT icmp -- * * 0.0.0.0/0 0.0.0.0/0 icmptype 8
0 0 ACCEPT udp -- * * 0.0.0.0/0 0.0.0.0/0 udp dpt:51895
0 0 ACCEPT tcp -- * * 0.0.0.0/0 0.0.0.0/0 tcp dpt:7985
Chain FORWARD (policy DROP 0 packets, 0 bytes)
pkts bytes target prot opt in out source destination
Chain OUTPUT (policy ACCEPT 34 packets, 5056 bytes)
pkts bytes target prot opt in out source destinationPart 6 – Final troubleshooting
Enable Wireguard on startup
If we are going to move SSH into the Wireguard tunnel only, we need to make sure that the interface is active even (or especially) after the server restarts. For that, we need to enable Wireguard with systemd (or other init service). Fortunately it's pretty easy.
$ sudo systemctl enable wg-quick@wg0.service
$ sudo systemctl daemon-reload
$ sudo wg-quick down wg0
$ sudo systemctl start wg-quick@wg0It's time to test all of our efforts – reboot the server and hope all configuration stays correct afterwards. I like to do this, even though it's not neccessary, to save myself from unnecessary headaches when the server unexpectedly restarts and it turns out that the configuration wouldn't survive a schedules restart anyway.
Troubleshooting post-reboot
First thing I noticed is that Nginx was unable to start. Wireguard interface started up fine, but the webserver didn't, even after manual service restart. Turns out Apache2 was starting as a service and occupying port 80. I am too scared to completely purge Apache2 from the system, so I will just stop and disable the service.
$ sudo systemctl stop apache2
$ sudo systemctl disable apache2Time for another reboot. This time, Nginx failed to start again, but manual restart of the serviced fixed it. This leads me to the idea, that Nginx is trying to start sooner than Wireguard and is unable to bind to the Wireguard interface, because it does not exist yet.
Edit the nginx.service systemd file to make sure it starts after Wireguard had already brought up the interface. You can either directly edit /lib/systemd/system/nginx.service file, but that is a bad practice, because the file is usually overwritten with updates. The correct way to do this should be use sudo systemctl edit --full nginx.service. Add wg-quick@wg0.service to the line end of the line with After= and add a new line Requires=wg-quick@wg0.service before the previous one.
After another reboot, Nginx started on its own successfully. List systemd services to check if there are any other issues.
$ systemctl list-units --type=service
UNIT LOAD ACTIVE SUB DESCRIPTION
console-getty.service loaded active running Console Getty
dbus.service loaded active running D-Bus System Message Bus
● dnsmasq.service loaded failed failed dnsmasq - A lightweight DHCP and caching DNS server
filtron.service loaded active running filtron
ifupdown-pre.service loaded active exited Helper to synchronize boot up for ifupdown
networking.service loaded active exited Raise network interfaces
nginx.service loaded active running nginx - high performance web server
ssh.service loaded active running OpenBSD Secure Shell server
systemd-journal-flush.service loaded active exited Flush Journal to Persistent Storage
systemd-journald.service loaded active running Journal Service
systemd-logind.service loaded active running User Login Management
systemd-modules-load.service loaded active exited Load Kernel Modules
systemd-networkd.service loaded active running Network Service
systemd-remount-fs.service loaded active exited Remount Root and Kernel File Systems
systemd-resolved.service loaded active running Network Name Resolution
systemd-sysctl.service loaded active exited Apply Kernel Variables
systemd-sysusers.service loaded active exited Create System Users
systemd-tmpfiles-setup-dev.service loaded active exited Create Static Device Nodes in /dev
systemd-tmpfiles-setup.service loaded active exited Create Volatile Files and Directories
● systemd-udev-trigger.service loaded failed failed Coldplug All udev Devices
systemd-udevd.service loaded active running Rule-based Manager for Device Events and Files
systemd-update-utmp.service loaded active exited Update UTMP about System Boot/Shutdown
systemd-user-sessions.service loaded active exited Permit User Sessions
user-runtime-dir@1000.service loaded active exited User Runtime Directory /run/user/1000
user@1000.service loaded active running User Manager for UID 1000
uwsgi.service loaded active running LSB: Start/stop uWSGI server instance(s)
wg-quick@wg0.service loaded active exited WireGuard via wg-quick(8) for wg0
whoogle.service loaded active running Whoogle
LOAD = Reflects whether the unit definition was properly loaded.
ACTIVE = The high-level unit activation state, i.e. generalization of SUB.
SUB = The low-level unit activation state, values depend on unit type.
28 loaded units listed. Pass --all to see loaded but inactive units, too.
To show all installed unit files use 'systemctl list-unit-files'.It seems that dnsmasq also failed to start and I assume it was due to the same issue. Edit dnsmasq with systemd again:
$ sudo systemctl edit --full dnsmasq.serviceBoth lines Requires and After already exist, so just add wg-quick@wg0.service on each of these line:
[Unit]
Description=dnsmasq - A lightweight DHCP and caching DNS server
Requires=network.target wg-quick@wg0.service
Wants=nss-lookup.target
Before=nss-lookup.target
After=network.target wg-quick@wg0.serviceThis howerver, creates a paradox. DNSmasq requires wg-quick and starts after wg-quick, but also before nss-lookup.target
Now examine wg-quick (systemctl cat wg-quick@wg0)
...
After=network-online.target nss-lookup.target
Wants=network-online.target nss-lookup.target
...According to this configuraion – wg-quick starts after nss-lookup.target when DNSmasq has to start before nss-lookup.target, while also starting after wg-quick, which has to start after nss-lookup.target......and we got a loop. My solution to this is to simply comment out the DNSmasq dependency of starting before nss-lookup.target.
$ sudo systemctl edit --full dnsmasq.service[Unit]
Description=dnsmasq - A lightweight DHCP and caching DNS server
Requires=network.target wg-quick@wg0.service
Wants=nss-lookup.target
# Before=nss-lookup.target
After=network.target wg-quick@wg0.serviceThis shouldn't break anything. Here's a sidenote about what nss-lookup.target even is:
A target that should be used as synchronization point for all host/network name service lookups. Note that this is independent of UNIX user/group name lookups for which nss-user-lookup.target should be used. All services for which the availability of full host/network name resolution is essential should be ordered after this target, but not pull it in. systemd automatically adds dependencies of type After= for this target unit to all SysV init script service units with an LSB header referring to the "$named" facility.
The only thing that's left is to restore iptables at boot according to the config.
Setup iptables-persistent
There are multiple ways to make iptables rules persist accross reboots, but this seems to be the prefered way.
Install iptables-persistent. It will ask you to save the current configuration to a file. We already have a config file present and this would only overwrite our file, so say no.
$ sudo apt install iptables-persistent
Reading package lists... Done
Building dependency tree... Done
Reading state information... Done
The following additional packages will be installed:
netfilter-persistent
The following NEW packages will be installed:
iptables-persistent netfilter-persistent
0 upgraded, 2 newly installed, 0 to remove and 0 not upgraded.
Need to get 23.4 kB of archives.
After this operation, 91.1 kB of additional disk space will be used.
Do you want to continue? [Y/n] yTry rebooting and checking with sudo iptables -L -nv if the rules have been applied.
Part 7 – Migrating SSH access
Migrate SSH to Wireguard interface
Notice that I am running SSH on a non-standard port. The default is 22 and is often changed to reduce the number of bots spamming it on public servers. When running over VPN, it is safe to return back to the default 22 for simpler configuration.
Configure SSH on all interfaces
Currently my iptables firewall accepts SSH traffic on all interfaces on the correct port. SSH server configuration resides in /etc/ssh/ssdh_config. In this file ListenAddress is currently pointed to the public IP only. To bind both the public and Wireguard IP, replace the old value of ListenAddress with 0.0.0.0 and restart the service (your SSH connection won't be droped)
....
Port 7985
#AddressFamily any,inet
ListenAddress 0.0.0.0
#ListenAddress ::
....$ sudo systemctl restart sshd$ systemctl status sshd
sudo systemctl status sshd
● ssh.service - OpenBSD Secure Shell server
Loaded: loaded (/lib/systemd/system/ssh.service; enabled; vendor preset: enabled)
Active: active (running) since Tue 2021-09-21 20:02:01 CEST; 4s ago
Docs: man:sshd(8)
man:sshd_config(5)
Process: 3503 ExecStartPre=/usr/sbin/sshd -t (code=exited, status=0/SUCCESS)
Main PID: 3504 (sshd)
CPU: 55ms
CGroup: /system.slice/ssh.service
└─3504 sshd: /usr/sbin/sshd -D [listener] 0 of 10-100 startups
Sep 21 20:02:00 hostname systemd[1]: ssh.service: Succeeded.
Sep 21 20:02:00 hostname systemd[1]: Stopped OpenBSD Secure Shell server.
Sep 21 20:02:00 hostname systemd[1]: Starting OpenBSD Secure Shell server...
Sep 21 20:02:01 hostname sshd[3504]: Server listening on 0.0.0.0 port 7985.
Sep 21 20:02:01 hostname systemd[1]: Started OpenBSD Secure Shell server.Connect SSH using the Wireguard server IP
Open another terminal windows on the machine that you use to connect to the server (Windows clients in my case):
> ssh username@10.20.20.1 -p 7985It will give you the classic warning about unknown ECDSA fingerprint, type yes to procceed.
The authenticity of host '[10.20.20.1]:7985 ([10.20.20.1]:7985)' can't be established.
ECDSA key fingerprint is SHA256:&UIhigdanUYdfs/wF56atgafd851jL4w9uT564sg6133.
Are you sure you want to continue connecting (yes/no/[fingerprint])? yes
Warning: Permanently added '[10.20.20.1]:7985' (ECDSA) to the list of known hosts.Voila...you should be in. Before binding SSH to the Wireguard interface only, edit SSHd service to start after wg-quick. Currently, SSHd doesn't care if wg-quick already started or not and might try to bind to an interface that doesn't exist yet. See the config now:
$ sudo systemctl cat sshd
[Unit]
Description=OpenBSD Secure Shell server
Documentation=man:sshd(8) man:sshd_config(5)
After=network.target auditd.service
ConditionPathExists=!/etc/ssh/sshd_not_to_be_run
[Service]
EnvironmentFile=-/etc/default/ssh
ExecStartPre=/usr/sbin/sshd -t
ExecStart=/usr/sbin/sshd -D $SSHD_OPTS
ExecReload=/usr/sbin/sshd -t
ExecReload=/bin/kill -HUP $MAINPID
KillMode=process
Restart=on-failure
RestartPreventExitStatus=255
Type=notify
RuntimeDirectory=sshd
RuntimeDirectoryMode=0755
[Install]
WantedBy=multi-user.target
Alias=sshd.serviceEdit the config like this: (changes on the Requires and After line)
$ sudo systemctl edit --full sshd
[Unit]
Description=OpenBSD Secure Shell server
Documentation=man:sshd(8) man:sshd_config(5)
Requires=wg-quick@wg0.service
After=network.target auditd.service wg-quick@wg0.service
ConditionPathExists=!/etc/ssh/sshd_not_to_be_run
[Service]
EnvironmentFile=-/etc/default/ssh
ExecStartPre=/usr/sbin/sshd -t
ExecStart=/usr/sbin/sshd -D $SSHD_OPTS
ExecReload=/usr/sbin/sshd -t
ExecReload=/bin/kill -HUP $MAINPID
KillMode=process
Restart=on-failure
RestartPreventExitStatus=255
Type=notify
RuntimeDirectory=sshd
RuntimeDirectoryMode=0755
[Install]
WantedBy=multi-user.target
Alias=sshd.serviceReload systemctl daemon to make the new configuration active:
$ sudo systemctl daemon-reloadI am now going to reboot the server for the last time I hope to see whether all services started up in a correct order and everything works. Surprise, surprise – it does.
Limit SSH to the Wireguard interface only
Go back to the sshd config file in /etc/ssh/sshd_config and set the ListenAddress field to 10.20.20.1. Restart sshd to apply.
$ sudo systemctl restart sshdNotice sshd binding to the Wireguard interface.
$ systemctl status sshd
...
Sep 21 22:53:20 hostname sshd[301]: Server listening on 10.20.20.1 port 7985.
...Check netstat to confirm that everything is running on the Wireguard interface:
$sudo netstat -tulpn
Active Internet connections (only servers)
Proto Recv-Q Send-Q Local Address Foreign Address State PID/Program name
tcp 0 0 127.0.0.1:5000 0.0.0.0:* LISTEN 76/python3
tcp 0 0 10.20.20.1:7985 0.0.0.0:* LISTEN 301/sshd: /usr/sbin
tcp 0 0 10.20.20.1:80 0.0.0.0:* LISTEN 149/nginx: master p
tcp 0 0 127.0.0.53:53 0.0.0.0:* LISTEN 71/systemd-resolved
tcp 0 0 127.0.0.1:8888 0.0.0.0:* LISTEN 230/uwsgi
tcp 0 0 10.20.20.1:443 0.0.0.0:* LISTEN 149/nginx: master p
tcp 0 0 127.0.0.1:4004 0.0.0.0:* LISTEN 80/filtron
tcp 0 0 127.0.0.1:4005 0.0.0.0:* LISTEN 80/filtron
udp 0 0 127.0.0.53:53 0.0.0.0:* 71/systemd-resolved
udp 0 0 0.0.0.0:51895 0.0.0.0:* -
udp6 0 0 :::51895 :::* -Adjust iptables
Make a last slight change to the iptables configuration in /etc/iptables/rules.v4 by restricting SSH to the wg0 interface
Replace the line
-A INPUT -p tcp -m tcp --dport 7985 -j ACCEPTwith
-A INPUT -i wg0 -p tcp -m tcp --dport 7985 -j ACCEPTApply iptables using iptables-restore
$ sudo iptables-restore /etc/iptables/rules.v4This should be it. Turned out to be way more complicated than expected, but that's exactly how it usually works, but unexpected things occur :)
Recap what we have managed to do today:
- Setup Wireguard with 3 peers (Linux server, Windows and Android client)
- Setup web services and SSH on correct interfaces
- Setup a DNS server for our clients
- Adjust network firewall and make it persistent
Doesn't seems like a lot, though when you look through this entire article, it's clear that it took some serious research and troubleshooting (just like any other IT thing, right?).
(FULL) Setting up Wireguard on VPS
Introduction
You have one or more services running on a VPS somewhere. Because the VPS is sitting on the internet with a public IP, the easiest way to access it is by exposing a port on that VPS where the service is running. This, however, opens up a load of possible security issues. Because now anyone on the internet can access the service just like you. This is perfectly fine in most cases, I mean, all websites that you browse work this way – they are exposed so that people can access them. You may have some form of 2FA or other application-level security method setup, but that doesn't help mitigate vulnerabilities in the application itself. By limiting access to your application in the first place, you covering a large part of the attack surface. All of this by leveraging the power of VPN technology.
Setup Plan
Currently, all services on my VPS are listening on the server's public IP, which is the only network interface together with localhost. Here's what we will do:
- Install and setup Wireguard interface on the server
- Setup clients
- Stop all services and bind them only to the Wireguard interface
- Adjust firewall rules according to our new setup
This guide assumes that you will access these services only from a few devices. If, for example, you would like to provide your whole home network with access to the services running on your VPS, you will have to do it a bit differently.
|‾‾‾‾‾‾‾‾‾‾‾‾‾‾‾‾‾‾‾‾‾‾‾‾‾‾‾‾‾‾‾‾‾‾‾‾‾‾‾‾‾‾‾‾‾‾‾‾‾‾‾| |‾‾‾‾‾‾‾‾‾‾‾‾‾‾‾‾‾‾‾‾‾‾‾‾‾‾‾‾‾‾‾‾‾‾‾‾‾‾‾‾‾‾‾|
| HOME | | VPS |
|Android Device------------------------------------->---WG tunnel---> |
|[Interface] | | |
|eth0: 192.168.20.55 (private IP from DHCP at home) | |Server |
|WG IP: 10.20.20.2/29 | |[Interface] |
|WG public key: 16f5das48wa1f684g1a489awg5a | |eth0: 78.97.52.14 (example public IP) |
|WG private key: gzf74894ger89a46sd14g84r8esg | |WG IP: 10.20.20.1/29 |
| | |WG public key: 6t57489hgnufjfiosdjjfp98h |
|Windows Device------------------------------------->---WG tunnel--->WG private key: 4gfd89a7g1fd56g848g4fdg41fd|
|[Interface] | | |
|eth0: 192.168.20.56 (private IP from DHCP at home) | | |
|WG IP: 10.20.20.3/29 | | |
|WG public key: fgd489fdsg84168e46g1514ge5g | | |
|WG private key: iyut789tr496516sh416g4164h6h | | |
|___________________________________________________| |___________________________________________|*note: don't worry, the public and private keys in the diagram are just random placeholder values
Installation on the VPS
Since we are running Debian, we can get Wireguard from the official repository. I usually prefer building software from source, but for the sake of this guide, I will go the easier route and simply use the repo version.
Note that since it's Debian, the packages are sometimes a bit outdated. At the time of writing, the tools weren't available in the newest version – even in the unstable repo. The default stable repo has even older packages.
The situation around Debian and Wireguard is a bit confusing. Debian is known to be stable but has older packages. If you don't want to worry about anything, just install it from the stable repo:
$ sudo apt install wireguardHowever, if you are on Debian 10, Wireguard still isn't integrated into the 4.19 kernel, which means the installation will bring the wireguard-dkms (Dynamic Kernel Module Support) package as well. On Debian 11, this should not be necessary, because Wireguard is already natively in the 5.10 kernel (which is default for Debian 11). I have it a bit more complicated. I am in fact running Debian 11, but with the 5.4 kernel (backported from Debian 10), which also doesn't have Wireguard natively, but that's just a side note. You can see the version status of the Wireguard package here:
To find out how to add testing or unstable to Debian 11, check out my guide over here.
Configure Wireguard on the server
The main configuration folder is located in /etc/wireguard. This directory will contain both configuration and private/public key, therefore it is only accessible with root by default. To get to this directory, you need to elevate privileges.
$ sudo su
(root)$ cd /etc/wireguard/Create configuration file for the Wireguard interface
Create a new file in /etc/wireguard. The name of the file will also be the name of the interface (like eth0,lo,etc.) + .conf file extension. I like the default naming, so I will use name it wg0.conf. Before creating the file, change umask to 077, so that the file is readable only by root. Umask controlls what permissions will newly created files and directories have. The default umask is 022. When we use the umask command with a different number, all new files and directories will be created under permissions we have set. This modifies the default umask value only for the current sub-shell. To go back to the default umask, just logout/login. You can also make the changes permanent if you want. You can read more about umask here.
(root)$ umask 077
(root)/etc/wireguard$ touch wg0.confPrepare wg0.conf
Open wg0.conf with your favorite editor.
(root)$ vi /etc/wireguard/wg0.confWe can slowly start preparing the config file, step by step. Right now, add the [Interface] block, which will define properties of the server's Wireguard interface.
Address– The local IP of the server within the Wireguard tunnel and subnet mask in CIDR notation. I know I will only have 3 clients, therefore I picked a small subnet/29with only 6 usable hosts. (Basic subnetting knowledge is required).ListenPort– The port on the server Wireguard will use to communicate with other peers. After everything is set up, this will be the only port exposed to the open internet. If left unspecified, default is51820.PrivateKey– The private key of the server that will be generated in a moment. This key should never be shared or leave the server. We will only send out the public key (as the name suggests).
Always keep private keys on devices where they were created. They should never be moved accross network or even accross devices.
The wg0.conf file should look like this right now:
[Interface]
Address = 10.20.20.1/29
ListenPort = 51895
PrivateKey =Generate server public/private keys
Wireguard is built around the public and private key pairs structure. There is technically no such a thing as client or server in Wireguard, because everything is a peer. We use the client/server terminology to help our mind imagine the setup better. Each peer will generate its own private and public key. The private key will never leave the device where it originated from and should be kept well secured. The public key will be copied over to the other peers. In my case, the VPS will become a peer to both the Android and Windows device (clients). However, Android nor Windows will even know about each other, they will only be aware of the VPS, which will be their only peer. Reason for this is that they only need to talk to the VPS, not to each other.
Still as root, with umask set to 0077 (check by typing umask in the terminal) and in the /etc/wireguard directory, create a new subdirectory for the public/private keys and preshared keys (will explain in a second).
(root)$ mkdir keys psk(root)$ cd keys
(root)$ wg genkey | tee wg0_private.key | wg pubkey > wg0_public.keyThe wg genkey command generates a random private key in base64 and prints it to standard output (terminal). The output is instead redirected to tee, which both prints it to stdout (terminal), but also saves it into a file wg0_private.key. The private key printed to stdout is then piped (| symbol) to wg pubkey, which calculates the public key and prints it in base64 to stdout from a corresponding private key (the one we redirected to it with the pipe), lastly redirect the public key from stdout to a file wg0_public.key
Now we have two files in the keys directory:
(root)$ ls
wg0_private.key wg0_public.keyGenerate preshared keys
This option adds an additional layer of symmetric-key cryptography to be mixed into the already existing public-key cryptography, for post-quantum resistance (for paranoid people like me).
From the Wireguard whitepaper:
In order to mitigate any future advances in quantum computing, WireGuard also supports a mode in which any pair of peers might additionally pre-share a single 256-bit symmetric encryption key between themselves, in order to add an additional layer of symmetric encryption. The attack model here is that adversaries may be recording encrypted traffic on a long term basis, in hopes of someday being able to break Curve25519 and decrypt past traffic. While pre-sharing symmetric encryption keys is usually troublesome from a key management perspective and might be more likely stolen, the idea is that by the time quantum computing advances to break Curve25519, this pre-shared symmetric key has been long forgotten. And, more importantly, in the shorter term, if the pre-shared symmetric key is compromised, the Curve25519 keys still provide more than sufficient protection. In lieu of using a completely post-quantum crypto system, which as of writing are not practical for use here, this optional hybrid approach of a pre-shared symmetric key to complement the elliptic curve cryptography provides a sound and acceptable trade-off for the extremely paranoid. Furthermore, it allows for building on top of WireGuard sophisticated key-rotation schemes, in order to achieve varying types of post-compromise security.
Move to the psk directory and generate preshared keys for each of the clients. The preshared key will then be part of both the server and client configuration file.
(root)$ cd /etc/wireguard/psk
(root)$ wg genpsk > android_client.psk
(root)$ wg genpsk > windows10_client.pskAgain, there should be 2 files in the directory, one for each client.
(root)$ ls
android_client.psk windows10_client.pskEdit wg0.conf
Open the config file again and fill in some of the remaining information:
[Interface]
Address = 10.20.20.1/29
ListenPort = 51895
PrivateKey = your_private_key
[Peer]
PublicKey =
PresharedKey = your_preshared_key_for_this_client
AllowedIPs = 10.20.20.2/32
[Peer]
PublicKey =
PresharedKey = your_preshared_key_for_this_client
AllowedIPs = 10.20.20.3/32Open two terminals – one with wg0.conf in editor and the other in /etc/wireguard/ directory. Now use cat to print contents of your newly generated key files to the terminal and simply copy and paste them to the editor.
AllowedIPs – IP address within the Wireguard tunnel for each peer in CIDR notation. Wireguard will accept only packets coming from these specific IP ranges or from a single IP of the client when used with /32.
This is it for now, we will come back to the config file in a moment.
Remember which peer is which. The first one is for the Android device, while the second one is for the Windows client.
Setting up the clients
1. Windows
Download and install Wireguard
Download the Windows Installer from the official Wireguard website.
Run the wireguard-installer.exe and after a few moments, this window should appear:
Click the arrow next to Add Tunnel and select Add empty tunnel...
Wireguard will automatically generate a private and public key for this client.
*note: all keys shown will be destroyed afterwards and are only used for demonstration purposes
Pick a name for the new tunnel, can be anything without spaces. Fill in the client config like I did:
[Interface]
PrivateKey = your_private_key
Address = 10.20.20.3/29
[Peer]
PublicKey = public_key_of_the_server
PresharedKey = preshared_key_from_server
AllowedIPs = 10.20.20.1/32
Endpoint = public_server_ip:51895PrivateKey– Private key of the client that it just generatedAddress– Client's IP within the Wireguard tunnel[Peer]– Configuration block with information about the VPS (the other end of the Wireguard tunnel)PublicKey– The public key of the server. Use cat to print the file/etc/wireguard/keys/wg0_public.keyto the terminal and copy & paste it here.PresharedKey– Preshared key generated on the server to thepskdirectory, namedwindows10_client.psk.AllowedIPs– Only traffic destined for the10.20.20.1/32network will go through the Wireguard tunnel (32 is only 1 host). To make all traffic go through the tunnel, put0.0.0.0/0to the same field.Endpoint– The public IP address and port on your Wireguard server. Runip aon the server to get it.
Add Windows client public key to the server config
Copy this public key and paste it into wg0.conf on the server to the PublicKey line in the corresponding (second) [Peer] block.
Server /etc/wireguard/wg0.conf
[Interface]
Address = 10.20.20.1/29
ListenPort = 51895
PrivateKey = your_private_key
[Peer]
PublicKey =
PresharedKey = your_preshared_key_for_this_client
AllowedIPs = 10.20.20.2/32
[Peer]
PublicKey = public_key_from_the_windows_client
PresharedKey = your_preshared_key_for_this_client
AllowedIPs = 10.20.20.3/32Windows client should now be set up, before testing, make sure you have completed the following:
- On the Windows client:
Addressin the[Interface]block is correct and same asAllowedIPsin[Peer]block on the server (expect the number after /, that can be different)PublicKeyis filled with the key from/etc/wireguard/keys/wg0_public.keyfrom the server.PresharedKeyis filled with the key from/etc/wireguard/psk/windows10_client.psk.AllowedIPsis set to the Wireguard local IP of the server with/32subnet mask.Endpointhas the public IP of the server with the correct port.
- On the server:
PublicKeyin the[Peer]block is copied from the Windows client.PresharedKeyis the same as on the client.AllowedIPscorresponds to theAddressfield on the client (expect the number after /, that can be different).
Test the Windows–Server connection
Make sure the firewall is set to allow communication on port 51895 on the server and comment out the other peer in wg0.conf like this:
[Interface]
Address = 10.20.20.1/29
ListenPort = 51895
PrivateKey = your_private_key
# [Peer]
# PublicKey =
# PresharedKey = your_preshared_key_for_this_client
# AllowedIPs = 10.20.20.2/32
[Peer]
PublicKey = public_key_from_the_windows_client
PresharedKey = your_preshared_key_for_this_client
AllowedIPs = 10.20.20.3/32Start Wireguard interface on the server:
$ wg-quick up wg0
[#] ip link add wg0 type wireguard
[#] wg setconf wg0 /dev/fd/63
[#] ip -4 address add 10.20.20.1/29 dev wg0
[#] ip link set mtu 8920 up dev wg0Start Wireguard tunnel on the Windows client by clicking Activate:
The tunnel is now established, use ping from both devices to test connectivity.
2. Android
Leave the Windows client for a while, we will come back to it later to finish some things.
Install Wireguard for Android
Wireguard can be installed from Google Play Store or preferably from F-Droid. Use option which suits you the best.
|
|
|
Wireguard allows you to create tunnels in 3 ways – import from file, scan QR code or create from scratch. The first two options are more convenient, however they require additional setup that we will leave for another blog post. I will use the third option now.
Configure Wireguard tunnel
|
Interface
Name– Name for the interfacePrivate key– Will be generated on the device and hidden by default, keep it secretPublic key– Derived from the Private key, will be shared with the serverAddresses– IP address of this device within the Wireguard tunnel in/29subnet
Peer
Public key– Public key of the server (/etc/wireguard/keys/wg0_public.key)Pre-shared key– Pre-shared key generated on the server (/etc/wireguard/psk/android_client.psk)Endpoint– Public IP address of the server with appropriate port (look into/etc/wireguard/wg0.conf, value ofListenPort)Allowed IPs– Wireguard IP of the server in/32subnet (only that IP), checkAddressfield inwg0.confon the server. To route everything through the VPN, use0.0.0.0/0
Additionally, if you want to restrict some apps from using the Wireguard interface, you can do so by clicking All Applications and either excluding or including some apps. I will only be using my web browser with the Wireguard tunnel to access my websites, therefore I include Bromite only (one of the best Android web browsers).
Click the save icon in the top right corner and you should see the name of the interface in the main menu. Toggle it on by clicking the button next to it or edit by clicking on the name.
Add Android client to the server config
The Android client should be fully set up for now. Go back to the server and fill appropriate part of wg0.conf. Focus on the part we have commented out while testing the Windows client:
# [Peer]
# PublicKey =
# PresharedKey = your_android_preshared_key
# AllowedIPs = 10.20.20.2/32
Either come up with a way to copy the public key over to the server or just carefully type it in manually.
Restart server interface
After editing the config, bring the Wireguard interface down and up again to reload the configuration.
$ sudo wg-quick down wg0
[#] ip link delete dev wg0
$ sudo wg-quick up wg0
[#] ip link add wg0 type wireguard
[#] wg setconf wg0 /dev/fd/63
[#] ip -4 address add 10.20.20.1/29 dev wg0
[#] ip link set mtu 8920 up dev wg0Test the Android–Server connection
Make sure the server Wireguard interface is up and click the button next to the name of the Wireguard interface on Android. Android might ask you to confirm starting a VPN service and a little key icon will appear in the notification bar.
Try accessing 10.20.20.1 in you Android browser or ping it with Termux or other application.
If you've done everything correctly, you should be able to ping the server from your client. For troubleshooting, try removing the pre-shared keys or check if you have copied all the keys correctly or if the firewall is not preventing communication on the Wireguard port.
Android – restricting apps
When configuring the Android client, we have restricted all apps, except for our web browser, from accessing the Wireguard tunnel. Therefore we aren't able to use ping in app like Termux to test connecitivity to the server. You can temporarily include all apps and save the configuration or navigate to 10.20.20.1 in the browser to perform a handshake with the server.
Wireguard and NAT
Wireguard is by design a very quiet protocol. If there's nothing to talk about then there's no data going through the tunnel. Communication only takes place when peers have some data to send. When there's no real data exchange happening, it seems like there is no tunnel at all. This works perfectly fine in configurations where all peers are reachable through a public IP address, because they can be reached at any moment by anyone. Peer 1 wants to talk to Peer 2? No problem. After 5 minutes, Peer 2 suddently wants to send something to Peer 1? Totally okay, they can all reach each other.
But what if Peer 2 was instead hidden behind NAT? This is very common in consumer-grade internet connections or in mobile networks. They don't have public IPv4 addresses, simply because they don't need them. Now Peer 1 wants to talk to Peer 2, but how to get to it? There's no public IPv4 address and the firewalls between Peer 1 and Peer 2 have already forgot any previously established connections. You can test this yourself and see what happens. First of all, turn off all tunnels and wait a few moments.
Pinging server and clients
$ sudo wg-quick down wg0
[#] ip link delete dev wg0
Now bring both peers up again:
$ sudo wg-quick up wg0
[#] ip link add wg0 type wireguard
[#] wg setconf wg0 /dev/fd/63
[#] ip -4 address add 10.20.20.1/29 dev wg0
[#] ip link set mtu 8920 up dev wg0Click Activate in Windows.
First of all, try pinging the client from the server. The server is 10.20.20.1 and client 10.20.20.3
$ ping 10.20.20.3
PING 10.20.20.3 (10.20.20.3) 56(84) bytes of data.
From 10.20.20.3 icmp_seq=1 Destination Host Unreachable
ping: sendmsg: Destination address required
From 10.20.20.3 icmp_seq=2 Destination Host Unreachable
ping: sendmsg: Destination address required
From 10.20.20.3 icmp_seq=3 Destination Host Unreachable
ping: sendmsg: Destination address required
From 10.20.20.3 icmp_seq=4 Destination Host Unreachable
ping: sendmsg: Destination address required
From 10.20.20.3 icmp_seq=5 Destination Host Unreachable
ping: sendmsg: Destination address requiredWait...why? Both clients are running and have the Wireguard interface active, right? Well, because the client (10.20.20.3) is behind NAT and it hasn't contacted the server yet, the server doesn't know where to send the data.
Now ping the server (10.20.20.1) from the client (10.20.20.3). This works because the server (10.20.20.1) has a public IP and we can route the data to it this way.
PS C:\Users\Marek> ping 10.20.20.1
Pinging 10.20.20.1 with 32 bytes of data:
Reply from 10.20.20.1: bytes=32 time=87ms TTL=64
Reply from 10.20.20.1: bytes=32 time=42ms TTL=64
Reply from 10.20.20.1: bytes=32 time=42ms TTL=64
Reply from 10.20.20.1: bytes=32 time=42ms TTL=64
Ping statistics for 10.20.20.1:
Packets: Sent = 4, Received = 4, Lost = 0 (0% loss),
Approximate round trip times in milli-seconds:
Minimum = 42ms, Maximum = 87ms, Average = 53msQuickly go back to the server and ping the client (10.20.20.3) again:
$ ping 10.20.20.3
PING 10.20.20.3 (10.20.20.3) 56(84) bytes of data.
64 bytes from 10.20.20.3: icmp_seq=1 ttl=128 time=42.7 ms
64 bytes from 10.20.20.3: icmp_seq=2 ttl=128 time=42.8 ms
64 bytes from 10.20.20.3: icmp_seq=3 ttl=128 time=42.5 msWhy is it working now? It is because the client established the connection first and now for a while, the server will be able to reach the client until this connection gets lost. There are two ways to prevent this behavior (client having to send data first)
- Setup Persistent keepalive to keep the connection alive behind NAT or stateful firewalls, disabled by default.
- Always initiate connection from the client first.
In our case (connecting to a web server to access a service), the server doesn't need to communicate with us unless we want it to. When accessing a website on the server, we know that we (the client) will always initiate the connection first. However, if it causes issues within your setup, configure Persistent keepalive.
Moving network services to the WG interface
In order to move our network services to another interface, we first need to find out what exactly is running on the server. We are interested in services and their listening ports. There are a few commands to achieve this, e.g netstat, lsof, ss and nmap. Pick the one that works on your server, so you don't have to install anything additional just for one command.
$ netstat -tulpnI will run netstat with a couple of flags grouped together, definitely easier than writing netstat -t -u -l -p -n
-tlists TCP-ulists UDP-lshows only listening ports (omitted by default)-pshows what program/service is running on each port-ndoesn't resolve IPs and hosts
$ sudo netstat -tulpn
Active Internet connections (only servers)
Proto Recv-Q Send-Q Local Address Foreign Address State PID/Program name
tcp 0 0 127.0.0.53:53 0.0.0.0:* LISTEN 72/systemd-resolved
tcp 0 0 127.0.0.1:8888 0.0.0.0:* LISTEN 205/uwsgi
tcp 0 0 0.0.0.0:443 0.0.0.0:* LISTEN 98/nginx: master pr
tcp 0 0 127.0.0.1:4004 0.0.0.0:* LISTEN 82/filtron
tcp 0 0 127.0.0.1:4005 0.0.0.0:* LISTEN 82/filtron
tcp 0 0 127.0.0.1:5000 0.0.0.0:* LISTEN 77/python3
tcp 0 0 78.97.52.14:7985 0.0.0.0:* LISTEN 107/sshd: /usr/sbin
tcp 0 0 0.0.0.0:80 0.0.0.0:* LISTEN 98/nginx: master pr
udp 0 0 127.0.0.53:53 0.0.0.0:* 72/systemd-resolved
udp 0 0 0.0.0.0:51895 0.0.0.0:* -
udp6 0 0 :::51895 :::* -We can see a few services running on localhost (127.0.0.1), systemd-resolve localhost address (127.0.0.53), example public IP (78.97.52.14) or on all interfaces (0.0.0.0). The only one that we will care about now are 0.0.0.0 and 78.97.52.14. From now on, everything will be very setup specific, so I might even change the way I write, from we to me.
Binding Nginx to wg0 interface
The main service I want to move is Nginx. It runs all my websites on this server, so it would make sense to migrate it first. Right now, it binds itself to all interfaces (0.0.0.0), so the websites should technically be already accessible on the Wireguard IP of the server (10.20.20.1), but I want them to be ONLY accessible on that interface.
Edit /etc/nginx/conf.d/name_of_config.conf and add the Wireguard IP address in front of ports in server config block on the listen line, like this:
server {
listen 443 ssl http2;
server_name youwebsite.com
...
...
to
server {
listen 10.20.20.1:443 ssl http2;
server_name youwebsite.com
...
...
Before reloading or restarting Nginx, make sure Wireguard is running and the interface is up, otherwise you will run into errors.
$ sudo wg-quick up wg0Reload Nginx to cause least interruption to the service.
$ sudo systemctl reload nginxRun netstat again to check if Nginx rebinded like I wanted:
$ sudo netstat -tulpn
Active Internet connections (only servers)
Proto Recv-Q Send-Q Local Address Foreign Address State PID/Program name
tcp 0 0 127.0.0.53:53 0.0.0.0:* LISTEN 72/systemd-resolved
tcp 0 0 127.0.0.1:8888 0.0.0.0:* LISTEN 205/uwsgi
tcp 0 0 10.20.20.1:443 0.0.0.0:* LISTEN 23281/nginx: master
tcp 0 0 127.0.0.1:4004 0.0.0.0:* LISTEN 82/filtron
tcp 0 0 127.0.0.1:4005 0.0.0.0:* LISTEN 82/filtron
tcp 0 0 127.0.0.1:5000 0.0.0.0:* LISTEN 77/python3
tcp 0 0 78.97.52.14:7985 0.0.0.0:* LISTEN 107/sshd: /usr/sbin
tcp 0 0 10.20.20.1:80 0.0.0.0:* LISTEN 23281/nginx: master
udp 0 0 127.0.0.53:53 0.0.0.0:* 72/systemd-resolved
udp 0 0 0.0.0.0:51895 0.0.0.0:* -
udp6 0 0 :::51895 :::* -When I try to access my websites now, it....doesn't work. But at least I perfectly know why and how to fix it. Before, when I wanted to access mysite.com, I typed in mysite.com into the browser address bar and my device requested a DNS record for mysite.com, which turned out to be a public IP address of my server, or something else (depending on what I had set on my domain's registrar website.) The DNS records still points to the public IP of my server, but Nginx isn't serving the websites on that public IP anymore, but on the Wireguard one. How do I fix this?
Remove old DNS records
First of all, I will remove the old DNS A records with my registrar so that I don't forget. This varies vastly from registrar to registrar, so you will have to figure it our on your own.
Point new DNS records to Wireguard
The problem is that I cannot just create new A records with the Wireguard IP (10.20.20.1), because that's a reserved private IP, it wouldn't route anywhere. There are couple of ways to solve this:
- Fill in the
DNS Serverfield on both clients with a DNS server that will be able to provide resolution for the private IP10.20.20.1. It could even be the10.20.20.1server itself, but that means I would have to setup a DNS service on the server - Point clients (using the
DNS Serverfield) to your local DNS server on your home network and create the A records there. This method, however, will not work for roaming clients if they connect to a different network (like mobile data). - Since it's just one server with two websites and two clients (this method wouldn't make sense in larger deployments), I could just edit local DNS entries (hosts file) to avoid having to configure a whole new DNS server, just for this single purpose.
I might look into a more sophisticated solution for DNS with split tunnel VPN later on, but for now I will use the third method.
Editing hosts file on Windows
10.20.20.1 mysite.com
10.20.20.1 mysite2.comYou might need to flush your DNS cache, but after saving the file, those two sites should now resolve correctly, because Windows checks the local hosts file first by default.
Editing hosts file on Android
With Android, it's a little more complicated. Since its a mobile operating system designed to keep the user away from all advanced configuration (but still better than iPhone in this regard), we cannot simply open the hosts file and edit it. On a rooted phone you can, but on a regular one you can't. We have basically two options
-
Use a pseudo-VPN app to re-route all traffic locally through a filter that allows you to add custom DNS entries (I think Blokada can do that, apart from other things), except we can't, because
There can be only one VPN connection running at the same time. The existing interface is deactivated when a new one is created.– developer.android.com Judging by one comment on Reddit "I'm not entirely sure if this is how it works but using wireguard on a rooted phone and a compatible kernel let's wireguard interact directly through the kernel. It doesn't show up as an active VPN through android. So it may be possible to use that and a conventional VPN approach to have two at once?" If this actually works, it should theoretically be possible, but you need a rooted phone and it's probably in early stages. - Use the VPN server as a DNS server, since it's a roaming device anyway.
- Use
adbto pull the hosts file to PC, edit it and push it back to your Android device. That's what I'll do.
How to get abd up and running is outside of this guide, there might be a guide for that on this site at some point, but until then, refer to the internet.
Enable USB debugging in Android settings and connect it using a cable to you PC. Allow USB debugging for this specific device and check that it's recongnized.
$ .\adb.exe devices
List of devices attached
215e29da deviceTransfer the hosts file from Android to your device:
.\adb.exe pull /system/etc/hosts C:\Users\Marek\DesktopOpen it with Notepad and add new lines containing IP and hostname in this format:
10.20.20.1 mysite.com
10.20.20.1 mysite2.comNope, this didn't work because pushing the file to a read-only file system doesn't work. Christ, I have to root my phone as soon as I can...
Setup basic DNS server on Linux
So I will eventually have to setup a DNS server on the Wireguard server, but just a simple one. No need to use bind, but simply DNSmasq.
Install DNSmasq
$ sudo apt install dnsmasq
Unpacking dnsmasq-base (2.85-1) ...
Selecting previously unselected package dnsmasq.
Preparing to unpack .../dnsmasq_2.85-1_all.deb ...
Unpacking dnsmasq (2.85-1) ...
Setting up dnsmasq-base (2.85-1) ...
Setting up dns-root-data (2021011101) ...
Setting up dnsmasq (2.85-1) ...
Created symlink /etc/systemd/system/multi-user.target.wants/dnsmasq.service → /lib/systemd/system/dnsmasq.service.
Job for dnsmasq.service failed because the control process exited with error code.
See "systemctl status dnsmasq.service" and "journalctl -xe" for details.
invoke-rc.d: initscript dnsmasq, action "start" failed.
● dnsmasq.service - dnsmasq - A lightweight DHCP and caching DNS server
Loaded: loaded (/lib/systemd/system/dnsmasq.service; enabled; vendor preset: enabled)
Active: failed (Result: exit-code) since Mon 2021-09-20 00:43:35 CEST; 18ms ago
Process: 23908 ExecStartPre=/etc/init.d/dnsmasq checkconfig (code=exited, status=0/SUCCESS)
Process: 23915 ExecStart=/etc/init.d/dnsmasq systemd-exec (code=exited, status=2)
CPU: 55ms
Sep 20 00:43:35 hostname systemd[1]: Starting dnsmasq - A lightweight DHCP and caching DNS server...
Sep 20 00:43:35 hostname dnsmasq[23915]: dnsmasq: failed to create listening socket for port 53: Address already in use
Sep 20 00:43:35 hostname dnsmasq[23915]: failed to create listening socket for port 53: Address already in use
Sep 20 00:43:35 hostname systemd[1]: dnsmasq.service: Control process exited, code=exited, status=2/INVALIDARGUMENT
Sep 20 00:43:35 hostname dnsmasq[23915]: FAILED to start up
Sep 20 00:43:35 hostname systemd[1]: dnsmasq.service: Failed with result 'exit-code'.
Sep 20 00:43:35 hostname systemd[1]: Failed to start dnsmasq - A lightweight DHCP and caching DNS server.
Processing triggers for dbus (1.12.20-2) ...Run DNSmasq at startup:
$ sudo systemctl enable dnsmasqThe problem is that DNSmasq tries to bind to port 53, which on my system is already occupied by systemd-resolved. I need to figure out how to make these two work together or disable systemd-resolved.
Heads up – Skip to Final configuration for server to see the final configuration files. The following is mostly me trying to figure out how to do this properly. If you enjoy reading about others suffering, go ahead.
Edit /etc/systemd/resolved.conf
DNS configuration is usually managed by /etc/resolv.conf file, however, if you open the file, it states the following – # This file is managed by man:systemd-resolved(8). Do not edit.
Therefore use /etc/systemd/resolved.conf to perform any configuration regarding DNS. We are interested mainly in the DNSStubListener line, which we have to uncomment and set to no. That disables systemd-resolved from binding to 127.0.0.53:53. I would also advise to disable LLMNR and MulticastDNS, do some research about these two yourself to figure if you need them. The file should now look like this:
[Resolve]
DNS=your_DNS_server
#FallbackDNS=
#Domains=
LLMNR=no
MulticastDNS=no
#DNSSEC=allow-downgrade
#DNSOverTLS=no
#Cache=yes
DNSStubListener=no
#ReadEtcHosts=yesRestart systemd-resolved. Be aware that you might lose DNS connectivity until you start DNSmasq. I won't do that right now, because I still need to change a few things:
$ sudo systemctl restart systemd-resolvedRunning systemd-resolve to check it's status reveals that some settings aren't still how I wanted. I have managed to change the Global configuration, but not settings for individual interfaces.
$ sudo systemd-resolve --status
Global
Protocols: -LLMNR -mDNS -DNSOverTLS DNSSEC=no/unsupported
resolv.conf mode: uplink
DNS Servers: my_prefered_DNS_server
Link 15 (wg0)
Current Scopes: none
Protocols: -DefaultRoute +LLMNR -mDNS -DNSOverTLS DNSSEC=no/unsupported
Link 19 (eth0)
Current Scopes: DNS
Protocols: +DefaultRoute +LLMNR -mDNS -DNSOverTLS DNSSEC=no/unsupported
DNS Servers: DNS_server_i_dont_likeI haven't find another config file to add these values into, so just change them using the systemd-resolve command.
$ sudo systemd-resolve --interface eth0 --set-dns my_prefered_DNS_server
$ sudo systemd-resolve --interface eth0 --set-llmnr no
$ sudo systemd-resolve --interface wg0 --set-llmnr noAgain, confirm that everything is set to your liking with systemd-resolve --status
$ systemd-resolve --status
Global
Protocols: -LLMNR -mDNS -DNSOverTLS DNSSEC=no/unsupported
resolv.conf mode: uplink
Current DNS Server: my_prefered_DNS_server
DNS Servers: my_prefered_DNS_server
Link 15 (wg0)
Current Scopes: none
Protocols: -DefaultRoute -LLMNR -mDNS -DNSOverTLS DNSSEC=no/unsupported
Link 19 (eth0)
Current Scopes: DNS
Protocols: +DefaultRoute -LLMNR -mDNS -DNSOverTLS DNSSEC=no/unsupported
Current DNS Server: my_prefered_DNS_server
DNS Servers: my_prefered_DNS_serverEdit /etc/dnsmasq.d
By default, the file is full of commented out lines with all kinds of configuration settings. In fact, it's so long that it's better to back it up and write just the options you want into an empty one.
$ sudo cp /etc/dnsmasq.conf /etc/dnsmasq.conf.defaultDelete everything in /etc/dnsmasq.conf with vi and 1000dd.
$ sudo vi /etc/dnsmasq.confAdd the following lines to the config:
interface=lo,wg0
bind-interfacesRestart DNSmasq and check if it binded to the right interfaces (localhost and Wireguard)
$ sudo systemctl restart dnsmasq
$ sudo netstat -tulpn | grep 53
tcp 0 0 127.0.0.1:53 0.0.0.0:* LISTEN 25764/dnsmasq
tcp 0 0 10.20.20.1:53 0.0.0.0:* LISTEN 25764/dnsmasq
udp 0 0 127.0.0.1:53 0.0.0.0:* 25764/dnsmasq
udp 0 0 10.20.20.1:53 0.0.0.0:* 25764/dnsmasqAll looks great, however, trying multiple pings to common websites reveal random DNS issues:
$ ping google.com
ping: google.com: Temporary failure in name resolutionAt this point, I have spent a few hours researching how name resolution works on Linux machines. It got a little more complicated with systemd-resolved. I won't explain the whole proccess or what I did, just show you the final configuration files and try to explain how the name resolution works as of now.
Previous plan
I'm currently trying to figure out how to get DNS resolution working on the server itself (so that the server can resolve names with DNSmasq and systemd-resolved combined). My previous plan was:
- Disable
systemd-resolvedbinding to127.0.0.53withDNSStubListener=noin/etc/systemd/resolved.conf - Set DNS on all interfaces with systemd-resolved to
127.0.0.1(this also changes nameserver in/etc/resolv.confto127.0.0.1) - Run DNSmasq on
127.0.0.1(for the server itelf) and on10.20.20.1(for the Android Wireguard client). - Set DNS server in DNSmasq (
/etc/dnsmasq.conf) to a public DNS of choice for regular name resolution.
Thanks to this, when the server wants to perform a DNS query, this happens (as far as I understand, don't @ me and kindly let me know if I'm wrong):
- It first looks into
/etc/nsswitch.confand looks onto thehostsline, which saysfiles dns. - Because of
files, it looks into/etc/hostsfirst, to see if the address isn't hard-coded this way. - Then because of
dns, it looks into/etc/resolv.conf, which is managed by systemd-resolved. This file will only contain127.0.0.1, which points to DNSmasq running on that interface on port53. The reason why it points to127.0.0.1is because we have set DNS to127.0.0.1globally in/etc/systemd/resolved.conf. - DNSmasq will take that query and forward it to our prefered public DNS server configured in
/etc/dnsmasq.confwith theserverline.
Unfortunately, this does not work, or at least I was unable to make it work this way. The outcome of this is a broken name resolution that sometimes works and sometimes doesn't.
Current plan
To fix my server's DNS resolution, I came up with a reversed setup plan. Instead of everything pointing to DNSmasq for name resolution, I will point DNSmasq to the other side, which is systemd-resolved – this turned out to produce the same behavior.
After thorough examination, I decided to completely throw systemd-resolved out the window by stopping the service and disabling it.
$ sudo systemctl stop systemd-resolved
$ sudo systemctl disable systemd-resolvedTry the good old way of editing /etc/resolv.conf and add your DNS server. After adding different upstream DNS servers, I'm slowly starting to realize that the entire issue might have been actually caused by the upstream server and not my local configuration. The DNS I used before is extremely fast (+-2 ms response times), but sometimes just stops responding completely. It might have something to do with reverse lookup and I might somehow fix it later, but for now, I have decided to opt for the slower, but more reliable upstream DNS server.
Final configuration for server
There might actually be a way to do it! Go back to my reversed setup plan, because this time it works.
Enable and start systemd-resolved again:
$ sudo systemctl enable systemd-resolved
$ sudo sytemctl start systemd-resolvedLook into /etc/resolv.conf. Because we have started systemd-resolved, it had already probably overwrote /etc/resolv.conf with the following, which is alright:
nameserver 127.0.0.53
options edns0 trust-ad
search .Open /etc/systemd/resolve.conf and make it look like this:
[Resolve]
DNS=my_prefered_DNS_server
FallbackDNS=secondary_DNS_server
#Domains=
LLMNR=no
MulticastDNS=no
#DNSSEC=allow-downgrade
#DNSOverTLS=no
#Cache=yes
DNSStubListener=yes
#ReadEtcHosts=yesCheck status of systemd-resolve and edit DNS server for eth0 if it still has a wrong value
$ systemd-resolve --status
Global
Protocols: -LLMNR -mDNS -DNSOverTLS DNSSEC=no/unsupported
resolv.conf mode: stub
Current DNS Server: my_prefered_DNS_server
DNS Servers: my_prefered_DNS_server
Fallback DNS Servers: secondary_DNS_server
Link 15 (wg0)
Current Scopes: none
Protocols: -DefaultRoute -LLMNR -mDNS -DNSOverTLS DNSSEC=no/unsupported
Link 19 (eth0)
Current Scopes: DNS
Protocols: +DefaultRoute -LLMNR -mDNS -DNSOverTLS DNSSEC=no/unsupported
Current DNS Server: my_prefered_DNS_server
DNS Servers: my_prefered_DNS_serverYour /etc/dnsmasq.conf should look like this. We want to run DNSmasq only on the Wireguard interface, but interface also automatically adds loopback to the list. Use except-interface to disable binding to localhost.
interface=wg0
except-interface=lo
bind-interfaces
server=127.0.0.53Start DNSmasq
# sudo systemctl start dnsmasqYou can tell by the output of systemctl status dnsmasq, that it's using 127.0.0.53 as it's DNS server.
...
using nameserver 127.0.0.53#53
reading /etc/resolv.conf
...Recap what we know about name resolution on the server now. When the server makes a DNS query, this happens (probably):
- Debian consults
/etc/nsswitch.conf, reads/etc/hostsdue tofilesoption specified at thehosts:line, then goes for the DNS server. - DNS server in
/etc/resolv.confpoints to127.0.0.53, which issystemd-resolv DNSStubListener. systemd-resolvedis set up to use a prefered public DNS server.
Now onto the main reason why I did this whole thing. Provide a simple DNS server for my Android client.
Setup DNS for client name resolution
Edit /etc/hosts
Add the websites you want to resolve to /etc/hosts. That way, when clients queries DNSmasq listening on 10.20.20.1, it forwards the query to 127.0.0.53, which also reads /etc/hosts, resolving the IP correctly.
10.20.20.1 mysite.com
10.20.20.1 mysite2.comAdd DNS to Android config
Edit the config by adding 10.20.20.1 to DNS servers.
Adjust Firewall for testing
In order for the Android device to be able to use the DNS server on 10.20.20.1, I need to adjust iptables to allow traffic on port 53 on the Wireguard interface. Add this to your iptables configuration file and apply with iptables-restore.
# Allow DNS queries on the Wireguard interface
-A INPUT -p udp -m udp --dport 53 -i wg0 -j ACCEPT$ sudo iptables-restore /etc/iptables/rules.v4Now access your websites from the Android client and it should resolve correctly to the server's Wireguard IP.
The only "problem" right now is that the Android client will most likely use the Wireguard server IP 10.20.20.1 for all name resolution while it's connected to the VPN. This is not a huge deal since the queries are pretty fast, but might be a deal breaker for some.
Adjusting Firewall rules
Everything regarding the Wireguard VPN should be configured:
- Wireguard tunnel between a server and 2 peers (clients)
- Services running on the Wireguard interface only (Nginx)
- Correct DNS resolving for both the server and Android client
Now it's time to fix the Firewall, so what are our goals here?
- DROP everything except:
- HTTP/S and DNS on Wireguard interface
- Ping on all interfaces
- SSH on Wireguard interface only (later, since SSH is our only access to the VPS and breaking it would cause immense headache)
I am using very powerful iptables with iptables-restore utility to write my rules to a config file instead to the command line. The config file is located in /etc/iptables/rules.v4 (may be different in your case).
Open the file and edit it. Everything will be explained in the following code block behind #. For easier reading, I have divided it into parts:
Setup the 3 main chains – INPUT, OUTPUT and FORWARD. It is recommended to always set INPUT as implicit DENY and only whitelist approved services and ports.
*filter
# CONFIGURE INPUT, OUTPUT AND FORWARD CHAINS
# Drop forwarded traffic, we don't need that since we are not acting as a router
:FORWARD DROP [0:0]
# Accept all outgoing connections
:OUTPUT ACCEPT [0:0]
# Block all incoming traffic (default DENY)
:INPUT DROP [0:0]When everything is blocked by default, these rules have to exist to allow communication on localhost and any established connections (when you initiace connection from the server)
# BASIC RULES FOR THINGS TO WORK WITH DEFAULT DENY ON INPUT CHAIN
# Do not block localhost traffic to itself
-A INPUT -i lo -j ACCEPT
# Allow established and related incoming connections
-A INPUT -m conntrack --ctstate ESTABLISHED,RELATED -j ACCEPTRules to allow devices within the Wireguard tunnel to access web services (ports 80 and 443) + 53 for DNS.
# WIREGUARD INTERFACE CONFIG
# Allow web traffic for my search engine (only on the Wireguard interface)
-A INPUT -p tcp -m tcp --dport 80 -i wg0 -j ACCEPT
-A INPUT -p tcp -m tcp --dport 443 -i wg0 -j ACCEPT
# Allow DNS queries on the Wireguard interface
-A INPUT -p udp -m udp --dport 53 -i wg0 -j ACCEPTRules for the public IP of the server. The only thing that needs to be open is the Wireguard port. You can also configure the server to accept ICMP ping requests for easier troubleshooting. Without this rule, the server won't be "pingable" even if it's up.
# PUBLIC IP RULES
# Allow ICMP pings on all interfaces (for easier troubleshooting)
-A INPUT -p icmp --icmp-type echo-request -j ACCEPT
# Allow Wireguard on the public IP
-A INPUT -p udp -m udp --dport 51895 -i eth0 -j ACCEPTSSH is the most critical service and therefore will still be available on all interface and I will move it to the Wireguard interface after testing.
# SSH
# Allow SSH on the port that it's running on
-A INPUT -p tcp -m tcp --dport 7985 -j ACCEPT
# Commit rules
COMMITThe entire config looks like this:
*filter
# CONFIGURE INPUT, OUTPUT AND FORWARD CHAINS
# Drop forwarded traffic, we don't need that since we are not acting as a router
:FORWARD DROP [0:0]
# Accept all outgoing connections
:OUTPUT ACCEPT [0:0]
# Block all incoming traffic (default DENY)
:INPUT DROP [0:0]
# BASIC RULES FOR THINGS TO WORK WITH DEFAULT DENY ON INPUT CHAIN
# Do not block localhost traffic to itself
-A INPUT -i lo -j ACCEPT
# Allow established and related incoming connections
-A INPUT -m conntrack --ctstate ESTABLISHED,RELATED -j ACCEPT
# WIREGUARD INTERFACE CONFIG
# Allow web traffic for my websites (only on the Wireguard interface)
-A INPUT -p tcp -m tcp --dport 80 -i wg0 -j ACCEPT
-A INPUT -p tcp -m tcp --dport 443 -i wg0 -j ACCEPT
# Allow DNS queries on the Wireguard interface
-A INPUT -p udp -m udp --dport 53 -i wg0 -j ACCEPT
# PUBLIC IP RULES
# Allow ICMP pings on all interfaces (for easier troubleshooting)
-A INPUT -p icmp --icmp-type echo-request -j ACCEPT
# Allow Wireguard on the public IP
-A INPUT -p udp -m udp --dport 51895 -j ACCEPT
# SSH
# Allow SSH on the port that it's running on
-A INPUT -p tcp -m tcp --dport 7985 -j ACCEPT
# Commit rules
COMMITApply the configuration with iptables-restore. First make sure all rules make sense to you.
$ sudo iptables-restore /etc/iptables/rules.v4List and check the rules (-n to not resolve DNS and -v for verbose output)
$ sudo iptables -L -nv
Chain INPUT (policy DROP 32 packets, 1941 bytes)
pkts bytes target prot opt in out source destination
0 0 ACCEPT all -- lo * 0.0.0.0/0 0.0.0.0/0
47 2876 ACCEPT all -- * * 0.0.0.0/0 0.0.0.0/0 ctstate RELATED,ESTABLISHED
0 0 ACCEPT tcp -- wg0 * 0.0.0.0/0 0.0.0.0/0 tcp dpt:80
0 0 ACCEPT tcp -- wg0 * 0.0.0.0/0 0.0.0.0/0 tcp dpt:443
0 0 ACCEPT udp -- wg0 * 0.0.0.0/0 0.0.0.0/0 udp dpt:53
2 168 ACCEPT icmp -- * * 0.0.0.0/0 0.0.0.0/0 icmptype 8
0 0 ACCEPT udp -- * * 0.0.0.0/0 0.0.0.0/0 udp dpt:51895
0 0 ACCEPT tcp -- * * 0.0.0.0/0 0.0.0.0/0 tcp dpt:7985
Chain FORWARD (policy DROP 0 packets, 0 bytes)
pkts bytes target prot opt in out source destination
Chain OUTPUT (policy ACCEPT 34 packets, 5056 bytes)
pkts bytes target prot opt in out source destinationEnable Wireguard on startup
If we are going to move SSH into the Wireguard tunnel only, we need to make sure that the interface is active even (or especially) after the server restarts. For that, we need to enable Wireguard with systemd (or other init service). Fortunately it's pretty easy.
$ sudo systemctl enable wg-quick@wg0.service
$ sudo systemctl daemon-reload
$ sudo wg-quick down wg0
$ sudo systemctl start wg-quick@wg0It's time to test all of our efforts – reboot the server and hope all configuration stays correct afterwards. I like to do this, even though it's not neccessary, to save myself from unnecessary headaches when the server unexpectedly restarts and it turns out that the configuration wouldn't survive a schedules restart anyway.
Troubleshooting post-reboot
First thing I noticed is that Nginx was unable to start. Wireguard interface started up fine, but the webserver didn't, even after manual service restart. Turns out Apache2 was starting as a service and occupying port 80. I am too scared to completely purge Apache2 from the system, so I will just stop and disable the service.
$ sudo systemctl stop apache2
$ sudo systemctl disable apache2Time for another reboot. This time, Nginx failed to start again, but manual restart of the serviced fixed it. This leads me to the idea, that Nginx is trying to start sooner than Wireguard and is unable to bind to the Wireguard interface, because it does not exist yet.
Edit the nginx.service systemd file to make sure it starts after Wireguard had already brought up the interface. You can either directly edit /lib/systemd/system/nginx.service file, but that is a bad practice, because the file is usually overwritten with updates. The correct way to do this should be use sudo systemctl edit --full nginx.service. Add wg-quick@wg0.service to the line end of the line with After= and add a new line Requires=wg-quick@wg0.service before the previous one.
After another reboot, Nginx started on its own successfully. List systemd services to check if there are any other issues.
$ systemctl list-units --type=service
UNIT LOAD ACTIVE SUB DESCRIPTION
console-getty.service loaded active running Console Getty
dbus.service loaded active running D-Bus System Message Bus
● dnsmasq.service loaded failed failed dnsmasq - A lightweight DHCP and caching DNS server
filtron.service loaded active running filtron
ifupdown-pre.service loaded active exited Helper to synchronize boot up for ifupdown
networking.service loaded active exited Raise network interfaces
nginx.service loaded active running nginx - high performance web server
ssh.service loaded active running OpenBSD Secure Shell server
systemd-journal-flush.service loaded active exited Flush Journal to Persistent Storage
systemd-journald.service loaded active running Journal Service
systemd-logind.service loaded active running User Login Management
systemd-modules-load.service loaded active exited Load Kernel Modules
systemd-networkd.service loaded active running Network Service
systemd-remount-fs.service loaded active exited Remount Root and Kernel File Systems
systemd-resolved.service loaded active running Network Name Resolution
systemd-sysctl.service loaded active exited Apply Kernel Variables
systemd-sysusers.service loaded active exited Create System Users
systemd-tmpfiles-setup-dev.service loaded active exited Create Static Device Nodes in /dev
systemd-tmpfiles-setup.service loaded active exited Create Volatile Files and Directories
● systemd-udev-trigger.service loaded failed failed Coldplug All udev Devices
systemd-udevd.service loaded active running Rule-based Manager for Device Events and Files
systemd-update-utmp.service loaded active exited Update UTMP about System Boot/Shutdown
systemd-user-sessions.service loaded active exited Permit User Sessions
user-runtime-dir@1000.service loaded active exited User Runtime Directory /run/user/1000
user@1000.service loaded active running User Manager for UID 1000
uwsgi.service loaded active running LSB: Start/stop uWSGI server instance(s)
wg-quick@wg0.service loaded active exited WireGuard via wg-quick(8) for wg0
whoogle.service loaded active running Whoogle
LOAD = Reflects whether the unit definition was properly loaded.
ACTIVE = The high-level unit activation state, i.e. generalization of SUB.
SUB = The low-level unit activation state, values depend on unit type.
28 loaded units listed. Pass --all to see loaded but inactive units, too.
To show all installed unit files use 'systemctl list-unit-files'.It seems that dnsmasq also failed to start and I assume it was due to the same issue. Edit dnsmasq with systemd again:
$ sudo systemctl edit --full dnsmasq.serviceBoth lines Requires and After already exist, so just add wg-quick@wg0.service on each of these line:
[Unit]
Description=dnsmasq - A lightweight DHCP and caching DNS server
Requires=network.target wg-quick@wg0.service
Wants=nss-lookup.target
Before=nss-lookup.target
After=network.target wg-quick@wg0.serviceThis howerver, creates a paradox. DNSmasq requires wg-quick and starts after wg-quick, but also before nss-lookup.target
Now examine wg-quick (systemctl cat wg-quick@wg0)
...
After=network-online.target nss-lookup.target
Wants=network-online.target nss-lookup.target
...According to this configuraion – wg-quick starts after nss-lookup.target when DNSmasq has to start before nss-lookup.target, while also starting after wg-quick, which has to start after nss-lookup.target......and we got a loop. My solution to this is to simply comment out the DNSmasq dependency of starting before nss-lookup.target.
$ sudo systemctl edit --full dnsmasq.service[Unit]
Description=dnsmasq - A lightweight DHCP and caching DNS server
Requires=network.target wg-quick@wg0.service
Wants=nss-lookup.target
# Before=nss-lookup.target
After=network.target wg-quick@wg0.serviceThis shouldn't break anything. Here's a sidenote about what nss-lookup.target even is:
A target that should be used as synchronization point for all host/network name service lookups. Note that this is independent of UNIX user/group name lookups for which nss-user-lookup.target should be used. All services for which the availability of full host/network name resolution is essential should be ordered after this target, but not pull it in. systemd automatically adds dependencies of type After= for this target unit to all SysV init script service units with an LSB header referring to the "$named" facility.
The only thing that's left is to restore iptables at boot according to the config.
Setup iptables-persistent
There are multiple ways to make iptables rules persist accross reboots, but this seems to be the prefered way.
Install iptables-persistent. It will ask you to save the current configuration to a file. We already have a config file present and this would only overwrite our file, so say no.
$ sudo apt install iptables-persistent
Reading package lists... Done
Building dependency tree... Done
Reading state information... Done
The following additional packages will be installed:
netfilter-persistent
The following NEW packages will be installed:
iptables-persistent netfilter-persistent
0 upgraded, 2 newly installed, 0 to remove and 0 not upgraded.
Need to get 23.4 kB of archives.
After this operation, 91.1 kB of additional disk space will be used.
Do you want to continue? [Y/n] yTry rebooting and checking with sudo iptables -L -nv if the rules have been applied.
Migrate SSH to Wireguard interface
Notice that I am running SSH on a non-standard port. The default is 22 and is often changed to reduce the number of bots spamming it on public servers. When running over VPN, it is safe to return back to the default 22 for simpler configuration.
Configure SSH on all interfaces
Currently my iptables firewall accepts SSH traffic on all interfaces on the correct port. SSH server configuration resides in /etc/ssh/ssdh_config. In this file ListenAddress is currently pointed to the public IP only. To bind both the public and Wireguard IP, replace the old value of ListenAddress with 0.0.0.0 and restart the service (your SSH connection won't be droped)
....
Port 7985
#AddressFamily any,inet
ListenAddress 0.0.0.0
#ListenAddress ::
....$ sudo systemctl restart sshd$ systemctl status sshd
sudo systemctl status sshd
● ssh.service - OpenBSD Secure Shell server
Loaded: loaded (/lib/systemd/system/ssh.service; enabled; vendor preset: enabled)
Active: active (running) since Tue 2021-09-21 20:02:01 CEST; 4s ago
Docs: man:sshd(8)
man:sshd_config(5)
Process: 3503 ExecStartPre=/usr/sbin/sshd -t (code=exited, status=0/SUCCESS)
Main PID: 3504 (sshd)
CPU: 55ms
CGroup: /system.slice/ssh.service
└─3504 sshd: /usr/sbin/sshd -D [listener] 0 of 10-100 startups
Sep 21 20:02:00 hostname systemd[1]: ssh.service: Succeeded.
Sep 21 20:02:00 hostname systemd[1]: Stopped OpenBSD Secure Shell server.
Sep 21 20:02:00 hostname systemd[1]: Starting OpenBSD Secure Shell server...
Sep 21 20:02:01 hostname sshd[3504]: Server listening on 0.0.0.0 port 7985.
Sep 21 20:02:01 hostname systemd[1]: Started OpenBSD Secure Shell server.Connect SSH using the Wireguard server IP
Open another terminal windows on the machine that you use to connect to the server (Windows clients in my case):
> ssh username@10.20.20.1 -p 7985It will give you the classic warning about unknown ECDSA fingerprint, type yes to procceed.
The authenticity of host '[10.20.20.1]:7985 ([10.20.20.1]:7985)' can't be established.
ECDSA key fingerprint is SHA256:&UIhigdanUYdfs/wF56atgafd851jL4w9uT564sg6133.
Are you sure you want to continue connecting (yes/no/[fingerprint])? yes
Warning: Permanently added '[10.20.20.1]:7985' (ECDSA) to the list of known hosts.Voila...you should be in. Before binding SSH to the Wireguard interface only, edit SSHd service to start after wg-quick. Currently, SSHd doesn't care if wg-quick already started or not and might try to bind to an interface that doesn't exist yet. See the config now:
$ sudo systemctl cat sshd
[Unit]
Description=OpenBSD Secure Shell server
Documentation=man:sshd(8) man:sshd_config(5)
After=network.target auditd.service
ConditionPathExists=!/etc/ssh/sshd_not_to_be_run
[Service]
EnvironmentFile=-/etc/default/ssh
ExecStartPre=/usr/sbin/sshd -t
ExecStart=/usr/sbin/sshd -D $SSHD_OPTS
ExecReload=/usr/sbin/sshd -t
ExecReload=/bin/kill -HUP $MAINPID
KillMode=process
Restart=on-failure
RestartPreventExitStatus=255
Type=notify
RuntimeDirectory=sshd
RuntimeDirectoryMode=0755
[Install]
WantedBy=multi-user.target
Alias=sshd.serviceEdit the config like this: (changes on the Requires and After line)
$ sudo systemctl edit --full sshd
[Unit]
Description=OpenBSD Secure Shell server
Documentation=man:sshd(8) man:sshd_config(5)
Requires=wg-quick@wg0.service
After=network.target auditd.service wg-quick@wg0.service
ConditionPathExists=!/etc/ssh/sshd_not_to_be_run
[Service]
EnvironmentFile=-/etc/default/ssh
ExecStartPre=/usr/sbin/sshd -t
ExecStart=/usr/sbin/sshd -D $SSHD_OPTS
ExecReload=/usr/sbin/sshd -t
ExecReload=/bin/kill -HUP $MAINPID
KillMode=process
Restart=on-failure
RestartPreventExitStatus=255
Type=notify
RuntimeDirectory=sshd
RuntimeDirectoryMode=0755
[Install]
WantedBy=multi-user.target
Alias=sshd.serviceReload systemctl daemon to make the new configuration active:
$ sudo systemctl daemon-reloadI am now going to reboot the server for the last time I hope to see whether all services started up in a correct order and everything works. Surprise, surprise – it does.
Limit SSH to the Wireguard interface only
Go back to the sshd config file in /etc/ssh/sshd_config and set the ListenAddress field to 10.20.20.1. Restart sshd to apply.
$ sudo systemctl restart sshdNotice sshd binding to the Wireguard interface.
$ systemctl status sshd
...
Sep 21 22:53:20 hostname sshd[301]: Server listening on 10.20.20.1 port 7985.
...Check netstat to confirm that everything is running on the Wireguard interface:
$sudo netstat -tulpn
Active Internet connections (only servers)
Proto Recv-Q Send-Q Local Address Foreign Address State PID/Program name
tcp 0 0 127.0.0.1:5000 0.0.0.0:* LISTEN 76/python3
tcp 0 0 10.20.20.1:7985 0.0.0.0:* LISTEN 301/sshd: /usr/sbin
tcp 0 0 10.20.20.1:80 0.0.0.0:* LISTEN 149/nginx: master p
tcp 0 0 127.0.0.53:53 0.0.0.0:* LISTEN 71/systemd-resolved
tcp 0 0 127.0.0.1:8888 0.0.0.0:* LISTEN 230/uwsgi
tcp 0 0 10.20.20.1:443 0.0.0.0:* LISTEN 149/nginx: master p
tcp 0 0 127.0.0.1:4004 0.0.0.0:* LISTEN 80/filtron
tcp 0 0 127.0.0.1:4005 0.0.0.0:* LISTEN 80/filtron
udp 0 0 127.0.0.53:53 0.0.0.0:* 71/systemd-resolved
udp 0 0 0.0.0.0:51895 0.0.0.0:* -
udp6 0 0 :::51895 :::* -Adjust iptables
Make a last slight change to the iptables configuration in /etc/iptables/rules.v4 by restricting SSH to the wg0 interface
Replace the line
-A INPUT -p tcp -m tcp --dport 7985 -j ACCEPTwith
-A INPUT -i wg0 -p tcp -m tcp --dport 7985 -j ACCEPTApply iptables using iptables-restore
$ sudo iptables-restore /etc/iptables/rules.v4This should be it. Turned out to be way more complicated than expected, but that's exactly how it usually works, but unexpected things occur :)
Recap what we have managed to do today:
- Setup Wireguard with 3 peers (Linux server, Windows and Android client)
- Setup web services and SSH on correct interfaces
- Setup a DNS server for our clients
- Adjust network firewall and make it persistent
Doesn't seems like a lot, though when you look through this entire article, it's clear that it took some serious research and troubleshooting (just like any other IT thing, right?).
SSH over VPN
SSH over Wireguard VPN
Managing servers on the public internet brings a lot of security threats with it. RDP is so bad it isn't recommended to even expose it to the public internet. With SSH, things are a bit more safe, but only after you perform a set of SSH hardening tasks, e.g.:
- Change default SSH port (security through obscurity, only helps reduce number of bots attempting to connect)
- Disable root login
- Disable password login, only use PubKey authentication
- Setup 2FA for SSH
- etc.
In order to add another layer of protection, you can setup VPN to protect your SSH connections (while leaving your website available to the public internet).
Having SSH over VPN shouldn't make you forget about the aforementioned SSH hardening steps. VPN is just one of them.
Wireguard Server setup
This guide uses Debian 11 as the server and Windows 10 as the client.
Install Wireguard on the server
Debian offers fairly outdated version of Wireguard in the official stable repository. At the time of writing, stable has 20210223, while testing has 20210424. You can check available version with apt.
$ apt-cache policy wireguardOutput:
wireguard:
Installed: (none)
Candidate: 1.0.20210223-1
Version table:
1.0.20210223-1 500
500 https://ftp.sh.cvut.cz/debian bullseye/main amd64 PackagesInstall from stable
You can decide if you want to use the stable or testing version. To install stable, simply type:
$ sudo apt install wireguardInstall from testing
To install from the testing repo, you have to perform the steps shown HERE. TLDR, add testing to /etc/apt/sources.list, adjust apt preferences in /etc/apt/preferences and update apt. Once you have enabled the testing repository with appropriate priorities, you can install Wireguard. To see if the preferences are set properly, try to see what apt would install. By default, everything should be installed from stable, unless specified otherwise.
$ apt-cache policy wireguardCandidate line shows what would be installed.
wireguard:
Installed: (none)
Candidate: 1.0.20210223-1
Version table:
1.0.20210424-1 -10
-10 http://deb.debian.org/debian testing/main amd64 Packages
1.0.20210223-1 900
900 https://ftp.sh.cvut.cz/debian stable/main amd64 PackagesNow specify that you want to install from testing:
$ apt-cache policy -t testing wireguardCandidate should now point to the newer version:
wireguard:
Installed: (none)
Candidate: 1.0.20210424-1
Version table:
1.0.20210424-1 990
990 http://deb.debian.org/debian testing/main amd64 Packages
1.0.20210223-1 900
900 https://ftp.sh.cvut.cz/debian stable/main amd64 PackagesFinally, to install from testing (-t to specify repository to install from), type this:
$ sudo apt install -t testing wireguardGenerate keys
Regardless of the version you have installed, it's time to create the configuration, directories and keys. We will be working in a restricted directory (only readable by root), so elevate the shell:
$ sudo su
(root)$Create directories
We need some place to store our public, private and preshared keys. All of these should be located in /etc/wireguard directory and only readable by root. The directory structure itself is up to you, I prefer having directory keys in /etc/wireguard for server public and private key and psk directory for preshared keys.
Set umask to 077 to create files and directories only readable by root:
(root)$ umask 077Create the aforementioned directories in /etc/wireguard:
(root)$ mkdir keys pskGenerate server keys
(root)$ cd keys
(root)$ wg genkey | tee wg0_private.key | wg pubkey > wg0_public.key
The wg genkey command generates a random private key in base64 and prints it to standard output (terminal). The output is instead redirected to tee, which both prints it to stdout (terminal), but also saves it into a file wg0_private.key. The private key printed to stdout is then piped (| symbol) to wg pubkey, which calculates the public key and prints it in base64 to stdout from a corresponding private key (the one we redirected to it with the pipe), lastly redirect the public key from stdout to a file wg0_public.key
You will now have two files in /etc/wireguard directory. One containing public, the other private key.
wg0_private.key wg0_public.keyCreate server configuration
Still under umask 077 and in the root shell, create a config file in /etc/wireguard directory. The name of the file will be used as the name of the interface.
(root)$ touch wg0.confReplace server_private_key with the private key of your server (content of wg0_private.key in /etc/wireguard/keys). ListenPort is the port you want Wireguard to listen on and Address specifies the subnet for the Wireguard tunnel. I chose /29 due to small subnet size, because more hosts aren't necessary.
[Interface]
Address = 10.20.20.1/29
ListenPort = 51895
PrivateKey = server_private_keyClient Wireguard setup
Download and install Wireguard
Download the Windows Installer from the official Wireguard website.
Run the wireguard-installer.exe and after a few moments, this window should appear:
Click the arrow next to Add Tunnel and select Add empty tunnel...
Wireguard will automatically generate a private and public key for this client.
*note: all keys shown will be destroyed afterwards and are only used for demonstration purposes
Configure the client
Under the PrivateKey line, add Address, which will be the address of the Wireguard client within the Wireguard tunnel.
[Interface]
PrivateKey = private_key
Address = 10.20.20.2/29Even though I am refering to the server as Wireguard server and my management station as the client, the truth is Wireguard doesn't care about that. In it's eyes, both are on the same level and there's no difference between them, they are both peers.
To configure the server, add [Peer] block to the client config.
[Peer]
PublicKey = server_public_key
AllowedIPs = 10.20.20.1/32
Endpoint = publicIP:portPublicKey– Copy the content of/etc/wireguard/wg0_public.keyto this lineAllowedIPs– IP of the server within the tunnel, use/32to allow only the server and not the whole subnetEndpoint– Public IP of the server and port where Wireguard is running (same asListenPortin the serverwg0.conf)
The entire client config should now look like this:
[Interface]
PrivateKey = private_key
Address = 10.20.20.2/29
[Peer]
PublicKey = server_public_key
AllowedIPs = 10.20.20.1/32
Endpoint = publicIP:portAdd client to the server configuration
To finish setting up the tunnel, add the client's public key and IP address to the wg0.conf in /etc/wireguard.
[Peer]
PublicKey = public_key_from_client
AllowedIPs = 10.20.20.2/32You have to copy the public key from the client to the server config. Make sure you don't switch up the public and private keys. Always copy the public key only! The private key should never leave the device it was created on.
wg0.conf will look something like this right now:
[Interface]
Address = 10.20.20.1/29
ListenPort = 51895
PrivateKey = server_private_key
[Peer]
PublicKey = public_key_from_client
AllowedIPs = 10.20.20.2/32Restart interface to refresh config
After editing wg0.conf, always run wg-quick to restart the interface, otherwise the changes to the configuration won't propagate.
$ sudo wg-quick down wg0

[#] ip link delete dev wg0
$ sudo wg-quick up wg0
[#] ip link add wg0 type wireguard
[#] wg setconf wg0 /dev/fd/63
[#] ip -4 address add 10.20.20.1/29 dev wg0
[#] ip link set mtu 1420 up dev wg0The tunnel should be now set up. Try pinging the server from the client. If it isn't working, make sure firewall like iptables isn't blocking the communication and you have ICMP enabled.
(Optional) Secure with Preshared keys
To add additional level of security, you can generate prehared keys for the client, which act as a shared secret and provide another layers of cryptographical security.
Generate Preshared keys
(root)$ cd /etc/wireguard/psk
(root)$ umask 077
(root)$ wg genpsk > windows10_client.pskAdd to server config
Open wg0.conf and add PresharedKey to the [Peer] block for the client:
[Peer]
PublicKey = public_key_from_client
PresharedKey = preshared_key
AllowedIPs = 10.20.20.2/32Add to client config
[Interface]
PrivateKey = private_key
Address = 10.20.20.2/29
[Peer]
PublicKey = server_public_key
PresharedKey = preshared_key
AllowedIPs = 10.20.20.1/32
Endpoint = publicIP:portMove SSH to Wireguard interface
Test connection over Wireguard
Right now, SSH is listening on 0.0.0.0 which means all available interfaces. This means it should be listening on the Wireguard interface as well. Try connecting over the Wireguard IP.
> ssh user@10.20.20.1 -p SSHportThe authenticity of host '[10.20.20.1]:port ([10.20.20.1]:port)' can't be established.
ECDSA key fingerprint is SHA256:fJOIGJoidhifdshug543fhsdof8h43hfo4.
Are you sure you want to continue connecting (yes/no/[fingerprint])? yes
Warning: Permanently added '[10.20.20.1]:port' (ECDSA) to the list of known hosts.Bind SSH to Wireguard interface
Open /etc/ssh/sshd_config and set ListenAddress to the IP address of the Wireguard interface (wg0).
$ ip a
...
 wg0: <POINTOPOINT,NOARP,UP,LOWER_UP> mtu 1420 qdisc noqueue state UNKNOWN group default qlen 1000
    link/none
    inet 10.20.20.1/29 scope global wg0
       valid_lft forever preferred_lft forever
$ sudo vi /etc/ssh/sshd_config/etc/ssh/sshd_config
ListenAddress 10.20.20.1Restart SSH and check:
$ sudo systemctl restart sshd

$ systemtl status sshd
...
Starting OpenBSD Secure Shell server...
Server listening on 10.20.20.1 port {ssh_port}.
Started OpenBSD Secure Shell server.
(Optional) Move Nginx to public IP only
The website (Nginx) is still listening on all interfaces on ports 80 and 443, but we only need it on the public IP, therefore:
- SSH on Wireguard IP ONLY
- Nginx on public IP ONLY
Open /etc/nginx/conf.d/name_of_your_config.conf and add the public IP of your server in front of port on the listen line. Both for 80 and 443.
server {
  listen 443 ssl;
to
server {
  listen publicIP:443 ssl;
Restart Nginx:
$ sudo systemctl restart nginxCheck with netstat that Nginx is listening on the correct IP:
$ sudo netstat -tulpn
...
tcp        0      0 publicIP:80          0.0.0.0:*               LISTEN      27870/nginx: master
tcp        0      0 publicIP:443         0.0.0.0:*               LISTEN      27870/nginx: master
Firewall setup
Wireguard tunnel is now fully established, SSH listens on the Wireguard interface, Nginx on the public IP. Let's adjust the firewall (iptables). I use iptables-restore in combination with a configuration file in /etc/iptables/rules.v4. The file should look like this, explaining what each of the lines is for is out of the scope of this guide, brief comment can be found on each line:
*filter

# Drop forwarded traffic, we don't need that since we are not acting as a router
:FORWARD DROP [0:0]

# Accept all outgoing connection now, later it will be restricted
:OUTPUT ACCEPT [0:0]

# Block all incoming traffic
:INPUT DROP [0:0]

# Do not block localhost
-A INPUT -i lo -j ACCEPT

# Allow established and related incoming connections
-A INPUT -m conntrack --ctstate ESTABLISHED,RELATED -j ACCEPT

# Allow SSH on the port that it's running on
-A INPUT -i wg0 -p tcp -m tcp --dport SSH_PORT -j ACCEPT

# Allow web traffic
-A INPUT -i eth0 -p tcp -m tcp --dport 80 -j ACCEPT
-A INPUT -i eth0 -p tcp -m tcp --dport 443 -j ACCEPT

# Allow Wireguard on public IP
-A INPUT -p udp -m udp --dport WIREGUARD_PORT -j ACCEPT

# Allow ping on all interfaces
-A INPUT -p icmp -m icmp --icmp-type 8 -j ACCEPT

# Commit rules
COMMIT
Commit rules with iptables-restore:
$ sudo iptables-restore /etc/iptables/rules.v4That's it, you now have SSH secured inside of a VPN tunnel and the website is still accessible over the public internet.
Enable Wireguard on startup
Because we have limited SSH only to our VPN, we need it running all the time to access the server. In the current state, if the server restarts, Wireguard won't start up and we won't be able to connect.
Create wg0.service
I am running Debian where services are managed by systemd. Fortunately, we don't have to create a Unit file from scratch, just issue one command:
$ sudo systemctl enable wg-quick@wg0.serviceCreated symlink /etc/systemd/system/multi-user.target.wants/wg-quick@wg0.service → /lib/systemd/system/wg-quick@.service.Reload daemon service to apply changes:
$ sudo systemctl daemon-reloadMake sure Wireguard starts before SSH
If you had tried to reboot right now, you would find out that you cannot connect. That is because SSHd would most likely try to start before Wireguard interface is ready. This will fail, because it would try binding to an interface that doesn't exist yet. To fix this, we would need to edit the SSHd service Unit file:
$ sudo systemctl edit --full sshdOn the After line, add wg-quick@wg0.service to make sure SSHd starts after wg-quick@wg0.service.
After=network.target auditd.service wg-quick@wg0.serviceYou can also make another adjustment by adding the line Requires and specifying the wg0 virtual interface like this:
Requires=sys-devices-virtual-net-wg0.deviceRestart SSHd
$ sudo systemctl restart sshdThis will make sure SSHd starts after the Wireguard interface is ready.
If you have iptables as your firewall, make sure the rules are applied after startup, research iptables-persistent to learn more.
Wireguard OpenBSD client
In this post, I will be installing Wireguard on my OpenBSD laptop to be able to connect to my personal services over a secure tunnel.
OpenBSD client setup
Install Wireguard
Wireguard tools are officially included in the OpenBSD repository, but are usually a bit outdated. To install them, type:
$ doas pkg_add wireguard-toolsAs usual, OpenBSD provides excellent documentation about Wireguard (man wg), use it if necessary.
Prepare directories
1. Switch to root so you don't have to type doas over and over again, also the config directory will only be readable by root.
$ doas su2. Set umask to 077 to allow rw access to root only.
(root)$ umask 0773. Create the config folder and its subdirectories.
(root)$ mkdir /etc/wireguard/{keys,psk}Generate keys
1. Move to the keys directory and generate client's public and private key. You will put the public key to the server config later, private key will never leave the device.
(root)$ cd /etc/wireguard/keys
(root)$ wg genkey | tee wg0_private.key | wg pubkey > wg0_public.key
The wg genkey command generates a random private key in base64 and prints it to standard output (terminal). The output is instead redirected to tee, which both prints it to stdout (terminal), but also saves it into a file wg0_private.key. The private key printed to stdout is then piped (| symbol) to wg pubkey, which calculates the public key and prints it in base64 to stdout from a corresponding private key (the one we redirected to it with the pipe), lastly redirect the public key from stdout to a file wg0_public.key
You will now have two files in /etc/wireguard directory. One containing public, the other private key.
wg0_private.key wg0_public.keywg0.conf) in /etc/wireguard. Make sure you still have umask set to 077.(root)$ touch wg0.conf3. Open the file and make it look like this. Replace IPs with the ones you are planning to use. [Peer] section specifies the server's part of config. AllowedIPs should point to the interal IP of the server within the Wireguard tunnel. PublicKey should contain the servers public key. PresharedKey will be generated on the server in a moment. Actually, you can generate this key on the client and then copy it to the server or vice versa, it's up to you. Either way, because it's a shared secret, it has to be present in both configuration files – on the server and the client.
[Interface]
PrivateKey = GeneratedPrivateKey_from_wg0_private.key
Address = 10.20.20.5/29

[Peer]
PublicKey =
PresharedKey =
AllowedIPs = 10.20.20.1/32
Endpoint = publicIP:port
Server setup
We assume that the server is already set up and we are just adding a new client. For a guide how to setup a server, head over here.
1. Go to /etc/wireguard/psk and generate the preshared key. Ideally, switch to 077 umask again.
(root)$ cd /etc/wireguard/psk
(root)$ wg genpsk > openbsd_client.psk
2. Add the following [Peer] block to the server wg0.conf. Replace PublicKey with the client public key (wg0_public.key). Copy the generated preshared key from openbsd_client.psk to PresharedKey in both the server and client config.
[Peer]
PublicKey =
PresharedKey =
AllowedIPs = 10.20.20.5/32
Start the Wireguard interface
1. Go back to the OpenBSD client and bring up the Wireguard interface manually:
$ doas wg-quick up wg02. Now check ifconfig and confirm connectivity to the server.
Start Wireguard on boot
In order to start Wireguard automatially after boot you need to create a rc.d service script that allows you to not only start the service on boot, but also start and stop it on demand.
On OpenBSD the systems daemon configuration database is located in rc.conf and rc.conf.local file.
It is recommended to leave rc.conf untouched and instead create and edit a new rc.conf.local file.
Create script
IMPORTANT! The following scripts were made by Mark Vainomaa <mikroskeem@mikroskeem.eu>, not me. The original script can be found here.
1. Open /etc/rc.conf.local file and add a new line containing wg_quick_flags=wg0 – wg0 is the name of the interface.
rc.conf.local
apmd_flags=-A
sshd_flags=NO
xenodm_flags=
wg_quick_flags=wg0
2. Create new file wg_quick in /etc/rc.d. Paste the following script to it. It has a few comments to make it easier to understand.
wg_quick
#!/bin/ksh
#
# Author: Mark Vainomaa <mikroskeem@mikroskeem.eu>

daemon="/usr/local/bin/wg-quick"

rc_reload=NO

. /etc/rc.d/rc.subr

pexp_wg="^/usr/local/bin/bash ${daemon} up ${daemon_flags}"
pexp_route="route -n monitor"

rc_check() {
    # Check the pid of wg-quick script whose parent is init
    pid="$(pgrep -P 1 -f "${pexp_wg}")"
    if [ -z "${pid}" ]; then
        return 1
    fi

    # Check for a stale wg-quick script process handling
    # only `route -n monitor`
    if [ ! -z "$(pgrep -P "${pid}" -f "${pexp_route}")" ]; then
        # TODO: uh-oh, stale wg-quick & route monitor; what should we do?
        return 1
    fi

    return 0
}

rc_start() {
    ${daemon} up ${daemon_flags}
}

rc_stop() {
    ${daemon} down ${daemon_flags}

    # TODO: remove this when wg-quick gets fixed
    #       this is here to kill 'route -n monitor' which
    #       keeps wg_quick rc script blocked on this function
    pid="$(pgrep -P 1 -f "${pexp_wg}")"
    pid2="$(pgrep -P "${pid}" -f "${pexp_wg}")"
    rpid="$(pgrep -P "${pid2}" -f "${pexp_route}")"

    # Get rid of the stale `route -n monitor' process
    if [ ! -z "${rpid}" ] && kill -0 "${rpid}"; then
        kill -15 "${rpid}"
    fi
}

rc_pre() {
    # Error out if flags are empty
    if [ -z "${daemon_flags}" ]; then
        echo "ERROR: daemon flags cannot be empty and must contain WireGuard tunnel configuration name!"
        return 1
    fi

    # Pass flags through basename so users couldn't do
    # something like `../../x' and other dumb stuff.
    configname="$(basename ${daemon_flags})"

    # Check if WireGuard's configuration file exists
    if [ ! -f "/etc/wireguard/${configname}.conf" ]; then
        echo "ERROR: file \`/etc/wireguard/${configname}.conf' does not exist!"
        return 1
    fi

    # Check if tunnel with given name is already running
    if [ -f "/var/run/wireguard/${configname}.name" ]; then
        echo "ERROR: tunnel \`${configname}' is already running!"
        return 1
    fi
}

rc_cmd $1
3. Adjust permissions to the script – set them to 555 (rx-rx-rx)
$ doas chmod 555 /etc/rc.d/wg_quickTest script
1. You can now test the script to see if it starts Wireguard.
$ doas rcctl start wg_quick
wg_quick(ok)
2. Also try to stop the service (one of the problems I ran into when I tried to simplify the script)
$ doas rcctl stop wg_quick
wg_quick(ok)
Keep in mind that Wireguard runs as root, therefore you need elevated privileges to start or stop the script.
Enable wg_quick
1. To make Wireguard start on boot, enable the service script we have just created.
$ doas rcctl enable wg_quick2. Check that wg_quick is actually enabled.
$ rcctl ls on
cron
...
wg_quick
xenodm
...
That's it, now reboot your device to test if Wireguard starts and you are done.