Paperless-ngx
Paperless-ngx is a community-supported open-source document management system that transforms your physical documents into a searchable online archive so you can keep, well, less paper.
Install Paperless-ngx on Debian 12 (bare-metal)
Paperless is a cool selfhosted application that allows you to manage your paper documents in a digital form. It provides OCR capabilities with automatic language detection (more on that later) and a bunch of other nice features. This guide walks you through the process on installing Paperless-ngx on a Debian 12 system. Before continuing, please note the following:
- Paperless-ngx has a Docker image avaiable for you to download. If you want to go the hassle-free way, choose this option
- The official documentation for bare-metal installation was written at the time when Buster was the latest release of Debian. Since that's not really up to date anymore, I decided to go through this process on Debian 12 to see if it still works or what changes are necessary to make it possible.
System preparation
This guide assumes that you have already installed a Debian 12 system on bare-metal or as a VM, so we won't go through the process here. You can checkout any article online as it's a fairly simple process.
Installation
Dependencies
First of all, we need to install a bunch of packages as dependencies for the Paperless-ngx application. Go for a cup of coffee while you run this, it's gonna take a few minutes.
- Install the following packages
sudo apt install python3 python3-pip python3-dev imagemagick fonts-liberation gnupg libpq-dev default-libmysqlclient-dev pkg-config libmagic-dev mime-support libzbar0 poppler-utils- Then get a few more for OCR
sudo apt install unpaper ghostscript icc-profiles-free qpdf liblept5 libxml2 pngquant zlib1g tesseract-ocr- If you are on Raspberry Pi, you are going to need
libatlas-base-devandlibxslt1-devas well.
Redis
You can install Redis from the official Debian repository, which will get you the version 7.0. Papereless requires anything newer than 6.0, so it's fine, howerver you can install a more recent 7.2 version through Redis repositories as per their official documentation. I decided to follow the Redis docs, so I'm going to be adding a new repo.
- First of all, install some basic prerequisites, which may already be on your system
sudo apt install lsb-release curl gpg- Add repository to apt using the following commands
curl -fsSL https://packages.redis.io/gpg | sudo gpg --dearmor -o /usr/share/keyrings/redis-archive-keyring.gpg
echo "deb [signed-by=/usr/share/keyrings/redis-archive-keyring.gpg] https://packages.redis.io/deb $(lsb_release -cs) main" | sudo tee /etc/apt/sources.list.d/redis.list- Then you just update your repos and install the latest stable redis
sudo apt update
sudo apt install redis
Configure Redis for systemd
For some reason, Redis doesn't automatically create a systemd service + there's a configuration option we need to change for it to work properly.
- Firstly, create a new file called
redis.servicein/etc/systemd/systemfolder using your favorite editor and paste the following contents into it:
[Unit]
Description=Redis
After=syslog.target

[Service]
ExecStart=/usr/bin/redis-server /etc/redis/redis.conf
RestartSec=5s
Restart=on-success

[Install]
WantedBy=multi-user.target
Make sure the binary /usr/bin/redis-server and config /etc/redis/redis.conf file for Redis exist on your system. Change them in the systemd unit file if necessary.
- Reload systemd daemons configuration
sudo systemctl daemon-reload- Before starting the service, you need to also edit the Redis configuration file, otherwise it will get stuck in a loop (which happened in my case)
- Open the
/etc/redis/redis.conffile and change the following options to look like thisdeamonize nosupervised systemd
################################# GENERAL #####################################

# By default Redis does not run as a daemon. Use 'yes' if you need it.
# Note that Redis will write a pid file in /var/run/redis.pid when daemonized.
# When Redis is supervised by upstart or systemd, this parameter has no impact.
daemonize no

# If you run Redis from upstart or systemd, Redis can interact with your
# supervision tree. Options:
#   supervised no      - no supervision interaction
#   supervised upstart - signal upstart by putting Redis into SIGSTOP mode
#                        requires "expect stop" in your upstart job config
#   supervised systemd - signal systemd by writing READY=1 to $NOTIFY_SOCKET
#                        on startup, and updating Redis status on a regular
#                        basis.
#   supervised auto    - detect upstart or systemd method based on
#                        UPSTART_JOB or NOTIFY_SOCKET environment variables
# Note: these supervision methods only signal "process is ready."
#       They do not enable continuous pings back to your supervisor.
#
# The default is "no". To run under upstart/systemd, you can simply uncomment
# the line below:
#
supervised systemd- After that, you can enable and start the service
sudo systemctl enable /etc/systemd/system/redis.service
sudo systemctl start /etc/systemd/system/redis.service
or
sudo systemctl enable /etc/systemd/system/redis.service --now- Please check if the service started properly and resolve any issues based on the output of the following command
sudo systemctl status /etc/systemd/system/redis.servicePostgreSQL database
Since Redis isn't an actual persistent database, we need something to store our data. By default, we can use the included SQLite database. For a more robust setup, it is advised to go for either PostgreSQL or MariaDB. We will go for PostgreSQL, since it's the preffered option.
- Install PostgreSQL from the official repo
sudo apt install postgresqlPaperless doesn't setup the database automatically in any way, so we need to prepare it ourselves. We are gonna create a database and user + password.
- Firstly, login to PostgreSQL - switch to postgres user and then run psql
sudo su postgres
postgres$ psql
psql (15.3 (Debian 15.3-0+deb12u1))
Type "help" for help.- When you are in, create a new database
postgres=# create database paperless;
CREATE DATABASE- Next up is the user, which paperless is going to use to connect to the database, replace
REDACTEDwith a secure password.
postgres=# create user paperless with encrypted password 'REDACTED';
CREATE ROLE- Lastly, grant all privileges to the Paperless user on the Paperless database
postgres=# grant all privileges on database paperless to paperless;
GRANT
Save the username and password somewhere safe, we will use it later.
Normally, this should be enough for everything to work properly, but for some reason, during the later steps, the application failed due to some error with the database, so I had to give the Paperless user a superuser permission on the database. This is something I would advise strongly against, however in this case, it's a standalone instance used only by Paperless, which can manage all data there anyway.
Similar issue has been mentioned on their Github here and resolved by temporarily assigning superuser permission to the Paperless user.
- List the current roles
postgres=# \du
                                   List of roles
 Role name |                         Attributes                         | Member of
-----------+------------------------------------------------------------+-----------
 paperless |                                                            | {}
postgres | Superuser, Create role, Create DB, Replication, Bypass RLS | {}- Add paperless to Superuser role
postgres=# alter user paperless with superuser;
ALTER ROLE- Check if the user is actually there
postgres=# \du
                                   List of roles
 Role name |                         Attributes                         | Member of
-----------+------------------------------------------------------------+-----------
 paperless | Superuser                                                  | {}
 postgres  | Superuser, Create role, Create DB, Replication, Bypass RLS | {}
Folders and user
Directories
Paperless will need a directory for files served by a web server + a place to save uploaded documents. I've chosen the following directories and disks. It is recommended to place the data directories to a drive that you can later expand.
- Web server directory -
/var/www/paperless/paperless-ngx/ - Media dir -
/data/paperless/media - Data dir -
/data/paperless/data - Consume dir -
/data/paperless/consume
If you want more convenience, you can setup a Samba share on the Consume directory, which is a place that Paperless watches for new documents to be "consumed" = added to Paperless. We won't go through the process here, since you can also upload trough web GUI, but there's a few guides online.
User
Paperless should run under a separate system user to increase security. You don't want to run these things as root, never.
- The following command will create the paperless user and set it's home directory to the web server root
adduser paperless --system --home /var/www/paperless --groupMake sure that all the directories above are readable and writable by the paperless user! /var/www/paperless should belong to the user as well.
- You can set the owner of the web server root directory like this
sudo chown -R paperless:paperless /var/www/paperless/Paperless binary
- Grab the latest release in .tar.xz format from the Releases page on Github and save it to your home directory using curl
curl -O -L https://github.com/paperless-ngx/paperless-ngx/releases/download/v1.17.1/paperless-ngx-v1.17.1.tar.xz- Extract the contents of the archive
tar -xvf paperless-ngx-v1.17.1.tar.xz- Copy the extracted folder to you web server root directory
sudo cp -r paperless-ngx /var/www/paperless/By doing this, you end up with /var/www/paperless as the home directory of the paperless user and /var/www/paperless/paperless-ngx as the actual web server root dir. You can play around with this yourself and choose your own folder structure.
Configure Paperless-ngx
There's a couple of configuration option we should check before continuing with the installation. The config file is named paperless.conf and is stored in /var/www/paperless/paperless-ngx.
By default, all configuration options are commented out and we have tu uncomment the ones we would like to edit. Pay special attention to the following options.
Required services
You have to specify these, otherwise it won't work
PAPERLESS_REDIS- Set this to the location where Redis is listening. Since we have Redis installed on the local system with the default port, you can useredis://localhost:6379PAPERLESS_DBHOST- Since we have PostgreSQL installed on the local system, uselocalhostas the value.PAPERLESS_DBPORT- We are running the default port5432. You can check this using tools likenetstat.PAPERLESS_DBNAME- Name of the database we created in PostgreSQL -paperless.PAPERLESS_DBUSER- Username of the user with rights to DB, in our casepaperless.PAPERLESS_DBPASS- Password for the paperless DB user we have created earlier.PAPERLESS_DBSSLMODE- We haven't setup SSL/TLS so we can leave it atprefer
Paths and folders
You can point these at the folder we have setup earilier on a separate drive.
PAPERLESS_CONSUMPTION_DIR- This where your documents should go to be consumed -/data/paperless/consumePAPERLESS_DATA_DIR- This is where Paperless stores all its data -/data/paperless/dataPAPERLESS_MEDIA_ROOT- Place where documents and thumbnails are stored -/data/paperless/media
Security and hosting
PAPERLESS_SECRET_KEY- This should be a very long random key made out of letters, numbers and other characters as it's used for authentication. The default key is well known so CHANGE THIS.PAPERLESS_URL- This should point to your domain that you will use to access Paperless-ngx, e.g.https://paperless-ngx.mydomain.com
OCR settings
This is where you set you OCR languages. Paperless-ngx supports multiple languages at once, but sadly doesn't allow you to pick which to use in the web GUI, but so far the automatic detection worked pretty fine for me, even for documents with mixed languages.
PAPERLESS_OCR_LANGUAGES- You language/laguages as 3-letter codes from here separated by+- That would beces+engin my case.PAPERLESS_OCR_LANGUAGE- The same as above for some reason.
Please note that you have to install the corresponding tesseract-ocr packages selected here, e.g. apt-get install tesseract-ocr-ces
Software tweaks
PAPERLESS_TIME_ZONE- Set this to your timezone, otherwise you will get improper timestamps in the Paperless GUI. You can figure out the name of you timezone by runningtimedatectlon the system
user@server:/home/user# timedatectl
               Local time: Wed 2023-08-23 14:17:59 CEST
           Universal time: Wed 2023-08-23 12:17:59 UTC
                 RTC time: Wed 2023-08-23 12:18:01
                Time zone: Europe/Prague (CEST, +0200)
System clock synchronized: no
              NTP service: n/a
          RTC in local TZ: no
There's a lot more configuration options which we haven't talked about here. You can explore those in the official documentation.
Python packages
Paperless requires a lot of Python dependencies. This took me a while to troubleshoot since I was running into the following error:
sudo -Hu paperless pip3 install -r requirements.txt

error: externally-managed-environment

× This environment is externally managed
╰─> To install Python packages system-wide, try apt install
    python3-xyz, where xyz is the package you are trying to
    install.

    If you wish to install a non-Debian-packaged Python package,
    create a virtual environment using python3 -m venv path/to/venv.
    Then use path/to/venv/bin/python and path/to/venv/bin/pip. Make
    sure you have python3-full installed.

    If you wish to install a non-Debian packaged Python application,
    it may be easiest to use pipx install xyz, which will manage a
    virtual environment for you. Make sure you have pipx installed.

    See /usr/share/doc/python3.11/README.venv for more information.

note: If you believe this is a mistake, please contact your Python installation or OS distribution provider. You can override this, at the risk of breaking your Python installation or OS, by passing --break-system-packages.
hint: See PEP 668 for the detailed specification.
This was resolved by utilizing another python package that we have to install, which is python3-venv. It will allow us to create a virtual environment for pip to install python packages in. This is to avoid confict between python packages installed by apt and pip - something you don't want to run into.
sudo apt install python3-venvSetup Python virtual environment (venv)
- For this task, please switch to the paperless user. Since the user doesn't have a shell asigned, we have to specify
-s /bin/bashwhen running sudo.
sudo su paperless -s /bin/bash- Go to the Paperless web server directory and run the following. This will setup the virtual environment user
.venvfile in/var/www/paperless/paperless-ngx
python3 -m venv .venv- Still in the same directory, activate the venv
source .venv/bin/activateInstall Python packages
This is the part where you would normally run python3 -m pip install -r requirements.txt still in the .venv under paperless user, which will install all the Python packages specified in the requirements.txt file using pip. Unfortunately for us, the list of packages includes their versions, which are different in Python 3.11 (default on Debian 12). It's because Paperless clearly states Python 3.8 or 3.9 as a requirement in the docs.
What now? You can perhaps install the older version of Python from the repositories, but don't do that, just don't.
Thank fully, someone over at Github already complaned about this and someone else came up with a solution. This is an edited version of the requirements.txt file with updated versions of packages for Python 3.11.
-i https://pypi.python.org/simple
--extra-index-url https://www.piwheels.org/simple
amqp==5.1.1 ; python_version >= '3.6'
anyio==3.7.0 ; python_version >= '3.7'
asgiref==3.7.2 ; python_version >= '3.7'
async-timeout==4.0.2 ; python_full_version <= '4'
backports.zoneinfo==0.2.1 ; python_version < '3.9'
billiard==4.1.0 ; python_version >= '3.7'
bleach==6.0.0
brotli==1.0.9
celery[redis]==5.3.0
certifi==2023.5.7 ; python_version >= '3.6'
cffi==1.15.1
channels==4.0.0
channels-redis==4.1.0
charset-normalizer==3.1.0 ; python_full_version >= '3.7.0'
click==8.1.3 ; python_version >= '3.7'
click-didyoumean==0.3.0 ; python_full_version >= '3.6.2' and python_full_version < '4.0.0'
click-plugins==1.1.1
click-repl==0.2.0
coloredlogs==15.0.1 ; python_version >= '2.7' and python_version not in '3.0, 3.1, 3.2, 3.3, 3.4'
concurrent-log-handler==0.9.24
cryptography==40.0.1
dateparser==1.1.8
deprecation==2.1.0
django==4.1.9
django-celery-results==2.5.1
django-compression-middleware==0.5.0
django-cors-headers==4.0.0
django-extensions==3.2.3
django-filter==22.1
django-guardian==2.4.0
djangorestframework==3.14.0
djangorestframework-guardian==0.3.0
exceptiongroup==1.1.1 ; python_version < '4'
filelock==3.12.2
flower==1.2.0
gunicorn==20.1.0
h11==0.14.0 ; python_version >= '3.7'
hiredis==2.2.3
httpcore==0.17.2 ; python_version >= '3.7'
httptools==0.5.0
httpx==0.24.1
humanfriendly==10.0 ; python_version >= '2.7' and python_version not in '3.0, 3.1, 3.2, 3.3, 3.4'
humanize==4.6.0 ; python_version >= '3.7'
idna==3.4 ; python_version >= '3.5'
imap-tools==1.0.0
img2pdf==0.4.4
importlib-resources==5.12.0 ; python_version < '4'
inotify-simple==1.3.5 ; python_version >= '2.7' and python_version not in '3.0, 3.1, 3.2, 3.3'
inotifyrecursive==0.3.5
joblib==1.2.0 ; python_version >= '3.7'
kombu==5.3.0 ; python_version >= '3.8'
langdetect==1.0.9
lxml==4.9.2 ; python_version >= '2.7' and python_version not in '3.0, 3.1, 3.2, 3.3, 3.4'
msgpack==1.0.5
mysqlclient==2.1.1
nltk==3.8.1
numpy==1.24.3 ; python_version >= '3.8'
ocrmypdf==14.2.1
packaging==23.1 ; python_version >= '3.7'
pathvalidate==3.0.0
pdf2image==1.16.3
pdfminer.six==20221105 ; python_version >= '3.6'
pikepdf==7.2.0
pillow==9.5.0
pluggy==1.0.0 ; python_version >= '3.6'
portalocker==2.7.0 ; python_version >= '3.5'
prometheus-client==0.17.0 ; python_version >= '3.6'
prompt-toolkit==3.0.38 ; python_full_version >= '3.7.0'
psycopg2==2.9.6
pycparser==2.21
python-dateutil==2.8.2
python-dotenv==1.0.0
python-gnupg==0.5.0
python-ipware==0.9.0
python-magic==0.4.27
pytz==2023.3
pyyaml==6.0
pyzbar==0.1.9
rapidfuzz==3.1.1
redis[hiredis]==4.5.5
regex==2023.6.3 ; python_version >= '3.6'
reportlab==3.6.12
scikit-learn==1.2.2
scipy==1.10.1
setproctitle==1.3.2
setuptools==67.8.0 ; python_version >= '3.7'
six==1.16.0 ; python_version >= '2.7' and python_version not in '3.0, 3.1, 3.2, 3.3'
sniffio==1.3.0 ; python_version >= '3.7'
sqlparse==0.4.4 ; python_version >= '3.5'
threadpoolctl==3.1.0 ; python_version >= '3.6'
tika-client==0.2.0
tornado==6.3.2 ; python_version >= '3.8'
tqdm==4.65.0
typing-extensions==4.6.3 ; python_version < '4'
tzdata==2023.3 ; python_version >= '2'
tzlocal==5.0.1 ; python_version >= '3.7'
uvicorn[standard]==0.22.0
uvloop==0.17.0
vine==5.0.0 ; python_version >= '3.6'
watchdog==2.3.1
watchfiles==0.19.0
wcwidth==0.2.6
webencodings==0.5.1
websockets==11.0.3
whitenoise==6.4.0
whoosh==2.7.4
zipp==3.15.0 ; python_version < '4'
zstandard==0.21.0 ; python_version >= '3.7'
zxing-cpp==2.0.0 ; platform_machine == 'x86_64'- To proceed, replace the contents of the
requirements.txtfile in/var/www/paperless/paperless-ngxwith the list above. - Afterwards, return to the .venv as the paperless user and run this in the proper directory.
pip install -r requirements.txtYou can return to venv anytime by running source .venv/bin/activate as the Paperless user in the /var/www/paperless/paperless-ngx directory
Finish Paperless-ngx installation
- Still logged in as the paperless user in .venv go to folder
/var/www/paperless/paperless-ngx/srcand run the following command:
python3 manage.py migrate- This should look something like this:
Operations to perform:
  Apply all migrations: admin, auth, authtoken, contenttypes, django_celery_results, documents, guardian, paperless_mail, sessions
Running migrations:
  Applying contenttypes.0001_initial... OK
  Applying auth.0001_initial... OK
  Applying admin.0001_initial... OK
  Applying admin.0002_logentry_remove_auto_add... OK
  Applying admin.0003_logentry_add_action_flag_choices... OK
  Applying contenttypes.0002_remove_content_type_name... OK
.....- After everything finishes with OK, create the first superuser which we will use to log in
(.venv) paperless@server:~/paperless-ngx/src$ python3 manage.py createsuperuser
Username (leave blank to use 'paperless'): my-admin
Email address: my-admin@mydomain.com
Password:
Password (again):
Superuser created successfully.
Systemd services setup
Now that we have basically finished the installation, we still have nothing running. This is where the official documentation gets kinda rough and falls into "you can compile this random program to get his feature etc.". Fortunately, the basic systemd unit files are included in the scripts folder. Below are the same unit files, just edited to work with our current setup (different paths, .venv...)
paperless-consumer.service
[Unit]
Description=Paperless consumer
Requires=redis.service

[Service]
User=paperless
Group=paperless
WorkingDirectory=/var/www/paperless/paperless-ngx/src
ExecStart=/var/www/paperless/paperless-ngx/.venv/bin/python3 manage.py document_consumer

[Install]
WantedBy=multi-user.target
paperless-scheduler.service
[Unit]
Description=Paperless Celery Beat
Requires=redis.service

[Service]
User=paperless
Group=paperless
WorkingDirectory=/var/www/paperless/paperless-ngx/src
ExecStart=/var/www/paperless/paperless-ngx/.venv/bin/celery --app paperless beat --loglevel INFO

[Install]
WantedBy=multi-user.target
paperless-task-queue.service
[Unit]
Description=Paperless Celery Workers
Requires=redis.service

[Service]
User=paperless
Group=paperless
WorkingDirectory=/var/www/paperless/paperless-ngx/src
ExecStart=/var/www/paperless/paperless-ngx/.venv/bin/celery --app paperless worker --loglevel INFO

[Install]
WantedBy=multi-user.target
paperless-webserver.service
[Unit]
Description=Paperless webserver
After=network.target
Wants=network.target
Requires=redis.service
#Requires=paperless-webserver.socket

[Service]
User=paperless
Group=paperless
WorkingDirectory=/var/www/paperless/paperless-ngx/src
ExecStart=/var/www/paperless/paperless-ngx/.venv/bin/gunicorn -c /var/www/paperless/paperless-ngx/gunicorn.conf.py paperless.asgi:application

[Install]
WantedBy=multi-user.target
paperless-webserver.socket
[Unit]
Description=Paperless Webserver Socket

[Socket]
ListenStream=80
NoDelay=true

[Install]
WantedBy=sockets.target- Firstly, place these service files into the
/etc/systemd/systemdirectory, e.g.
sudo vim /etc/systemd/system/paperless-webserver.service- After you do this for each service above, run daemon reload
sudo systemctl daemon-reload- Start and enable each service by running
sudo systemctl enable nameoftheservice --now- Check status of each service and resolve any failed services (usually due to wrong paths and things like that, but these should work
sudo systemctl status nameoftheserviceNginx configuration
If you've done everything correctly so far, you should be able to reach the web GUI of Paperless on port 8000 in your web browser. You can also login using the superuser you create earlier.
The problem is that you are accessing a non-production gunicorn web server that should never be used standalone without a reverse proxy like nginx in front of it. We also need to enable TLS for secure communication which gunicorn allows, but advises against.
- Install nginx
sudo apt install nginx- Remove default websites and html
rm -rvf /var/www/html/
removed '/var/www/html/index.nginx-debian.html'
removed directory '/var/www/html/'

rm -rvf /etc/nginx/sites-enabled/*
removed '/etc/nginx/sites-enabled/default'

rm -rvf /etc/nginx/sites-available/*
removed '/etc/nginx/sites-available/default'- Generate and sign a TLS certificate (you can use Let's Encrypt, selfsigned or anything else) and place the cert and key into correct directories on the sytem
- Certificate -
/etc/ssl/certs/yourcert.crt - Key -
/etc/ssl/private/yourkey.key
- Certificate -
- Make sure the key is not readable by anyone other than root
sudo chmod 600 /etc/ssl/private/yourkey.key- Create a new nginx config file and paste in the following text
vim /etc/nginx/conf.d/paperless.confserver {
listen 80 default_server;
location / {
return 301 https://$host$request_uri;
}
}
server {
listen 443 ssl http2;
server_name paperless.mydomain.com;
location / {
# Adjust host and port as required.
proxy_pass http://localhost:8000/;
# These configuration options are required for WebSockets to work.
proxy_http_version 1.1;
proxy_set_header Upgrade $http_upgrade;
proxy_set_header Connection "upgrade";
proxy_redirect off;
proxy_set_header Host $host;
proxy_set_header X-Real-IP $remote_addr;
proxy_set_header X-Forwarded-For $proxy_add_x_forwarded_for;
proxy_set_header X-Forwarded-Host $server_name;
add_header Referrer-Policy "strict-origin-when-cross-origin";
}
ssl_certificate /etc/ssl/certs/yourcert.crt;
ssl_certificate_key /etc/ssl/private/yourkey.key;
ssl_session_timeout 1d;
ssl_session_cache shared:MozSSL:10m; # about 40000 sessions
ssl_session_tickets off;
# modern configuration
ssl_protocols TLSv1.3;
ssl_prefer_server_ciphers off;
# HSTS (ngx_http_headers_module is required) (63072000 seconds)
add_header Strict-Transport-Security "max-age=63072000" always;
client_max_body_size 100M;
}The configuration file above was generated using Mozzila's SSL Configuration Generator and merged with the official Paperless docs.
To explain it more precisely, here's the same configuration with comments
# This block redirects all traffic from port 80 to sercure port 443
server {
    listen 80 default_server;

    location / {
        return 301 https://$host$request_uri;
    }
}

server {
    listen 443 ssl http2;
    server_name paperless.mydomain.com; # Here's where you define your domain

    location / {

      # Adjust host and port as required.
      proxy_pass http://localhost:8000/; # This part passes all requests from Nginx to gunicorn running on the same system on port
                                         # 8000. This way, no user goes to gunicorn directly, but is secured by nginx in the front

      # These configuration options are required for WebSockets to work.
      proxy_http_version 1.1;
      proxy_set_header Upgrade $http_upgrade;
      proxy_set_header Connection "upgrade";

      proxy_redirect off;
      proxy_set_header Host $host;
      proxy_set_header X-Real-IP $remote_addr;
      proxy_set_header X-Forwarded-For $proxy_add_x_forwarded_for;
      proxy_set_header X-Forwarded-Host $server_name;
      add_header Referrer-Policy "strict-origin-when-cross-origin";
    }

    ssl_certificate /etc/ssl/certs/yourcert.crt; # Path to your TLS certificate
    ssl_certificate_key /etc/ssl/private/yourkey.key; # Path to your TLS certificate key
    ssl_session_timeout 1d;
    ssl_session_cache shared:MozSSL:10m;  # about 40000 sessions
    ssl_session_tickets off;

    # modern configuration
    ssl_protocols TLSv1.3;
    ssl_prefer_server_ciphers off;

    # HSTS (ngx_http_headers_module is required) (63072000 seconds)
    add_header Strict-Transport-Security "max-age=63072000" always;

    client_max_body_size 100M; # This allows you to upload documents up to 100MB in size. You can adjust this option to your liking
}- Now just check the configuration and reload nginx configuration
nginx -t
nginx: the configuration file /etc/nginx/nginx.conf syntax is ok
nginx: configuration file /etc/nginx/nginx.conf test is successful
systemctl reload nginxYou should be able to access Paperless using your domain name on standard HTTP/S ports.
Bind gunicorn to localhost
There's just one more little thing missing. If you try to access port 8000, you will still get directly to gunicorn skipping nginx. You want to avoid exposing this service since you have already setup nginx. To do this you can block port 8000 on your local firewall.
Proper way to do this, however, would be to change binding of gunicorn from the default 0.0.0.0 to 127.0.0.1.
0.0.0.0 means that it bind to all interfaces, but we only need it to bind to localhost (127.0.0.1) since all requests will be passed through nginx on the same machine.
- Edit the file
/var/www/paperless/paperless-ngx/gunicorn.conf.pyand replace[::]inPAPERLESS_BIND_ADDRwith127.0.0.1 - Before
import os

# See https://docs.gunicorn.org/en/stable/settings.html for
# explanations of settings

bind = f'{os.getenv("PAPERLESS_BIND_ADDR", "[::]")}:{os.getenv("PAPERLESS_PORT", 8000)}'

workers = int(os.getenv("PAPERLESS_WEBSERVER_WORKERS", 1))
worker_class = "paperless.workers.ConfigurableWorker"
timeout = 120- After
import os

# See https://docs.gunicorn.org/en/stable/settings.html for
# explanations of settings

bind = f'{os.getenv("PAPERLESS_BIND_ADDR", "[127.0.0.1]")}:{os.getenv("PAPERLESS_PORT", 8000)}'

workers = int(os.getenv("PAPERLESS_WEBSERVER_WORKERS", 1))
worker_class = "paperless.workers.ConfigurableWorker"
timeout = 120- Restart the webserver service
systemctl restart paperless-webserver.service- You should be able to see gunicorn listening at 127.0.0.1 only
root@server:# systemctl status paperless-webserver.service
● paperless-webserver.service - Paperless webserver
     Loaded: loaded (/etc/systemd/system/paperless-webserver.service; disabled; preset: enabled)
     Active: active (running) since Sun 2023-08-20 02:44:10 CEST; 2s ago
   Main PID: 1948 (gunicorn: maste)
      Tasks: 13 (limit: 4641)
     Memory: 84.7M
        CPU: 1.140s
     CGroup: /system.slice/paperless-webserver.service
             ├─1948 "gunicorn: master [paperless.asgi:application]"
             └─1965 "gunicorn: worker [paperless.asgi:application]"

Aug 20 02:44:10 server systemd[1]: Started paperless-webserver.service - Paperless webserver.
Aug 20 02:44:11 server gunicorn[1948]: [2023-08-20 02:44:11 +0200] [1948] [INFO] Starting gunicorn 20.1.0
Aug 20 02:44:11 server gunicorn[1948]: [2023-08-20 02:44:11 +0200] [1948] [INFO] Listening at: http://127.0.0.1:8000 (1948)
Aug 20 02:44:11 server gunicorn[1948]: [2023-08-20 02:44:11 +0200] [1948] [INFO] Using worker: paperless.workers.ConfigurableWorker
Aug 20 02:44:11 server1 gunicorn[1948]: [2023-08-20 02:44:11 +0200] [1948] [INFO] Server is ready. Spawning workers- We can also check by running netstat
root@server:# netstat -tulpn
Active Internet connections (only servers)
Proto Recv-Q Send-Q Local Address           Foreign Address         State       PID/Program name
tcp        0      0 127.0.0.1:8000          0.0.0.0:*               LISTEN      457/gunicorn: maste
Enjoy!
Paperless-ngx on Android (FOSS)
Paperless-ngx has a couple of community Android client applications for accessing your selfhosted Paperless-ngx instance. We will take a look at Paperless Mobile which is available on the IzzyOnDroid F-Droid Repository.
Installation
As mentioned above, you can install the application from F-Droid after adding the IzzyOnDroid repository. If you are using Neo Store, the repository should be available by default.

Preparation in Paperless-ngx
Decide which user you would like to use in the mobile app - most likely your main account where you store your documents.
It's necessary to check permissions of said user to make sure it will work with Paperless Mobile. There's specifically 2 permissions you have to grant to the user.
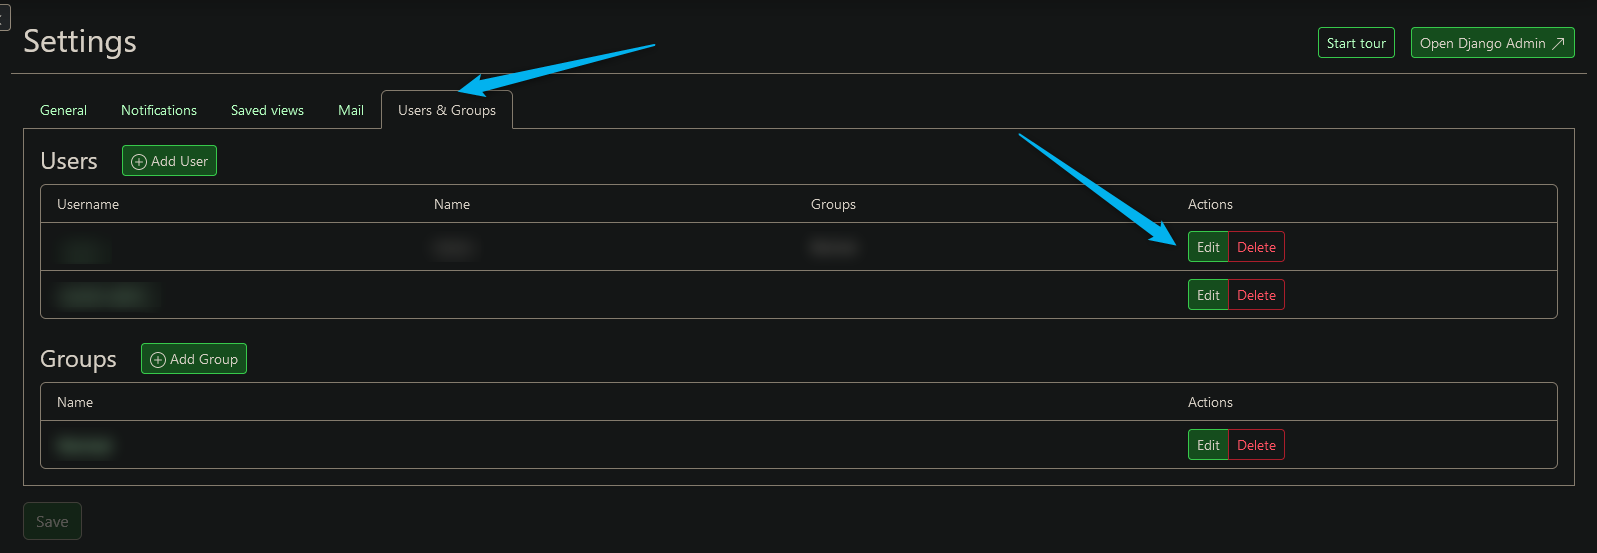
Login to your Paperless-ngx instance as an administrator through web interface and go to Settings.

Click on Users & Groups and select Edit on the user you will be using.
Make sure that the user has the following permissions. If not, grant them:
- UISettings: View
- User: View
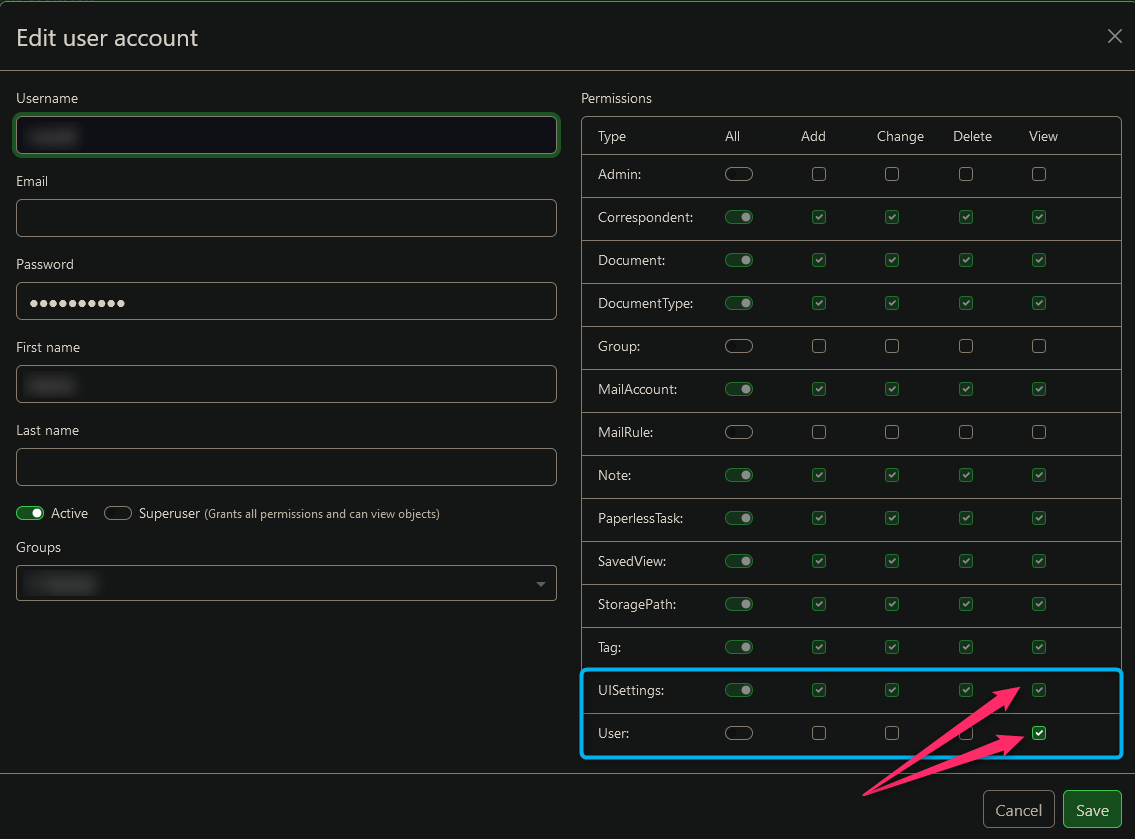
Click Save to apply the changes.
Setup in App
First of all, specify the address of your server. Depending on your setup, it could be an IP adress with a port, a domain name or any other HTTP or HTTPS endpoint. Even if you have a self-signed HTTPS certificate, it should not complain about it. You can also configure mTLS in case you want.
Don't be confused by the fact that the Sign In button is still grey even after you put in the server address - just press Enter on your Android keyboard and the app will try to connect to the server.
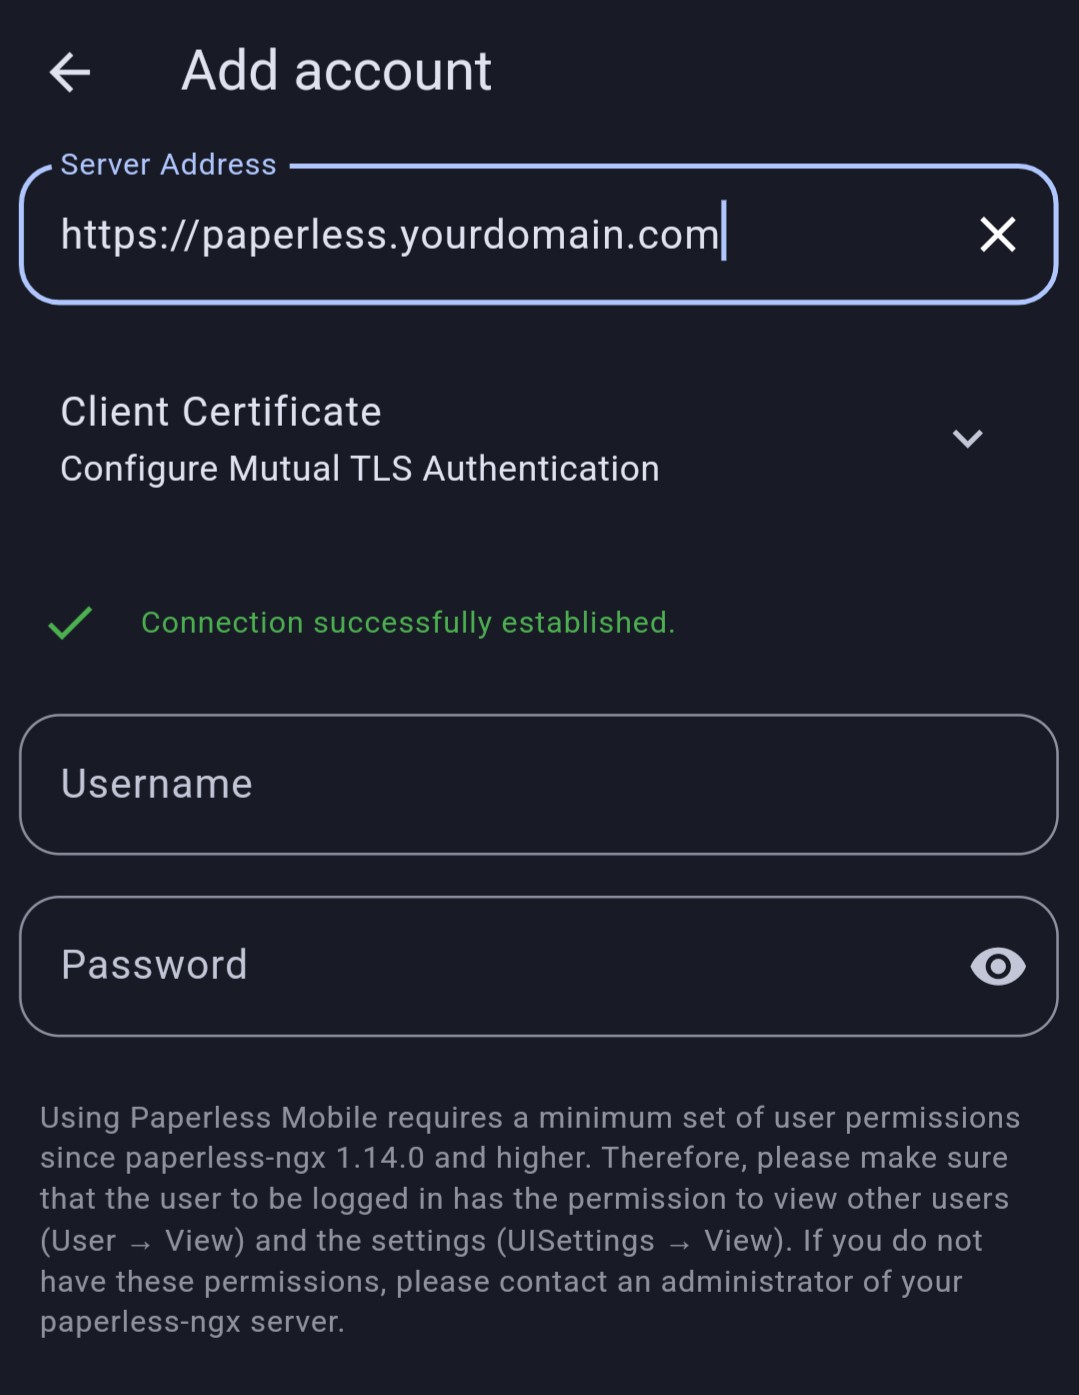
If you see a green text saying Connection successfully established. you are good to go. In case you get a timeout or other error, make sure you are connected to a network that can access your Paperless-ngx instance on the specified port (usually 80 or 443 or custom).
Now fill in the user credential and click Sign In.
If you have everything setup correctly, you will see your documents.