OpenBSD on a Laptop (Lenovo T500)
Place dedicated to my adventures with OpenBSD on my laptop.
Installation
Installing OpenBSD 6.9 on a laptop with encryption
Lately, I've been looking into some old laptops which I could spend my upcoming college years with. I wanted something cheap, but also good enough that I could use it for basic university related work. Of couse I could just buy a new low-end Windows laptop and be happy, but that would be a waste of money. Instead, I searched through used market for an old ThinkPad, T500 in particular. If you are a bit confused or haven't heard of Lenovo's ThinkPads and why they have a special place among many, I recommend you check out this guide. There are many newer models than the 2009's T500, however T500 seems to be the last "Librebootable" 15" ThinkPad. Flashing Libreboot is something I would love to do as well, but currently don't have the right tools to complete the process documented on the Libreboot wiki here. After T500 there are still a couple of pretty decent ThinkPad models, altough it is not possible to install completely Libre firmware on them.
Downloading OpenBSD
Downloading OpenBSD is pretty straightforward, just prepare two USB drives – one which we will boot the installer from and the other for our encryption key.
Head over to the download page and click on minirootXX.img

If you have a 64-bit machine, which the T500 is, select amd64. This will be a minimal intallation and we will only download file sets that we want during the install. If you do not care about this, you can pick one with the file sets already included.
For those unfortunate people who still use Windows on their main machine like me, you may use utility like Rufus to burn the image to a USB. Just pick the file and drive, make sure to choose the right one, this will overwrite all data on the USB drive.
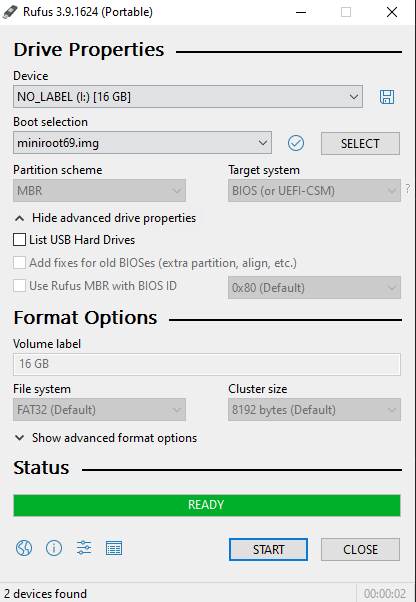
Once we have the USB ready, we can plug it into the T500, press F12 and choose to boot from it. We will be greeted by this screen:
Installing OpenBSD
Full disk encryption with key (FDE)
I'm using a laptop, so it would be advisable to implement some sort of encryption in case it gets lost or someone steals it. We will follow the official guide here (with a little modification) and setup FDE with a USB drive for convenience, so that we don't have to type the encryption password every time and instead rely on the possesion of the USB drive.
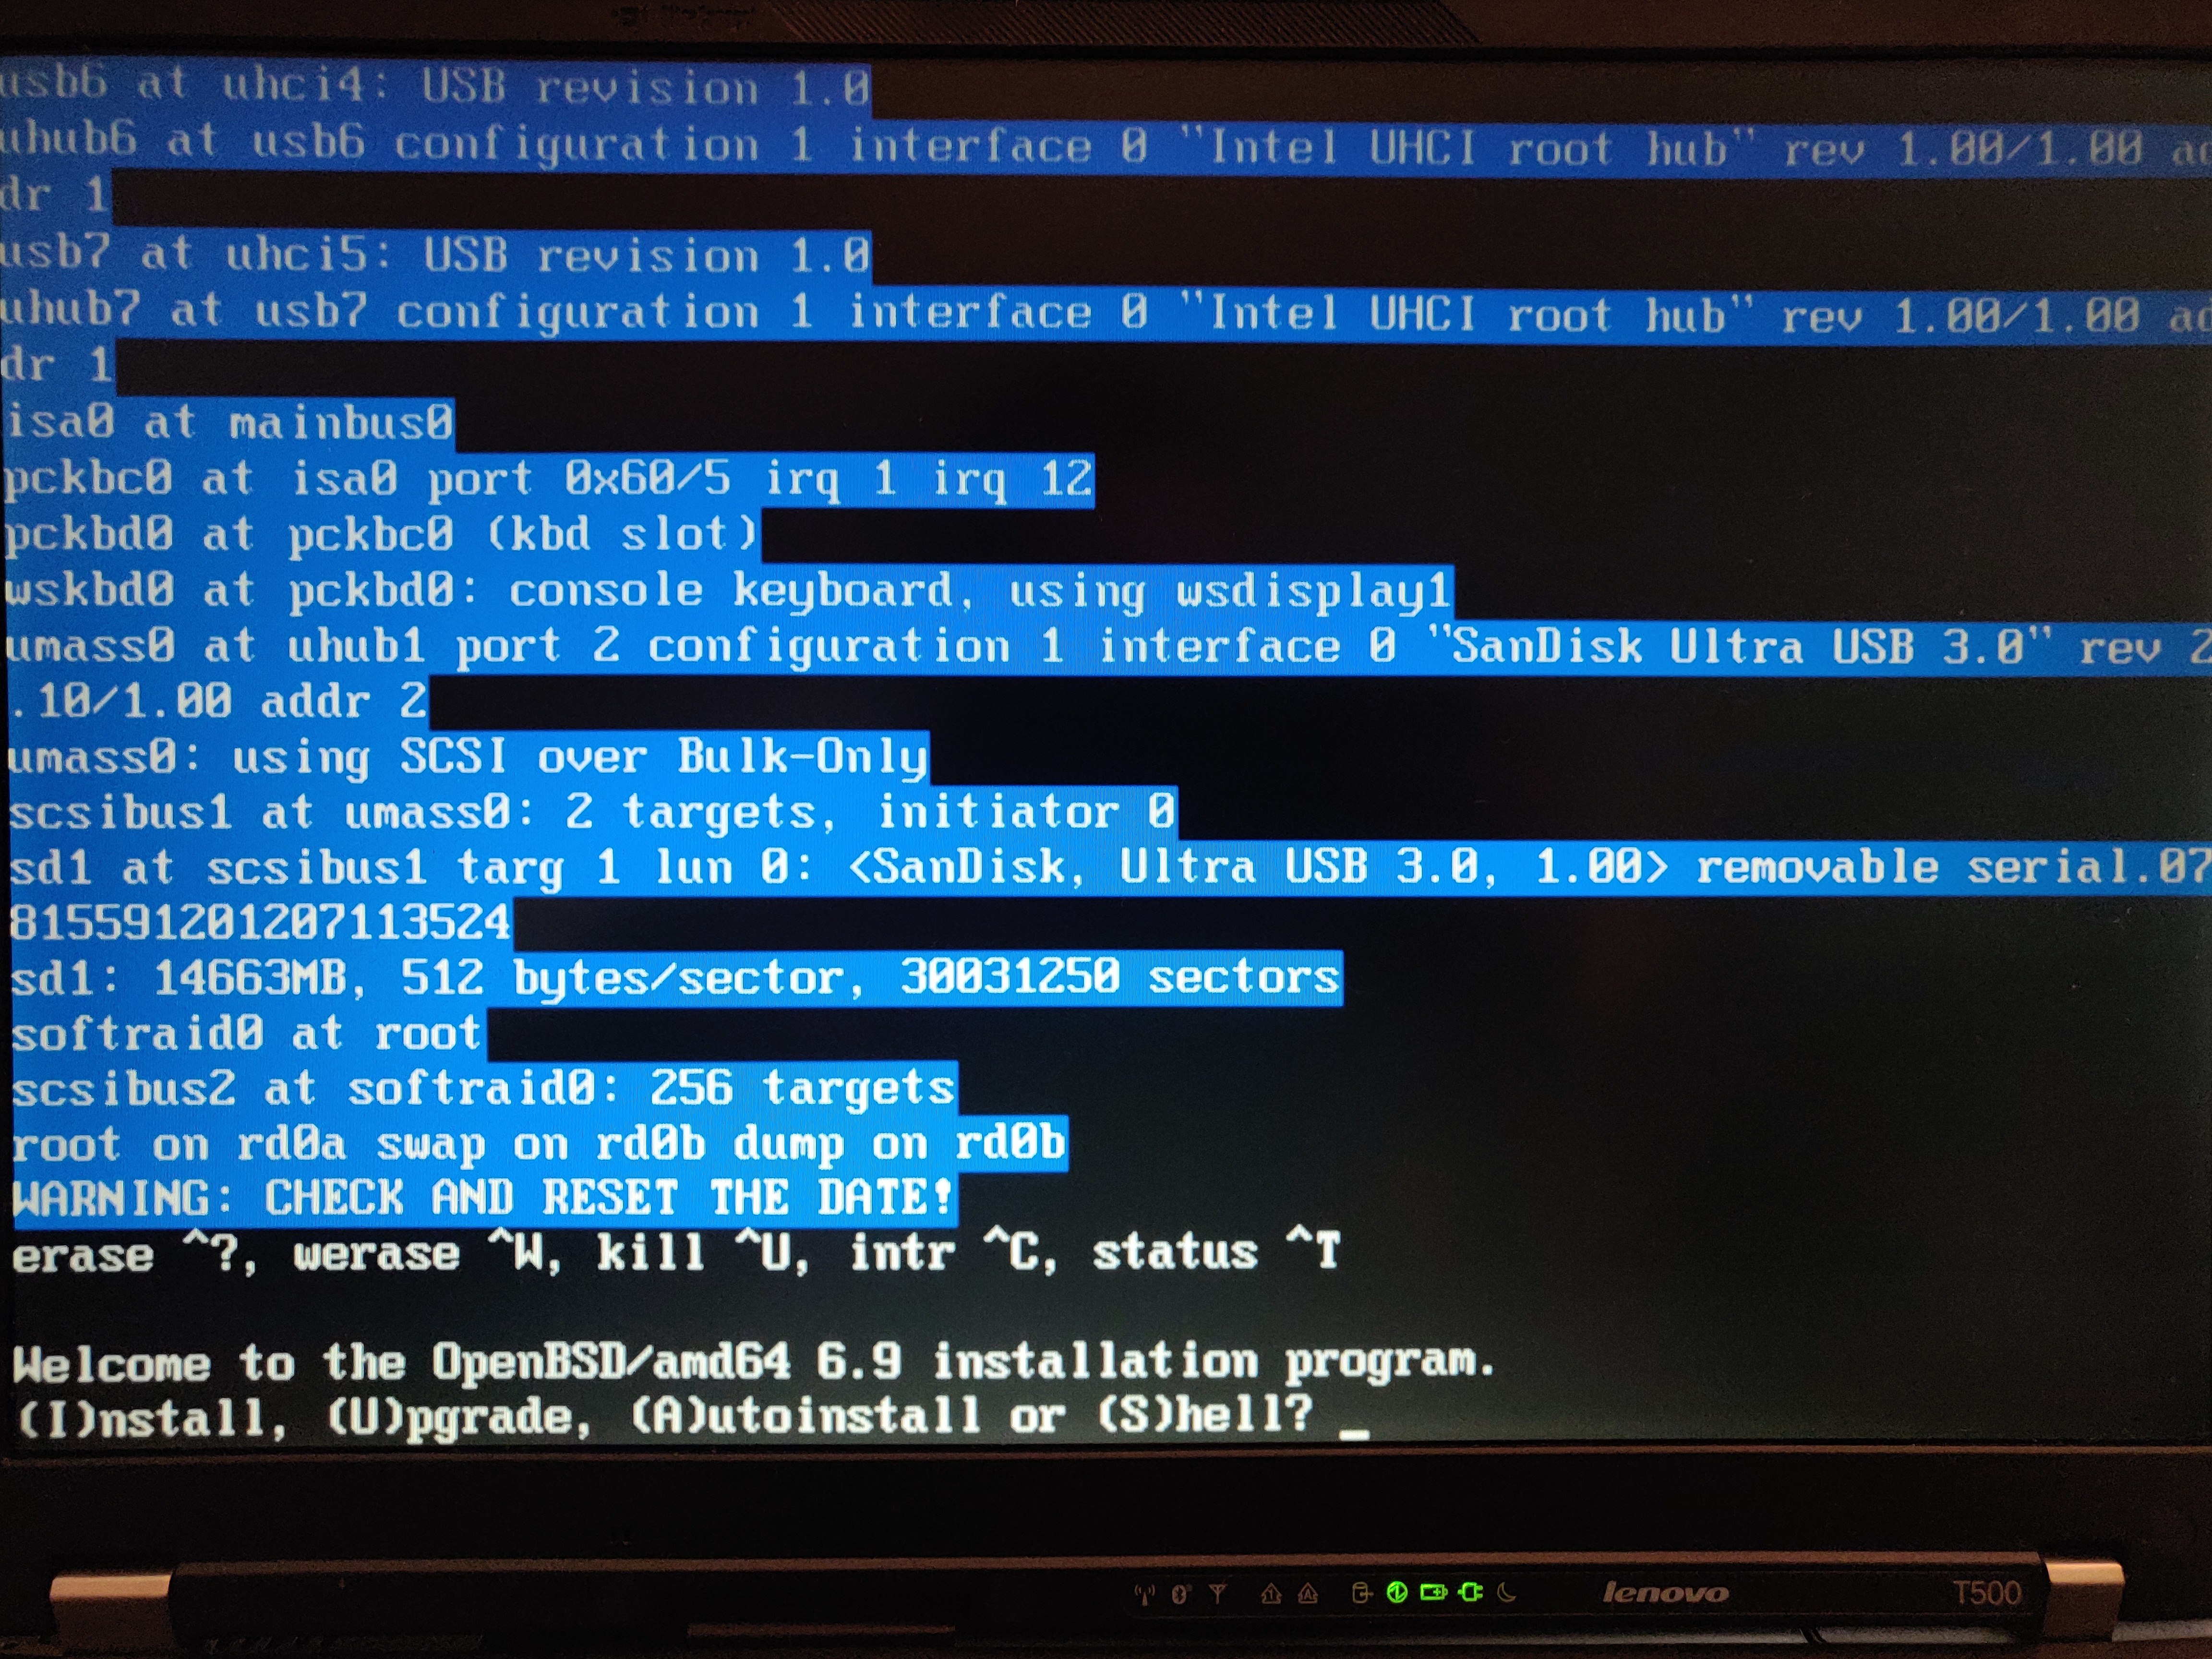
Jump out of the installer into the shell by typing S
Begin the proces by creating a device node. You may be familiar with the naming convetion from Linux. sd is essentially SCSI disk driver. Here's a little comparasion of naming drives Linux vs OpenBSD:
| Linux | OpenBSD | |
| First hard drive | /dev/sda | /dev/sd0 |
| First partition of the second hard drive | /dev/sdb1 | /dev/sd1a |
| Partition naming | /dev/sda1, /dev/sda2, /dev/sda3, etc. | /dev/sd0a, /dev/sd0b, /dev/sd0c |
As you can see, it's similar but not the same – Linux names devices using letters and partitions are named by numbers, OpenBSD does the opposite.
# cd /dev && sh MAKEDEV sd0We may also want to write some random data to the device, this is a fairly time consuming process, so get some coffee and do some work while it does it's thing. The bigger the drive, the longer this will take. The computer's speed also plays a big role. Wait, what is rsd0c? Haven't we just typed in sd0? Why are we writing something to rsd0c? I had the same questions, but the explanation is quite simple. R in the beginning stands for raw, as it is a raw (character) device. sd0 was already explained above (first SCSI driver device), but why c at the end? According to disklabel(5) "The ‘c’ partition is reserved for the entire physical disk". So there we have it, rsd0c points to the whole raw first hdd handled by the SCSI driver, to which we are currently writing random data.
# dd if=/dev/urandom of=/dev/rsd0c bs=1mSince we have a crap load of time before it finishes, let's dissect the command a little further. dd is a well known utility from the world of Linux and other UNIX-like operating systems. It can be used to copy standard input (stdin) to standard output (stdout). These two aforementioned terms usually mean "what you type" and "what you get" to/from the terminal. In this case we are using the if and of options of dd which replace stdin and stdout with files. Basically copying the contents of /dev/urandom to /dev/rsd0c. As you can tell by the fact that urandom resides in /dev, it is some kind of a device, but not a physical one. Together with random, urandom is a data source device which provides high quality pseudo-random data. Why is it called pseudo-random? Well, computers can't actually produce truly random data (but they can use realistically random sources), instead, the kernel utilizes all sorts of different things that are happening at any given moment (system activity, network, hadware output) and through some programming and math trickery output seemingly random data. It is important to make sure that the same data cannot be generated again, because that could lead to security issues, since actions like generating SSH key pairs use these pseudo-random data sources. (Imagine you generate an SSH key pair and someone finds a way to get the same pseudo-random output that you got, which will result in the same SSH key pair being generated, even though I'm sure there are reasons why this isn't realistically possible, correct me if I'm wrong about this whole thing). The last option bs specifies the block size (how large the blocks of data will be)
As far as I know, the T500 doesn't support UEFI, so we'll have to use MBR partitioning table. Use fdisk to initialize MBR.
- -i uses default MBR
- -y avoids unnecessary yes/no questions.
# fdisk -iy sd0If you have an UEFI device, use this command:
# fdisk -iy -g -b 960 sd0To create a partition layout, we need to enter disklabel's label editor with the -E option and name of the device we want to edit.
# disklabel -E sd0In the Label editor, enter the following commands (// respresent comments, don't type that into the terminal)
#sd0> a a // "a" to add partition and name it "a"
offset: [64] // press enter
size: [488391056] // enter
FS type: [4.2BSD] RAID // default is 4.2BSD, but we want to create RAID volume
sd0*> w // write changes to the disk
sd0> q // quit the editor
No label changes.Let's stop for a moment and let me explain the naming and structure. The device that we are now working with is sd0. We have just created an a parition on sd0, which resulted in sd0a RAID type filesystem that spans across the entire disk. Now we will use RAID management interface called bioctl to create a CRYPTO volume on sd0a. This encrypted volume will appear as another device, but it's just an encryption layer on the same physical device. Afterwards we can create volumes and file systems how we want, just like with a regular OpenBSD install without encryption.
If you are using a regular passphrase, the new encrypted device will become sd1. However, since we want a keydrive, we have to account for the other USB drive. Connect the USB that you want to use to unlock your laptop/PC and note the assigned name. In my case, it got recognized as sd2. This is important, becuase now our encrypted volume won't be sd1, but sd3.
Assume the key drive is sd2 and our initial parition is still sd0.
- -c sets the RAID level, but we just want an encryption layer, so we will use "C" which stands for CRYPTO
- -k use key disk device sd2a
- -l create volume on sd0a with software raid
This part took me a long time, because I got stuck on the -r option which specifies number of iterations for the KDF algorithm. What got me thinking was this article, which goes in depth into the encryption of OpenBSD. What confused me the most is that according to the bioctl man page, the default number of rounds is 16, however the author of the article mentions "The interesting part is the number of iterations which directly impact the resistance to brute force attacks. On OpenBSD, it is set to the hard-coded value of 8192. As discussed previously, this may be changed using bioctl options." If we are talking about the same thing, why the man page mentions 16 and he says 8192? Also "On my home install, my LUKS volume is configured for about 400,000 iterations, which is significantly higher than the OpenBSD default.". His closing thoughts are "If using OpenBSD on a recent computer, bump up the number of PBKDF2 iterations when creating the volume." What does bump up mean in this case? More than 10 000? 100 000? Anyway, take what you want from this, I will try 50 000 and see what happens.
# bioctl -c C -r 50000 -k sd2a -l sd0a softraid0Well, this happened.
bioctl: could not open sd2a: No such file or directoryOf course, we don't have any sd2x devices in /dev, which we can confirm by ls /dev/. Correct that by issuing
cd /dev
sh MAKEDEV sd2Aaaand, again we fail because:
bioctl: could not open sd2a: Device not configuredSure, even though our key drive showed up as sd2, we haven't touched it with fdisk like we did with our sd0. If I could read, I would know since the guide clearly mentions it "Initialize your keydisk with fdisk(8), then use disklabel(8) to create a 1 MB RAID partition for the key data"
I grouped all the commands we need into the following block:
# dd if=/dev/urandom of=/dev/rsd2c bs=1m // rsd2c - our raw sd2 key drive
# fdisk -iy sd2
# disklabel -E sd2
sd2> a a // create "a" partition
offset: [64] // accept default with enter
size: [7984241] 1M // we only need a small 1M partition
FS type: [4.2BSD] RAID // again, create RAID type partition
// we can confirm that everything is ok
> p
# size offset fstype [fsize bsize cpg]
a: 16001 64 RAID
c: 7987200 0 unused
sd2*> w // write changes
sd2*> q // quitNow we can run bioctl again
# bioctl -c C -r 50000 -k sd2a -l sd0a softraid0You should see similar output:
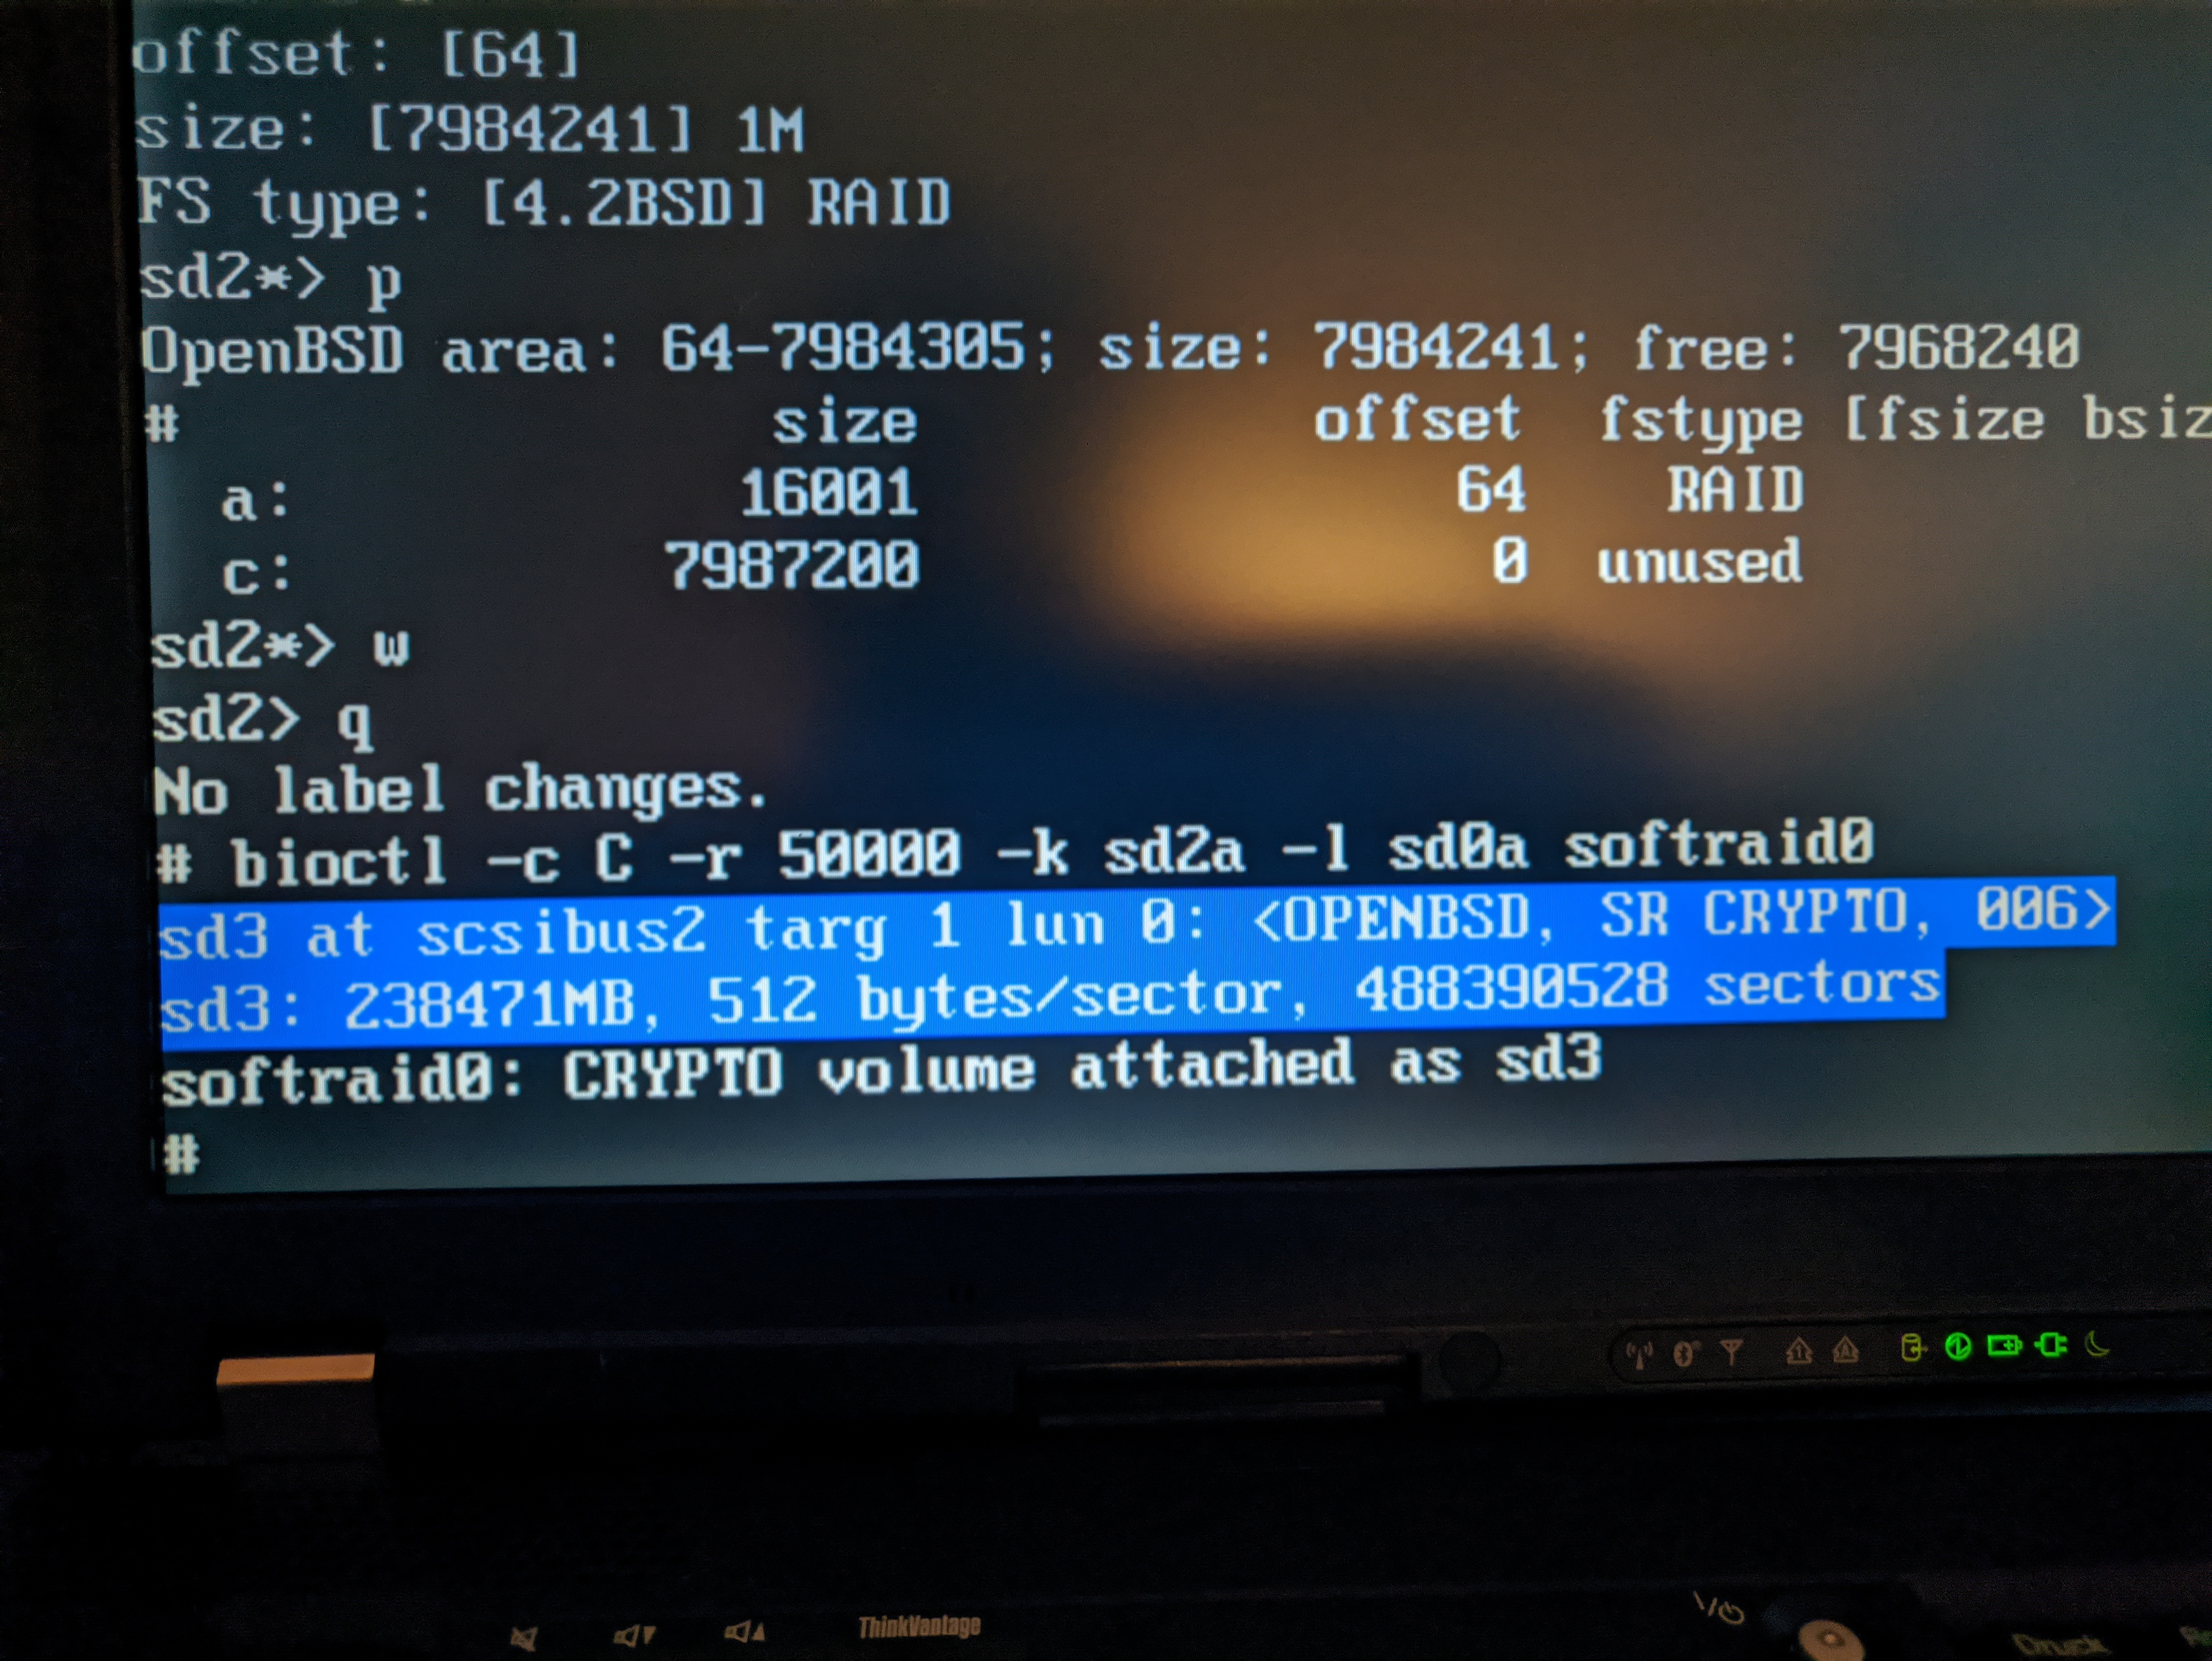
Please note the volume which was created, in this case sd3, you will need it later!
This is everything we had to do in order to setup encryption. What follows is only the installation process described bellow.
Installation script
Type I to begin the installer. The system will ask you some basic information, stuff in [] is default when you press enter.
You can pick a different keyboard layout, but I will stick with the default one
Choose your keyboard layout ('?' or 'L' for list) [default]Pick a hostname that you like
System hostname? (short form, e.g. 'foo')We are using a minimal image file, therefore we will need internet connection to download all required file sets, so it makes sense to configure network interface. I will just connect cable to the on board LAN (em0) and let DHCP give it lease. Unless you want to configure IPv6 stick to default none
Available network interfaces are: em0 iwn0 vlan0.
Which network interface do you wish to configure? (or 'done') [em0]
IPv4 address form em0? (or 'dhcp' or 'none') [dhcp]
em0: no link...got link
em0: no lease......got lease
em0: 10.5.51.122 lease accepted from 10.1.4.1 (mac address)
IPv6 address for em0 (or 'autoconf' or 'none') [none]
Which network interface do you wish to configure? (or 'done') [done]
Using DNS domainname your.server
Using DNS nameservers at 10.6.8.77Enter you root account, make sure it is a strong password and store it in a secure place. You will mostly interact with the system using a regular user and doas to elevate privileges. It is not a good security practice to log in with root!
Password for root account? (will not echo)
Password for root account? (again)This isn't going to be a server, so type no to SSH
Start sshd(8) by default? [yes] noI personally had some troubles with xenodm, but they mostly came down to me being incompetent. Using xenodm is a recommended security practice, instead of starting X server with startx. Not entirely sure why it's not default.
Do you want the X Window System to be started by xenodm(1)? [no] yesSetup a user that you will login with.
Setup a user? (enter a lower-case loginname, or 'no') [no] userTimezone settings. If the correct timezone wasn't selected automatically, press ? and pick a correct one and type it into the installer.
What timezone are you in? ('?' for list) [Europe/Prague]Now make sure you install into the right volume – in our case, sd3 because it's the crypto volume.
Available disks are: sd0 sd1 sd2 sd3
Which disk is the root disk? ('?' for details) [sd0] sd3We have a MBR machine, so pick MBR
No valid MBR or GPT
Use (W)whole disk MBR, whole disk (G)PT or (E)dit? [whole]
Setting OpenBSD MBR partition to whole sd3...done.OpenBSD partitioning is something we will leave for another time. This time I'm going with the default which is surprisingly sane.

We are using a minimal instalation file, therefore we need to download required file sets from the internet – http option. We aren't using any proxy servers, so leave that at default. You can also pick a server that is closer to you or that you prefer.
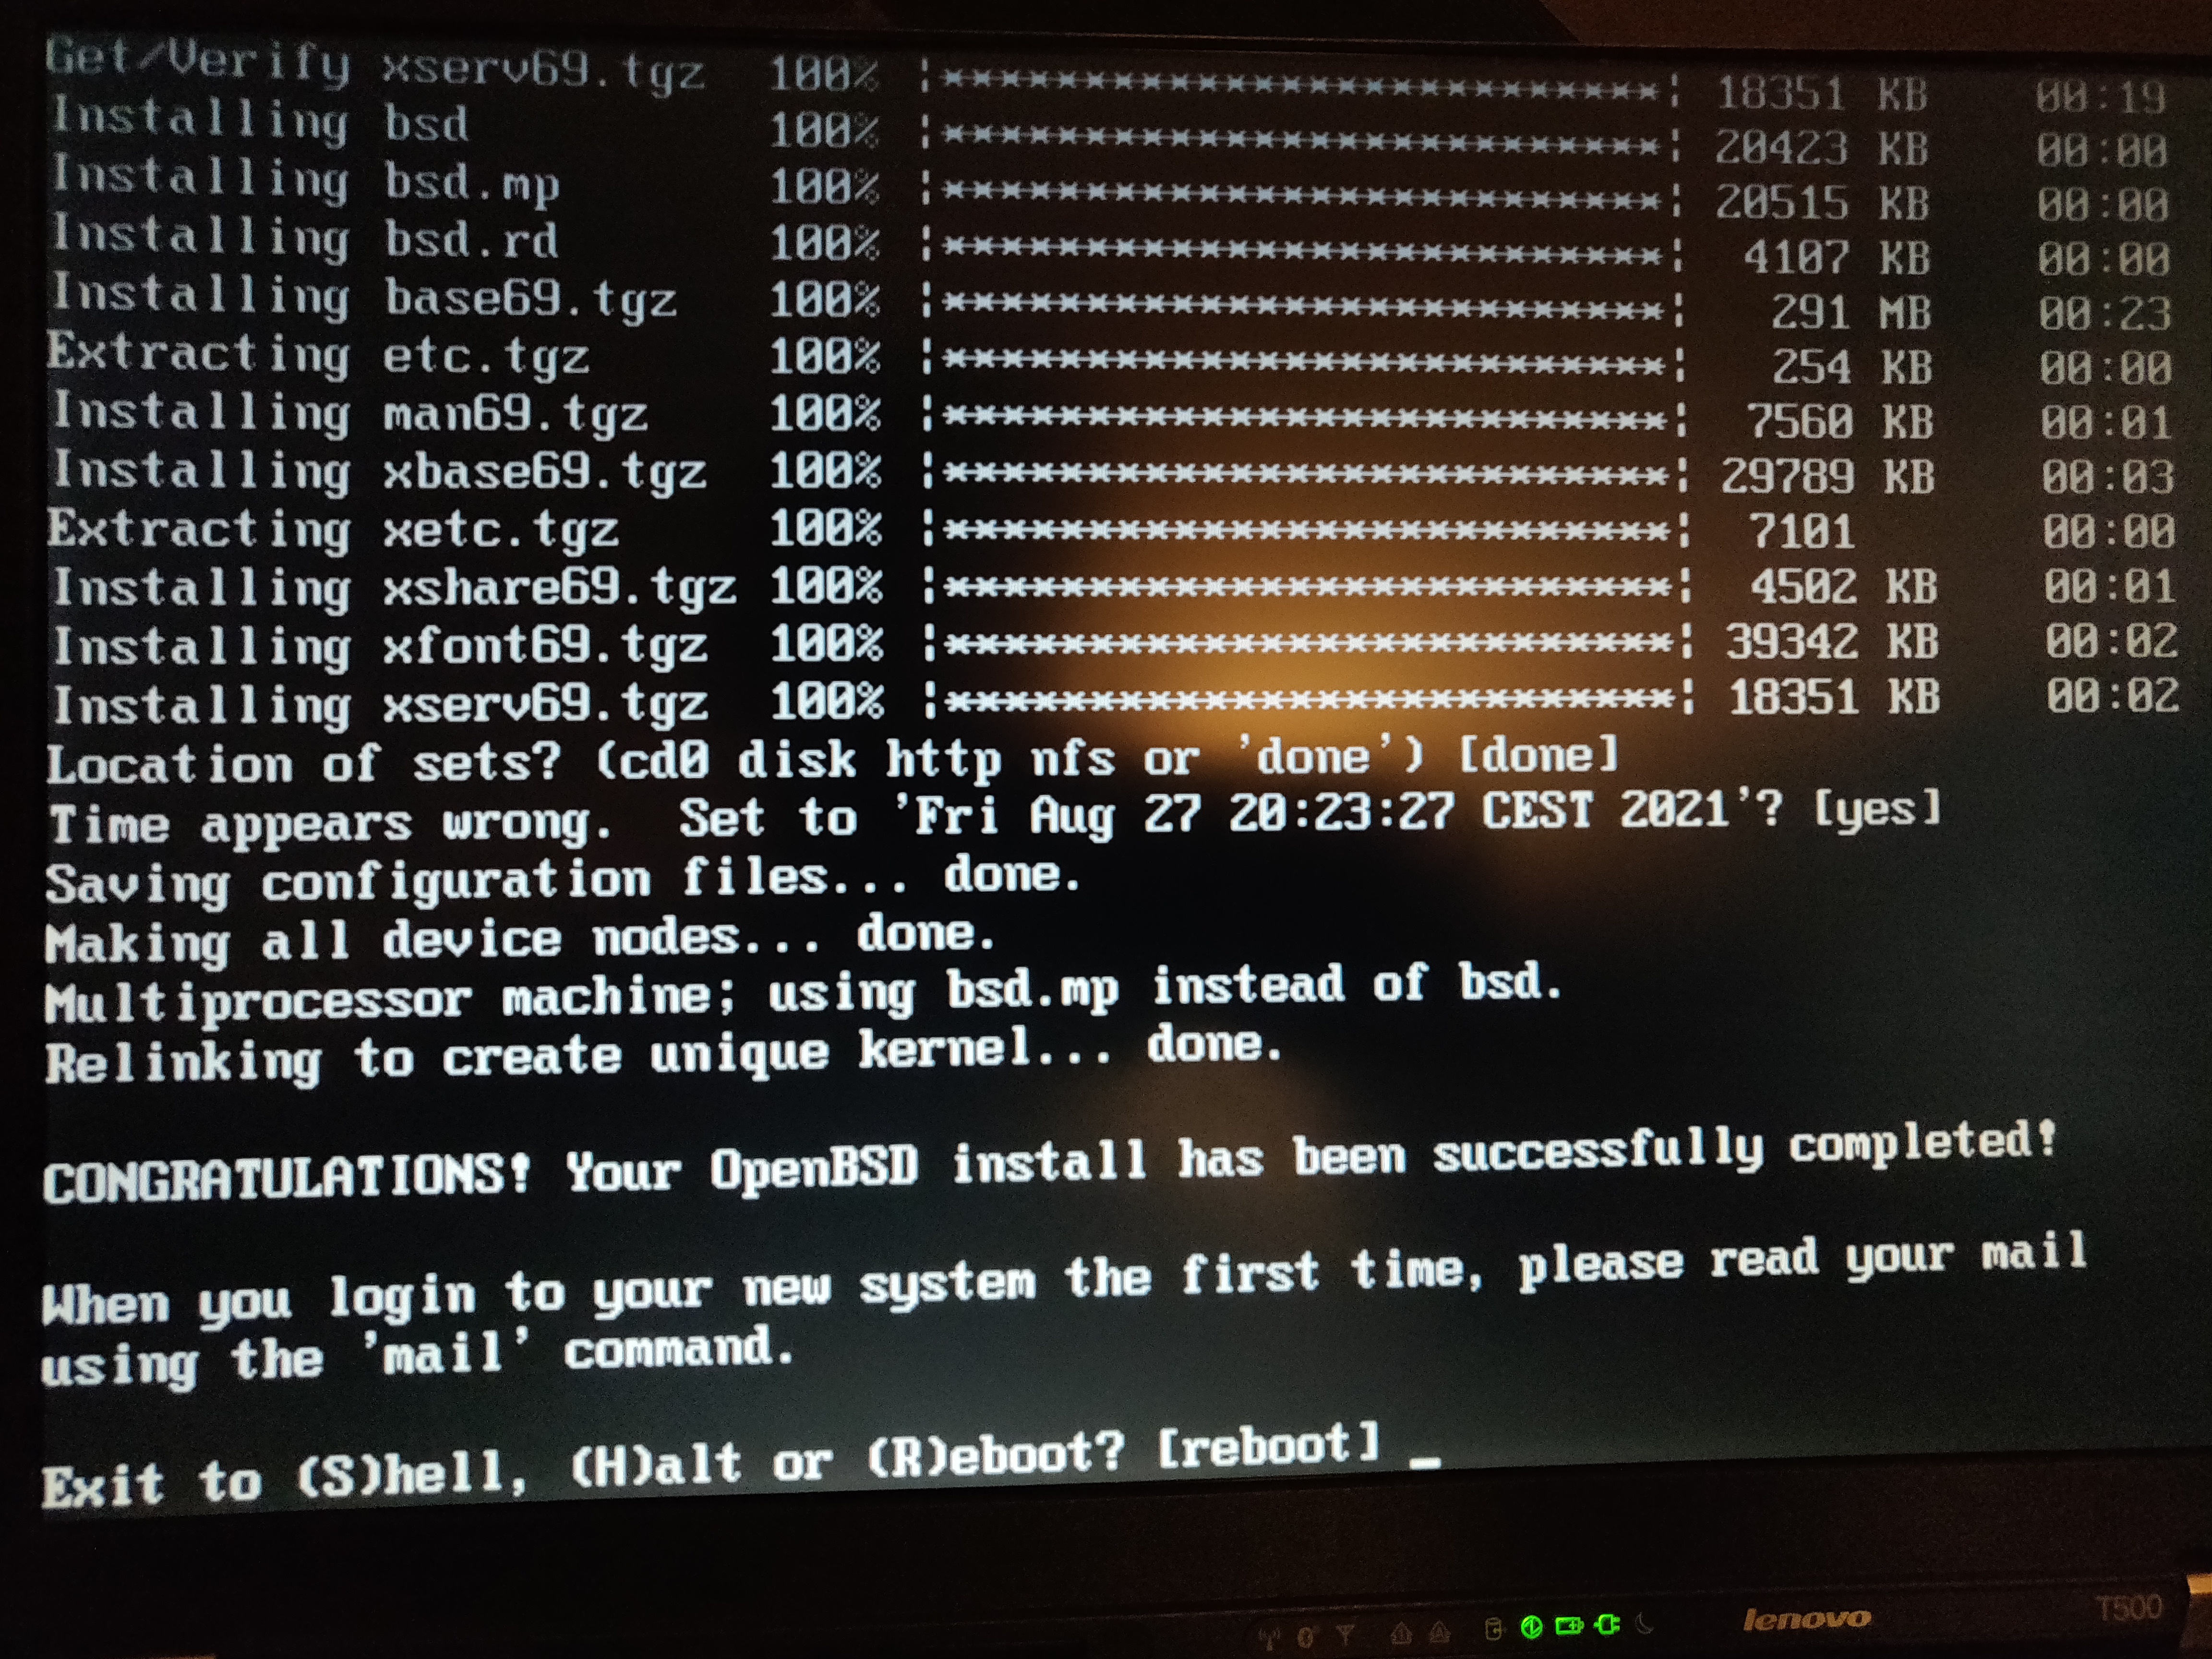
Let's install the sets!
Location of sets (cd0 disk http nfs or 'done') [http]
HTTP proxy URL? (e.g. 'http://proxy:8080', or 'none') [none]
HTTP Server? (hostname, list#, 'done' or '?') [ftp.eu.openbsd.org]
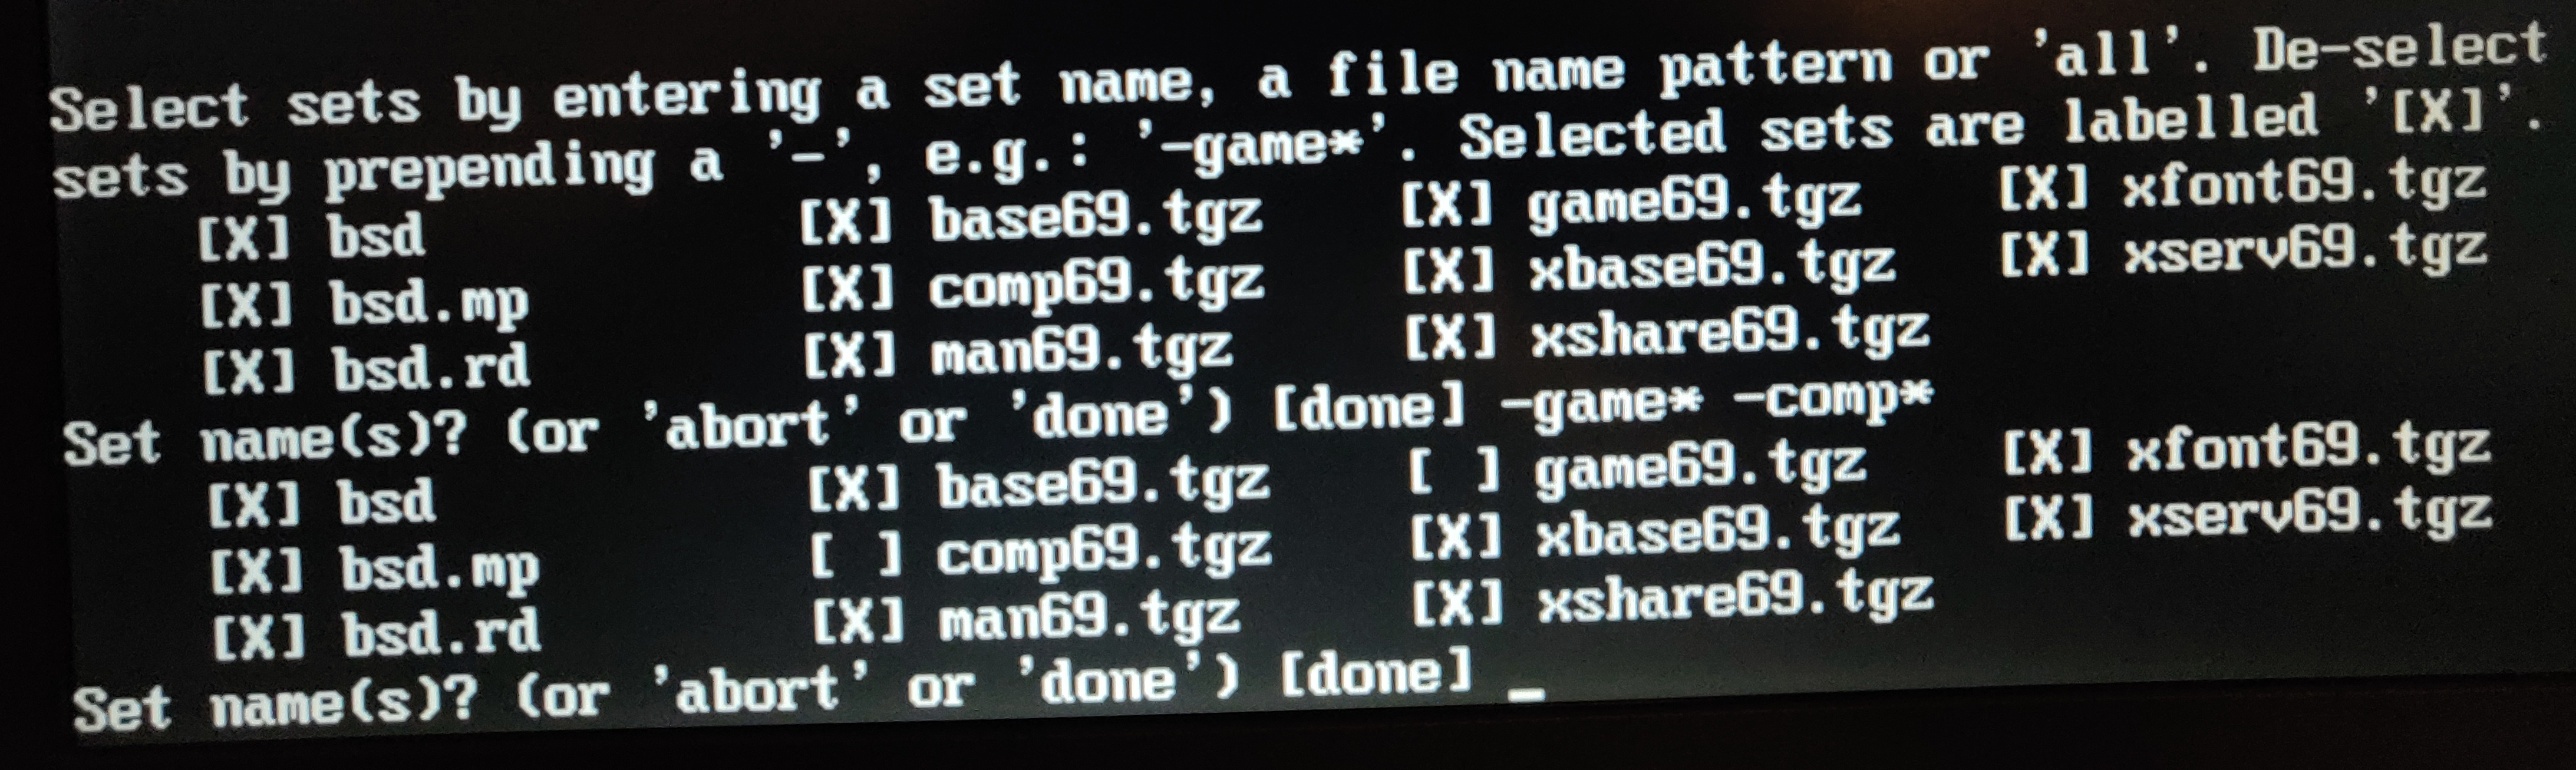
Server direcotry? [pub/OpenBSD/6.9/amd64]When it comes to file sets, most of the time it is easiest to just install them all. On a headless server installation, you certainly won't need any sets beginning with x, but we are running a laptop which will need X packages for GUI. I usually leave out game69.tgz and comp69.tgz, but if you aren't constrained by limited disk space available, just leave it at default. To read more about what these file sets are, check out OpenBSD FAQ.
It will take some time to download all the file sets, but after that's done, you should see a similar screen:
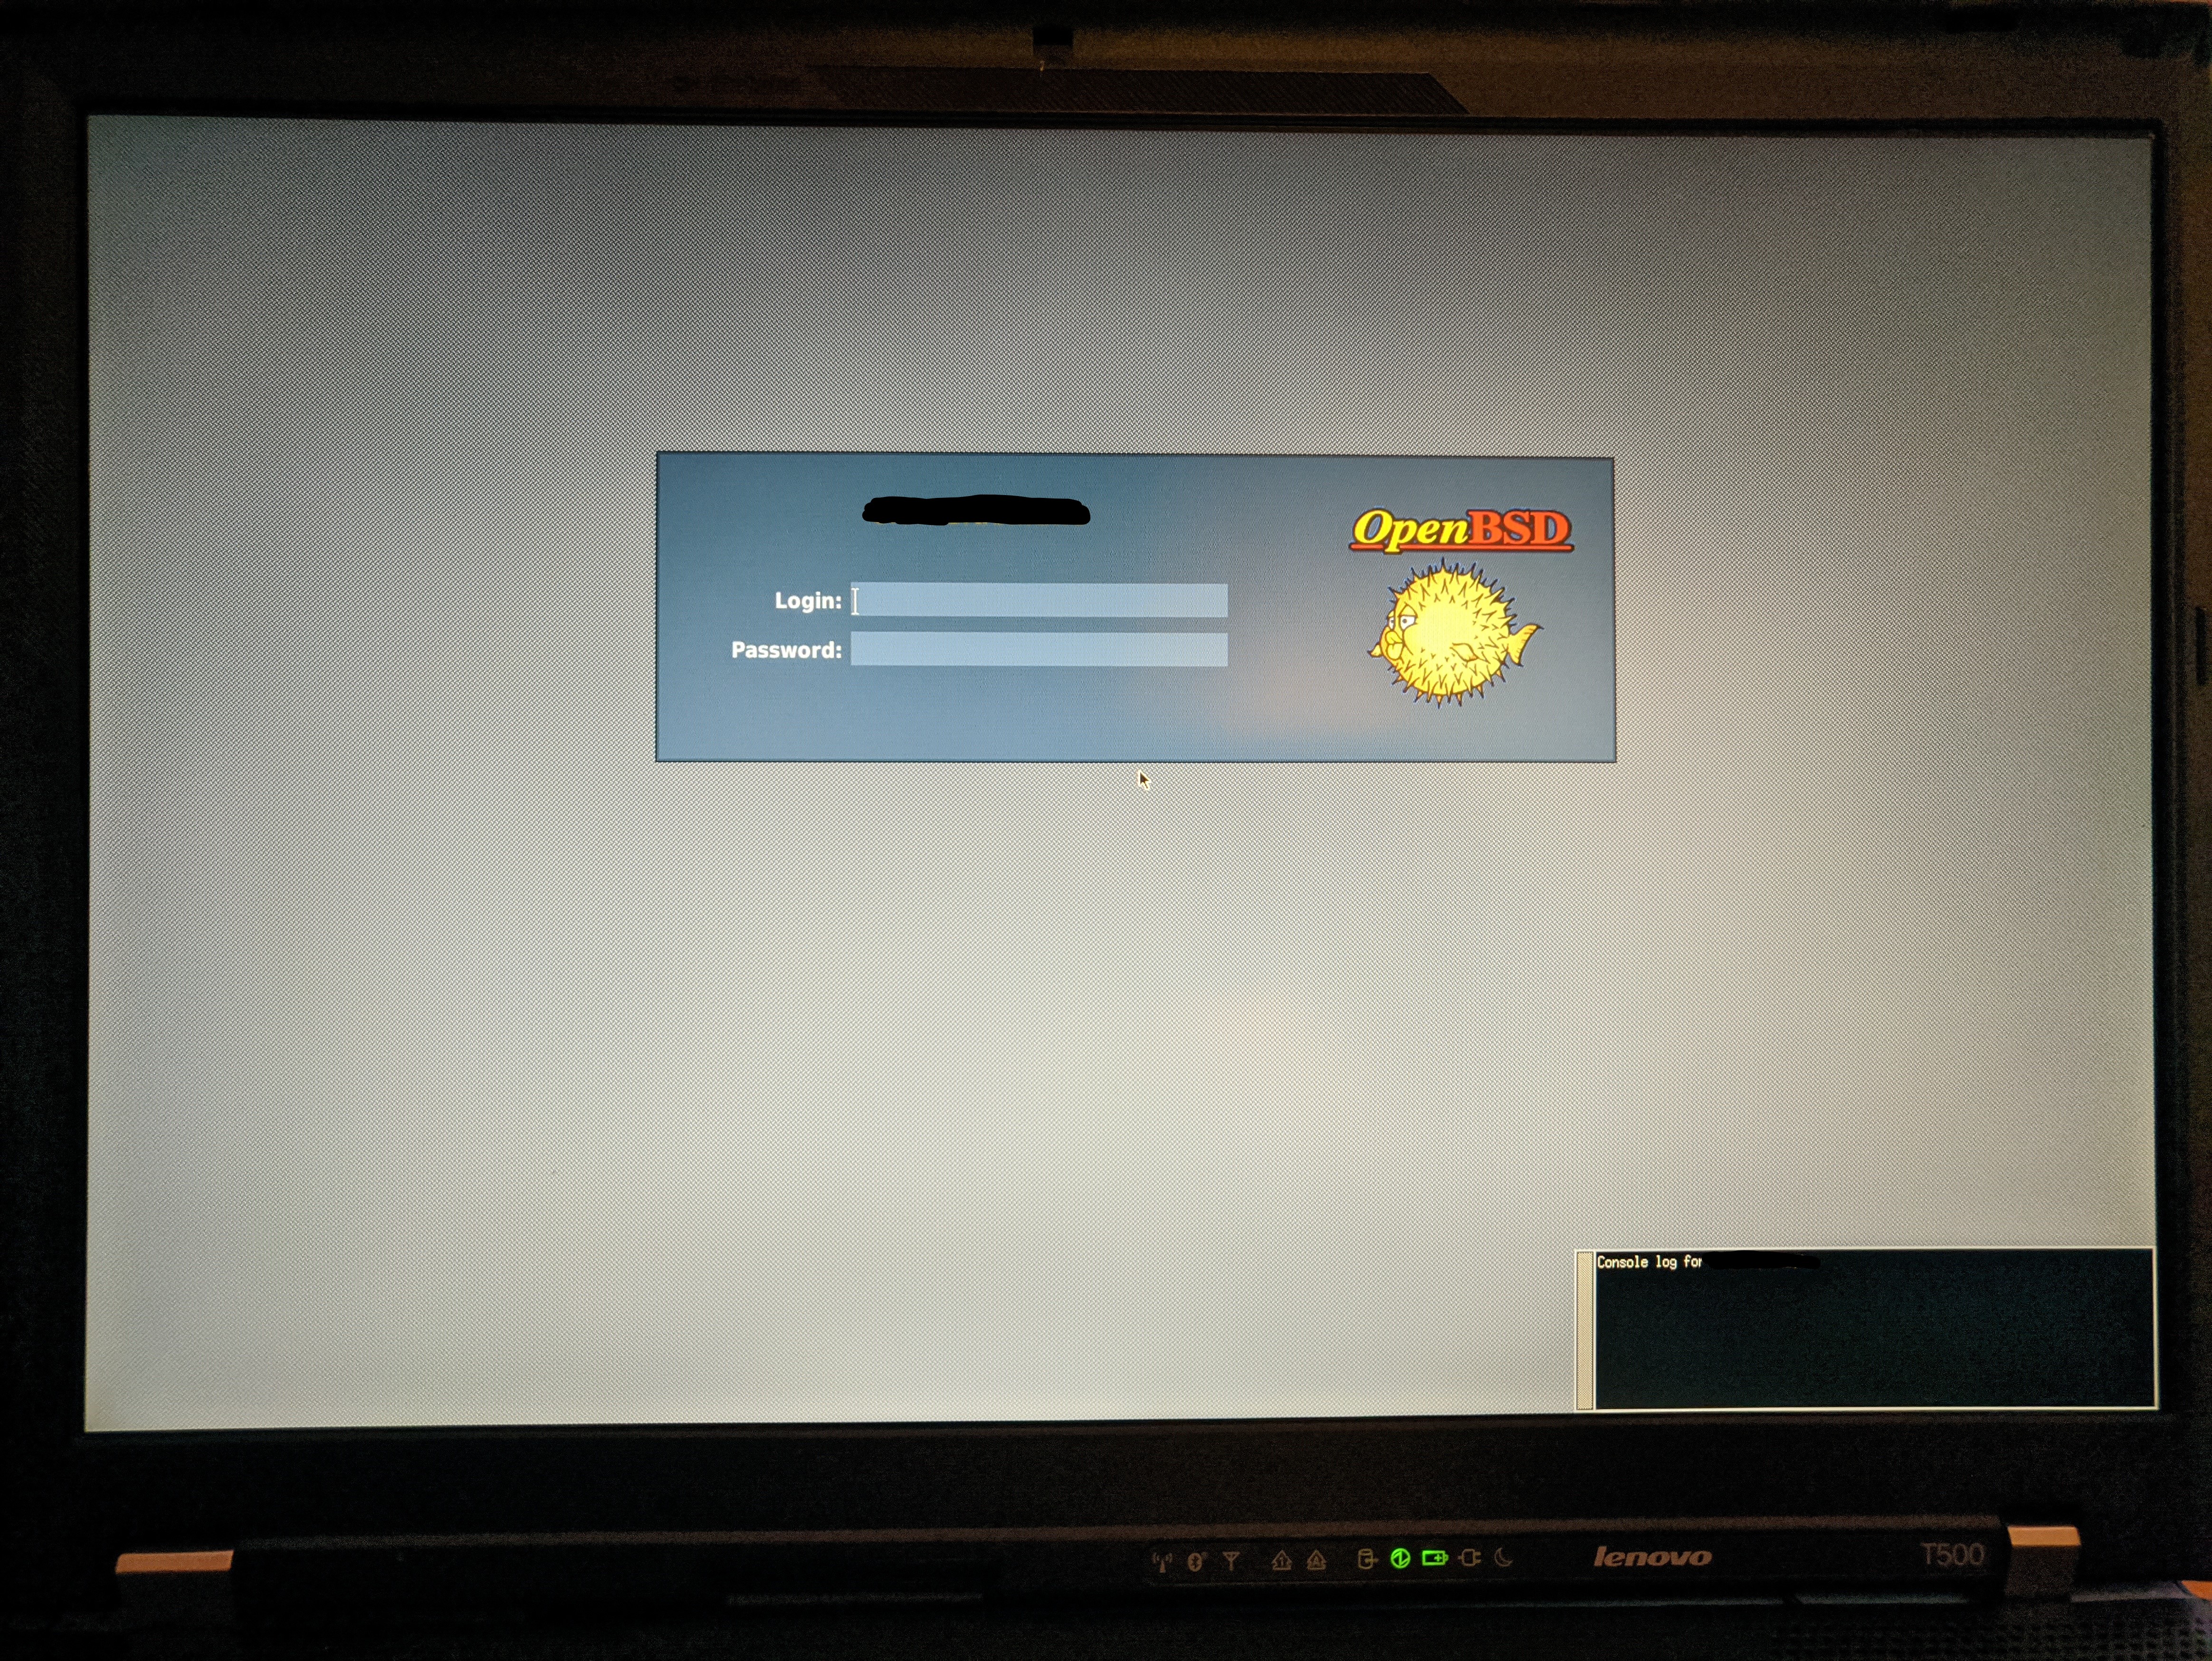
Just press enter to reboot. When it shuts down, remove the installation USB drive, but keep the key drive in, otherwise it won't boot.
You will be presented this very elegant login screen.
What comes next looks even better, doesn't it?
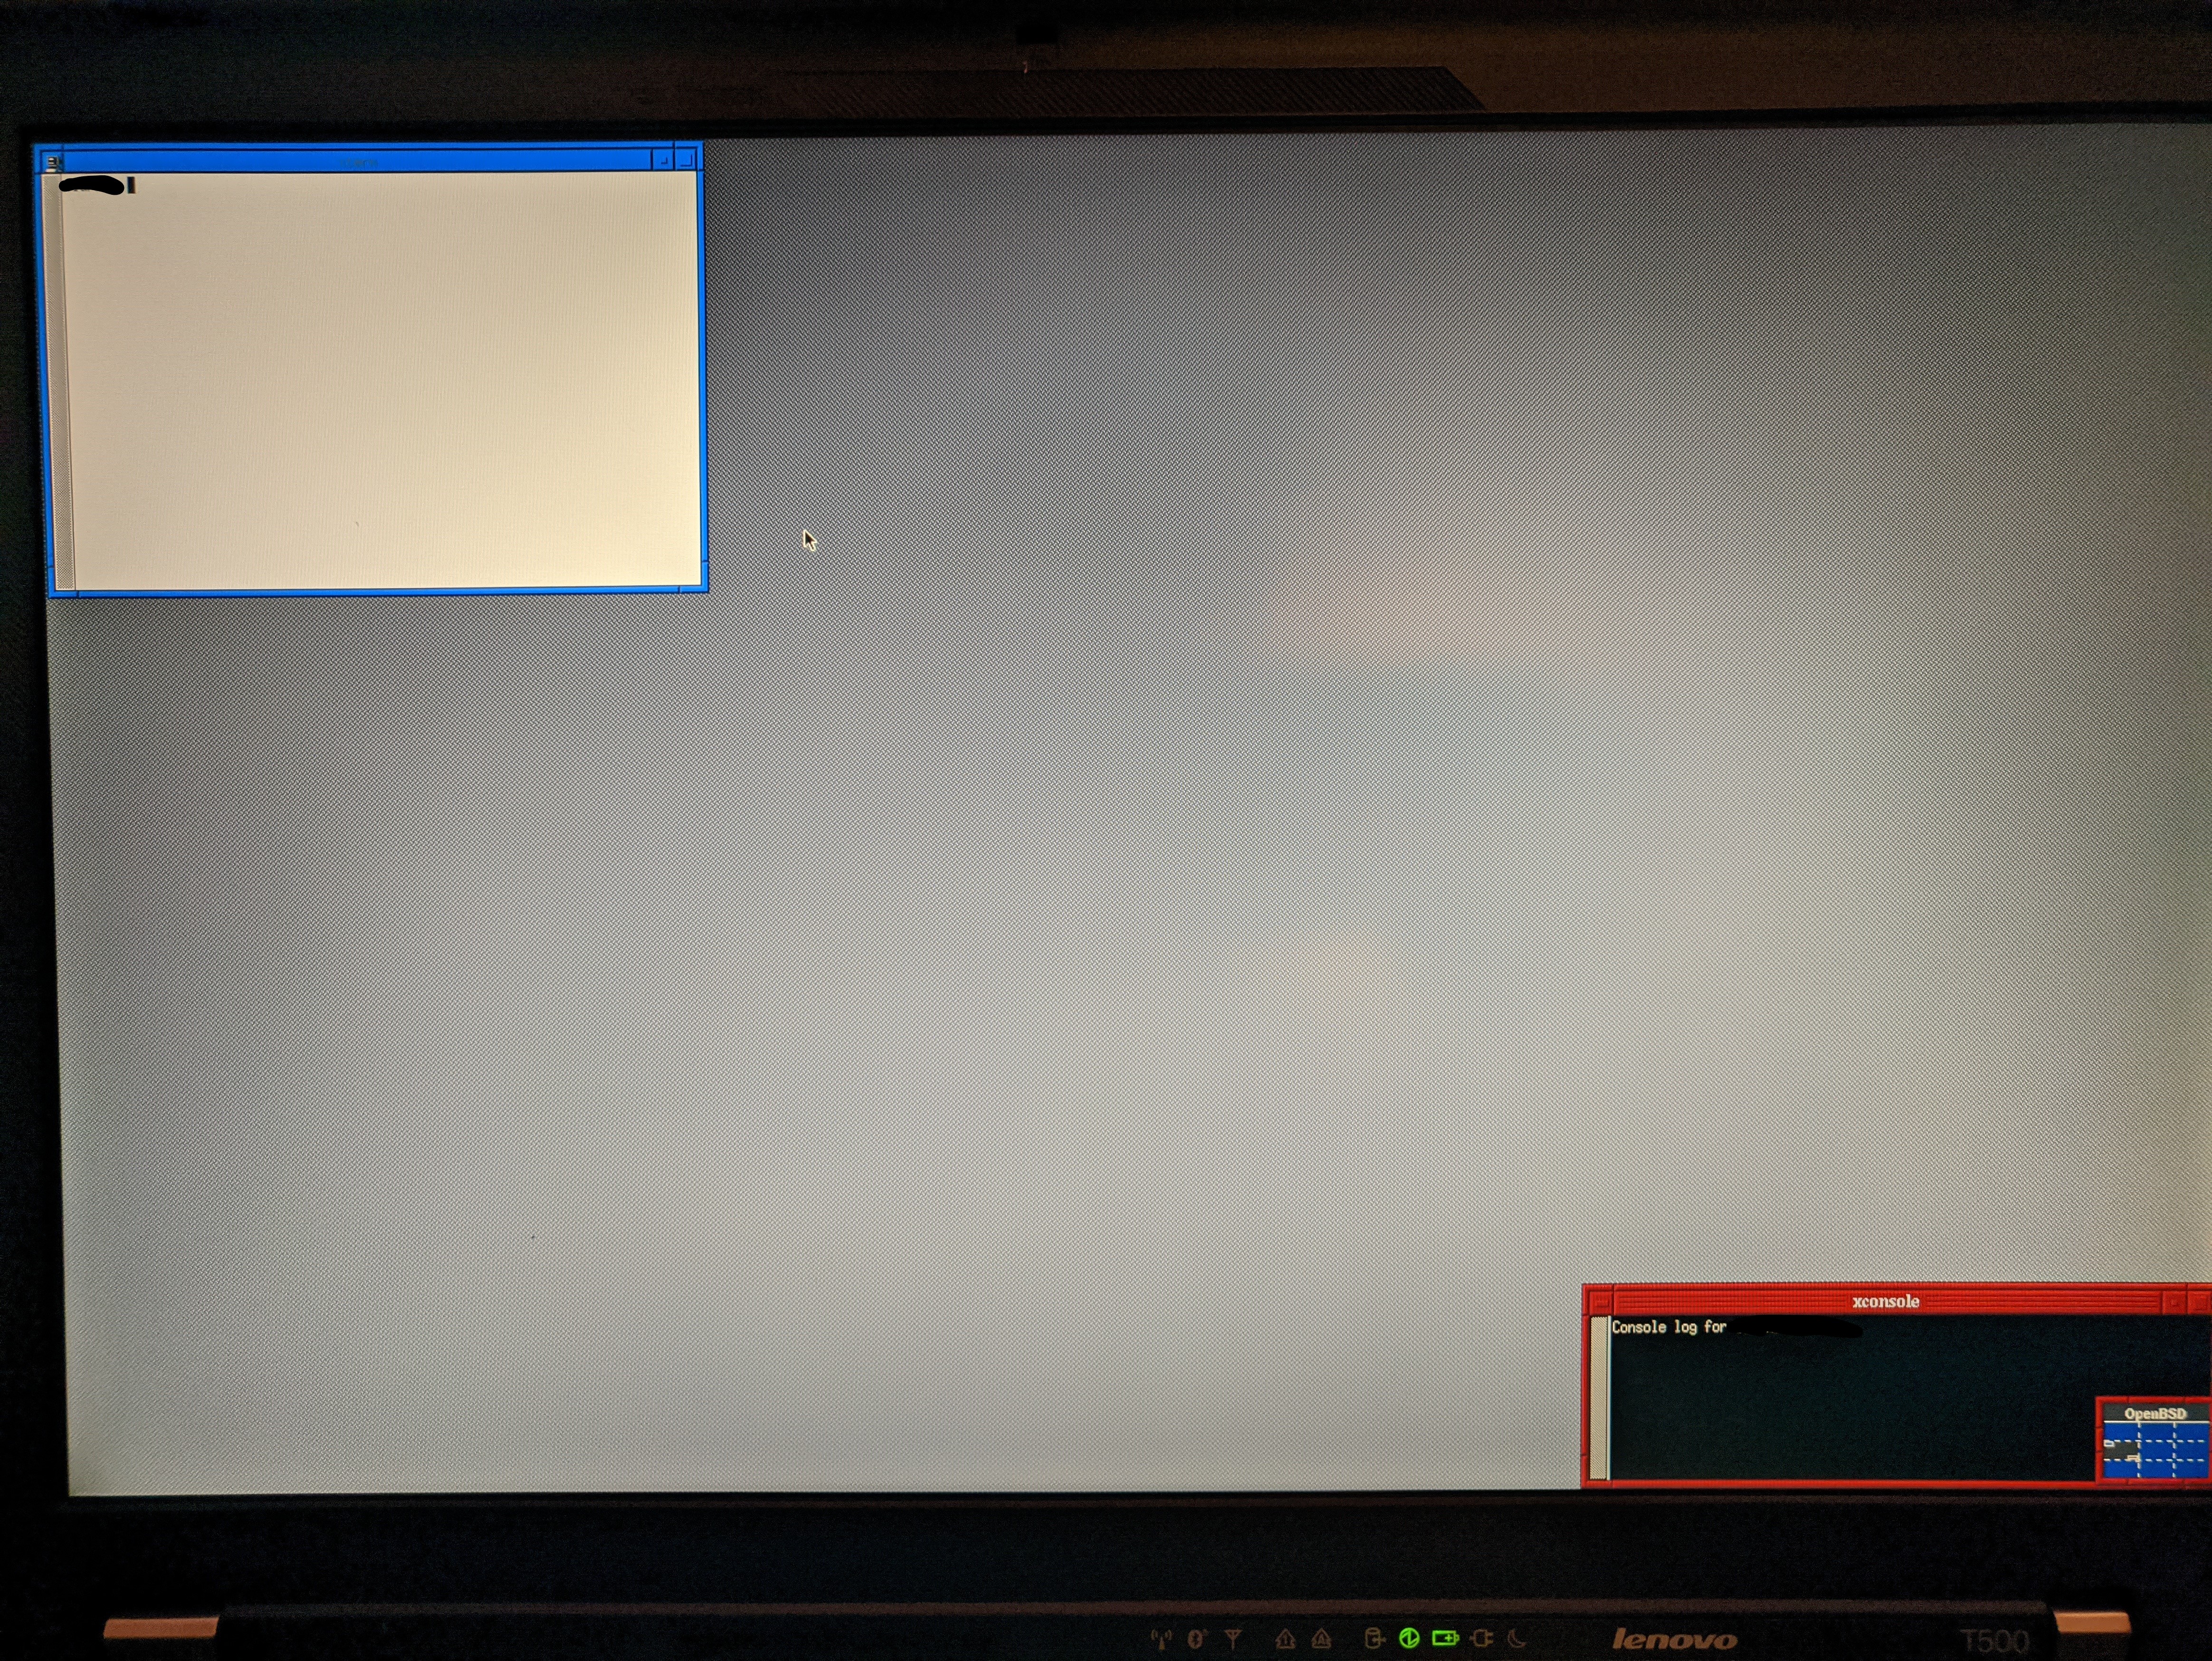
Don't worry, this is just the default FVWM windows manager. You can install any other windows manager you like or rice FVWM, which some people actually do, but I wouldn't recommend it. We will go over how to install DWM later in another write-up.
Backup the USB key drive
What we should do first before anything else is backup the damned USB key drive. There is no point of setting anything up when all our work can be lost at any moment due to the USB drive failure. You may either lose it or it might just die, not uncommon in the world of removable media devices. The official guide mentions two command for backup and restore, however we need to get the backup file off the system and store it in a secure place. For that, we will use another USB drive. This may seem a little daunting especially if you have never manipulated devices on Linux or BSD systems.
On Linux, there is a nice command to show what devices you have connected and what is on them – lsblk. Unfortunately, that is not a thing on OpenBSD.
T500# lsblk
ksh: lsblk: not foundFirst of all login with root, you will most likely need to elevate privileges. It is not a good idea to do it regulary, but totally fine until we setup doas for our normal user. Before connecting anything, issue the following commands to see how many devices there are and what they contain. T500 is our hostname, only type in stuff after the #, if there is no T500 at the front, that usually means it is an output of the previous command or a special sort-of "nested" or "interactive" command.
T500# sysctl hw.diskcount
hw.diskcount=3
T500# sysctl hw.disknames
hw.disknames=sd0:f985648fds15dsf,cd0:,sd2:d5876a3854643fc3deor you can list everything from sysctl and filter its output using grep
T500# sysctl -a | grep hw.disk
hw.disknames=sd0:f985648fds15dsf,cd0:,sd2:d5876a3854643fc3de
hw.diskcount=3I currently don't have any USB drives connected (I also disconnected the encryption key drive). sd0 is my SSD, but sd2 is the encryption layer where all partitions reside. You may have noticed that the encryption layer used to be sd3 during install. That's because these names don't always have to belong to the same device, they are assigned at boot. In our case, the laptop starts booting from the SSD – sd0, then finds a USB drive, recognizes it as sd1 and unlocks the encryption layer in which is another filesystem that gets named sd2.
Plug in the USB drive with the encryption key on it and run the commands above again. You should now see 4 devices and sd1 should appear.
T500# sysctl -a | grep
hw.diskhw.disknames=sd0:f985648fds15dsf,cd0:,sd2:d5876a3854643fc3de,sd1:0dfca798643fdjlk5
hw.diskcount=4To make sure you know which device is which, use fdisk on sd1. It should be significantly smaller than sd2 and sd0.
T500# fdisk sd1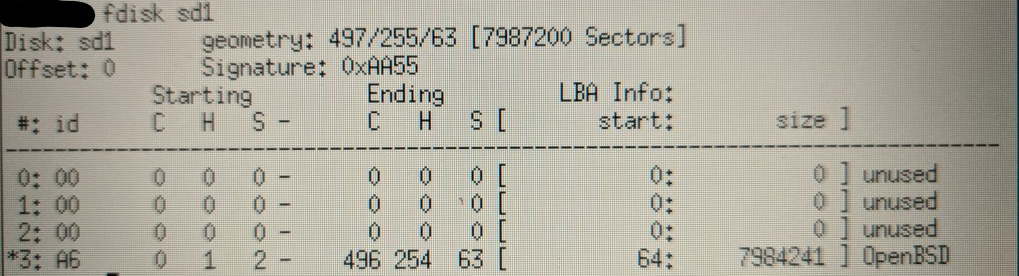
Plug in the second USB drive that will be used as a backup and repeat the process above.
T500# sysctl -a | grep
hw.diskhw.disknames=sd0:f985648fds15dsf,cd0:,sd2:d5876a3854643fc3de,sd1:0dfca798643fdjlk5,sd3:
hw.diskcount=5With all the devices connected, you can make sure once more you know which is which. To get more info about devices on OpenBSD, use the disklabel command. Running disklabel on all devices (e.g. disklabel sd0) will reveal what they are, the label line in the output should show this for each:
- sd0 – CT250MX500SSD1
- sd1 – Flash Disk
- sd2 – SR CRYPTO
- sd3 – Flash Disk
Example output for sd0:
T500# disklabel sd0
# /dev/rsd0c:
type: SCSI
disk: SCSI disk
label: CT250MX500SSD1
duid: f985648fds15dsf
flags:
bytes/sector: 512
sectors/track: 63
tracks/cylinder: 240
sectors/cylinder: 15120
cylinders: 32301
total sectors: 488397168
boundstart: 64
boundend: 488391120
drivedata: 0
16 partitions:
# size offset fstype [fzize bsize cpg]
a: 488391056 64 RAID
c: 488397168 0 unusedMount the backup USB
Encryption key drive is sd1 and the backup drive is sd3. Note that the backup drive already has a FAT32 partition set up from Windows, if it's a unformatted drive, either format it in OpenBSD using fdisk and disklabel or on another OS. When running disklabel on sd3 we can see the following partitions:
i: 7862272 2048 MSDOSCreate a mount point in /mnt:
mkdir /mnt/backup_driveMount the MSDOS partition of sd3 to /mnt/backup_drive
mount -t msdos /dev/sd3i /mnt/backup_driveYou can now cd into the mount point, there might be some kind of System Volume Information leftover from Windows.
T500# cd /mnt/backup_drive
T500# ls
System Volume InformationWrite data to the backup USB
Again, use the dd command with a couple of options according to the official guide. if takes data from the a partition on sd1, which is our key drive and writes it using of to our backup drive mounted at /mnt/backup_drive to a file openbsd-keydisk_backup.img. The name is completely up to you of course.
T500# dd bs=8192 skip=1 if=/dev/rsd1a of=/mnt/backup_drive/openbsd-keydisk_backup.img
999+1 records in
999+1 records out
8184320 bytes transferred in 2.982 secs (2744288 bytes/sec)Check if there is a new file in /mnt/backup_drive directory, you should see something like this:
T500# ls -lah
total 16012
drwxr-xr-x 1 root wheel 4.0K Jan 1 1980 .
drwxr-xr-x 3 root wheel 512B Aug 29 17:34 ..
drwxr-xr-x 1 root wheel 4.0K Aug 29 17:23 System Volume Information
-rw-r--r-- 1 root wheel 7.8M Aug 29 17:42 openbsd-keydisk_backup.imgBefore you shutdown you PC, don't forget to unmount the USB drive.
umount /mnt/backup_driveIn case you run into the following error,
umount: /mnt/backup_drive: Device busymake sure you aren't in the directory with your terminal and move somewhere else with cd.
Test the backup
You can shutdown and try booting into the system using the backup USB, but you will quickly realize that it doesn't work. We haven't created an identical backup key drive, only an image of the original one, which we saved to the backup USB. It is even viewable in Windows since it's just a FAT32 partition, so store it in a secure place.
With that in mind, how do you now know that the restore command will work? It wouldn't be a happy moment to discover that your backup wasn't working when something happens. Well, if you want to have peace in mind, get another blank USB drive.
Plug the backup USB and the new testing USB into the PC. Find out which is which using commands you already know (disklabel). In my case, the new USB is easily recongizable because its bigger and has a different label. We want to create a complete copy of the original key drive, not just a regular flash drive with a backup file like we just did.
Initialize MBR on the new drive (sd3). THIS WILL DELETE EVERYTHING ON THE USB DRIVE! But I hope you know that.
T500# fdisk -iy sd3
Writing MBR at offset 0.Open disklabel editor to create a RAID partition (same process when we were creating the first key drive during installation).
T500# disklabel -E sd3
Label editor (enter '?' for help at any prompt)
sd3> a a
offset: [64] // enter
size: [30025421] 1M // we only want a small partition
FS type: [4.2BSD] RAID // RAID partition
sd3*> w // write changes
sd3> q // quitThe drive is now prepared. Now mount the backup drive again. The backup_drive folder should still be in /mnt. The backup drive is sd1 in my case.
mount -t msdos /dev/sd1i /mnt/backup_driveWrite the image file to the new USB drive (a partition of the raw sd3 device)
# dd bs=8192 seek=1 if=/mnt/backup_drive/openbsd-keydisk_backup.img of=/dev/rsd3a
999+1 records in
999+1 records out
8184320 bytes transferred in 2.822 secs (2899937 bytes/sec)Unmount the USB drive with the backup image file and shutdown. Only leave in the third USB which we wrote the backup into.
T500# umount /mnt/backup_drive
shutdown -p nowIf you followed everything correctly, the system should now boot with the new USB drive! Now you have two drives for decrypting and one backup. Because you now know that the backup image file is working, you can scrape the second decrypting USB and store the backup image file in a secure place. In case something happens to the original decrypting drive, you have a tested backup.
This is it for now, to make the laptop a bit more usable, check out my other guides :)
Initial Configuration
Setting up doas
Enable doas for user
It is generally not recommended on any *NIX-based system to login as root on a regular basis. Apart from security reasons, not logging directly as root also prevents you from making dumb mistakes and causing issues (with a less privileged account, usually less stuff can break). On Linux, this is solved by leveraging the sudo program. It allows you to elevate privileges to root, set which accounts are allowed to do so, perform actions on behalf of different accounts, restrict accounts to execute only some commands as root etc. The amount of options makes sudo rather bloated according to some people. To offer a simpler alternative to sudo, doas was created. Doas's main fuction is essentially the same as sudo - safely elevate privileges, run commands as another user etc. Due to it's simplicity and smaller codebase (easier to audit, less room for error), OpenBSD uses the simpler doas program.
We currently have two accounts - root and the user account you have created during the setup, let's say it's bob.
Login as root to create configuration file. Doas comes preinstalled, but doesn't create the configuration file by default, we have to do it manually.
(root)$ touch /etc/doas.confWe are going to allow a special group called wheel (which our account bob should be part of by default) to execute commands as root. To check if your account is in the wheel group, use the groups {user} command or groupinfo wheel
$ groups bob
bob wheel$ groupinfo wheel
name wheel
passwd *
gid 0
members root bobOpen /etc/doas.conf in your favorite editor and add the following to the first line. For additional commands and information, run man doas.conf.
permit- We want to permit thewheelgroup to do certain things, usedenyto denynopass- I have a long password and I'm fine with typing in only to log in, this option makes sure that when I calldoas, it doesn't ask for a password. To type password every time you want to usedoas, omit this option. Alternatively, replace withpersistso it won't ask you for a password for 5 minutes after issuing the first elevated command.:wheel- Apply the previously mentioned options to thewheelgroup.
(root)$ nvim /etc/doas.confThe command above will only work if you have neovim installed. If not, use the default vi.
permit nopass :wheel - /etc/doas.confTo test your configuration file, run doas -C /etc/doas.conf {command}, replace {command} with anything like cat, vi etc. This will tell you whether you are allowed to run that specific command as root. We should be now able to run all commands as root. You may need to log in/log out if it doesn't work at first.
After you are done with the steps above, make sure /etc/doas.conf is owned by root and group wheel and has sane permissions (only writable by root). I also like tightening permissions even further, you might not want to do the same.
doas chmod 400 /etc/doas.confDisable root login?
Disable root login?
Unlike on Linux, where disabling the root account is one of the first things I do after setting up sudo, on OpenBSD, I don't find it necessary and it is even advised against. Try locking the root account with usermod and you will see that it won't even let you. Best practise in this case:
- Give
roota really long random password. - Write it down physically, store in a safe place.
- When needed (system recovery), use
rootto fix whatever is broken.
Connect to Wi-Fi on OpenBSD
Even though I prefer physical connection, even on a laptop, and I plug in an Ethernet cable whenever I can, it is sometimes necessary to use WiFi. This requires remembering a few commands on OpenBSD.
Figure out network interface name
OpenBSD offers support for various network cards. It used to be way worse, but now I would say it's pretty uncommon to find a wireless card that doesn't work at all, however, features might differ from driver to driver.
First, we need to get the name of our wireless interface. To do so, run ifconfig:
$ ifconfigIn the output, look for one of these interface names (list of possible wireless interfaces in OpenBSD, the name differs based on the wireless driver that handles the Wi-Fi card). Other clues that it's a wireless interface include wlan, 802.11 etc.
iwn0: flags=8843<UP,BROADCAST,RUNNING,SIMPLEX,MULTICAST> mtu 1500
lladdr 00:11:22:33:44:55
index 2 priority 4 llprio 3
groups: wlan
media: IEEE802.11 autoselect
status: no network
ieee80211: nwid ""In my case, the interface name is iwn0.
Up the interface
Before we can start scanning or connecting to networks, we need to make sure the wireless interface is UP. Replace iwn0 with the name of your interface.
$ doas ifconfig iwn0 upScan for Wi-Fi networks
Basically all operating systems allow you to view all available wireless networks around you in some way. Usually in a form of a list that appears after you turn on Wi-Fi access. It's basically the same on OpenBSD, it just took me a bit longer to figure out since OpenBSD won't give you shiny buttons, but a simple (and powerful!) terminal.
$ ifconfig iwn0 scanWhich will give you the aforementioned list:
iwn0: flags=8843<UP,BROADCAST,RUNNING,SIMPLEX,MULTICAST> mtu 1500
lladdr 00:11:22:33:44:55
index 2 priority 4 llprio 3
groups: wlan
media: IEEE802.11 autoselect
status: no network
ieee80211: nwid ""
nwid MyWiFi chan 11 bssid 55:44:33:22:55:66 -49dBm HT-MCS15 privacy,short_preamble,short_slottime,wpa2
nwid AnotherNetwork chan 112 bssid 88:00:11:99:55:33 -58dBm HT-MCS15 privacy,short_preamble,short_slottime,wpa2
nwid TP-Link chan 7 bssid 99:55:11:11:11:11 -91dBm HT-MCS15 privacy,short_slottime,radio_measurement
...
...Connect to a Wifi Network
Choose your desired network from the list generated by ifconfig iwn0 scan and run:
$ doas ifconfig iwn0 nwid "MyWiFi" wpakey MySuperSecretPasswordiwn0– Name of the interfaceMyWifi– Name of your Wi-Fi networkMySuperSecretPassword– password for your network, omitwpakeyif the network is open
You should now be connected, but you most likely won't be able to ping anything yet.
$ ping 8.8.8.8
PING 8.8.8.8 (8.8.8.8): 56 data bytes
ping: sendmsg: No route to host
ping wrote 8.8.8.8 64 chars, ret=-1That is because you haven't asked for a DHCP lease yet.
Get IP from DHCP server
This option assumes you want a DHCP address, not a static one. To get the address from DHCP, simply run dhclient on your Wi-Fi interface.
$ doas dhclient iwn0
iwn0: 192.168.1.58 lease accepted from 192.168.1.1 (11:11:11:11:11:11)Success! You are now connected to a Wi-Fi network with a valid IP address. There's, however, way more to discover and learn – auto connecting, configuration files so you don't have to remember all the commands etc. This guide was mainly designed to show you how to connect to a wireless network one-off.
Laptop – Touchpad tap to click
If you have installed OpenBSD on a laptop, you probably want the touchpad to work right. I expect to be able to click when I tap on the touchpad instead of having to press one of the buttons bellow it. To enable this feature, use wsconsctl.
To list current settings, type doas wsconsctl, which will show you all current settings controlled by wsconsctl.
keyboard.type=pc-xt
keyboard.bell.pitch=400
keyboard.bell.period=100
...
...
...
...
mouse.type=synaptics
mouse.rawmode=0
...
...We need to create a wsconsctl configuration file, so that the settings persist across reboots. There's an example configuration file located in /etc/examples/wsconsctl.conf. Conveniently, touchpad tapping is already as one of the examples.
# wscons configurable parameters
#
#keyboard.repeat.dell=200 # change keyboard repeat/delay
...
...
...
#mouse.tp.tapping=1 # enable tapping with default button mappings;
# for customized mappings, list 3 button codesYou can either copy this file to /etc/wsconsctl.conf and remove the lines you don't want there or create /etc/wsconsctl.conf from scratch and only add the mouse tapping line:
$ doas touch /etc/wsconsctl.conf/etc/wsconsctl.conf
mouse.tp.tapping=1Now reboot and it should be enabled.
GUI Setup (X11 + DWM)
Random notes & tips
Change or disable keyboard beep
Shutdown
$ doas shutdown -p nowLeave X and come back
You have logged into the X server, but want to quickly jump to a regular terminal? You can type this shortcut with an F key, depending on the number, you will either be dropeed to ttyC0, ttyC1, ttyC2, ttyC3, ttyC5 or ttyC6.
Ctrl+Alt+{F1,F2,F3,F4,F6}
To go back to the X server, pres Ctrl + Alt + F5 to go back to your X session, which will be left as it was before.
Also make sure to log out of the other terminal ttys because anyone will be able to switch back to them and you don't want to be logged in when that happens.
Vi – Show lines
To show lines in a file opened in vi, press Esc to enter Normal/Command mode and type :set number.
To make this persistent = show lines by default when you open any file, create a file called .nexrc in your home directory and put set number on the first line of it.
$ cd ~
$ touch .nexrc.nexrc
set numberVi – Jump to a line
In Normal mode, type :{line_nubmer}, e.g :20.
Show and change hostname
Show
To show your hostname, you can conveniently type hostname into the terminal:
Example output:
Desktop.domain.localTo omit the domain information from the output, type hostname -s
DesktopEdit
Hostname information is located in /etc/myname and it's read during the startup. Edit the content of the file to change hostname.
$ doas nvim /etc/mynameThis will however propagate on the next reboot, to change the hostname immediately, type:
$ doas hostname new_hostname$ hostname
new_hostnameError – database too small: /var/db/locate.database
Locate is a cool utility that allows you to search through your filesystem quickly thanks to an index database it maintains. It should update this index automatically at midnight (at least on Linux), but sometime you want to do that manually to have an up to date database index immediatelly. Also, if you run into the database too small: /var/db/locate.database issue, you can fix it with the following command as well:
$ doas /usr/libexec/locate.updatedbAfterwards, locate should execute normally.
Change repository, package mirror
Mirror information is located in /etc/installurl file. Unlike on Linux, where package managers usually offer extensive features like multiple repositories with different priority settings etc., on OpenBSD, there's just a single file with a single URL.
Open the /etc/installurl file in an editor and put a single URL from this mirror list into the file.
$ doas vi /etc/installurlThere's no need to update repositories like on Linux, it will automatically use the new repository when installing or updating packages, which you can try with pkg_add -u -v