Debian
Book about one of the oldest and arguably the most stable Linux distributions in existence.
- Updates & Upgrades
- Upgrading Debian 10 (Buster) to Debian 11 (Bullseye)
- Upgrading Debian kernel (5.4 to 5.10)
- Upgrade Debian 10 to 11 (speedrun)
- Apt
- Nginx
- Tips and tools
Updates & Upgrades
Upgrading Debian 10 (Buster) to Debian 11 (Bullseye)
I am a big fan of Debian in the server environment, mainly due to its great record in stability, security and other important aspects like having a huge number of tutorials and guides available online. Since the release of Debian 11 (codenamed Bullseye), I've been thinking about upgrading to the latest version. I will start on one of my VPS servers to test how is everything working. There are number of tutorials online explaining the exact same thing. Feel free to follow which you find the best, this is mainly for my documentation.
Before you begin the upgrade process, make sure you know/have these two things:
Standard Debian installation with the default kernel – in this case it is probably fine to update with SSH access only.
However, if you are using a different kernel or backports, I recommend you also have access to the boot process and recovery in case your system doesn't boot after the upgrade.
Summary
- Backup your system – You never know what can go wrong, be prepared.
- Edit apt's sources.list – In order to fetch and install packages meant for Debian 11, we need to change some lines in the /etc/apt/sources.list file.
- Update software repos – Make apt aware of the changes you've made in sources.list and upgrade existing packages.
- Upgrade the system itself – After upgrading packages, you can upgrade the system as well.
Backup your system
Unless you actually have a testing environment, where loss of files won't cause even a minimal headache, please backup your data. In most cases, it is OK to at least backup all configuration files for any services running on the server. You can always rebuild the server using them in case something bad happens. Always have a precise upgrade plan when upgrading production servers, including plans B and C and D, depenging on the criticality of the service you are running. I am upgrading a server with two services only I use, so I can afford a very simple "backup" – cat all config files into terminal and copy them to notepad on my workstation, that's it. You can also setup something fancier like rsnapshot or restic.
Prepare for the changes
Check system version
There are numerous ways (from basic to more fancy) to check what version and distribution you are running, try running couple of these:
lsb_release -aIf you don't have that installed like me, try on of the other options. Simply cat /etc/debian_version or /etc/os-release. The latter will give you more detailed information.
$ cat /etc/debian_version
10.10

$ cat /etc/os-release
PRETTY_NAME="Debian GNU/Linux 10 (buster)"
NAME="Debian GNU/Linux"
VERSION_ID="10"
VERSION="10 (buster)"
VERSION_CODENAME=buster
ID=debian
HOME_URL="https://www.debian.org/"
SUPPORT_URL="https://www.debian.org/support"
BUG_REPORT_URL="https://bugs.debian.org/"
You should also probably know about the uname command, combined with the -a (--all) prints some system information.
$ uname -a
Linux hostname 5.4.0-74-generic #83~18.04.1-Ubuntu SMP Tue May 11 16:01:00 UTC 2021 x86_64 GNU/Linux
If you run this command on a vanilla Debian 10 distribution, you will most likely see kernel version 4.19, which is the version Debian 10 shipped with. For some reason, my VPS provider is using a newer kernel and somehow managed to throw Ubuntu into the mix, even though the system clearly runs on Debian, based on the multiple command outputs above.
Update and upgrade existing software
It is recommended before installing any new packages or performing a large update such as this one to update and upgrade the existing system.
First of all, update apt repositories. Unless you are using Nginx from their official repository instead from the Debian one, you won't see the lines containing nginx.
$ sudo apt update
Get:1 https://nginx.org/packages/mainline/debian buster InRelease [3,607 B]
Hit:2 http://deb.debian.org/debian buster InRelease
Hit:3 http://security.debian.org/debian-security buster/updates InRelease
Hit:4 http://deb.debian.org/debian buster-backports InRelease
Get:5 https://nginx.org/packages/mainline/debian buster/nginx amd64 Packages [49.9 kB]
Fetched 53.5 kB in 1s (47.0 kB/s)
Reading package lists... Done
Building dependency tree
Reading state information... Done
Upgrade existing packages with apt upgrade.
$ sudo apt upgrade
Reading package lists... Done
Building dependency tree
Reading state information... Done
Calculating upgrade... Done
The following packages will be upgraded:
  nginx
1 upgraded, 0 newly installed, 0 to remove and 0 not upgraded.
Need to get 880 kB of archives.
After this operation, 0 B of additional disk space will be used.
Do you want to continue? [Y/n] y
Get:1 https://nginx.org/packages/mainline/debian buster/nginx amd64 nginx amd64 1.21.3-1~buster [880 kB]
Fetched 880 kB in 11s (83.5 kB/s)
debconf: delaying package configuration, since apt-utils is not installed
(Reading database ... 42829 files and directories currently installed.)
Preparing to unpack .../nginx_1.21.3-1~buster_amd64.deb ...
Unpacking nginx (1.21.3-1~buster) over (1.21.2-1~buster) ...
Setting up nginx (1.21.3-1~buster) ...
Processing triggers for systemd (241-7~deb10u8) ...
As you can see I had a pending upgrade of Nginx from 1.21.2 to 1.21.3. In production, always check before upgrading individual packages in case there is a major change that might break your system.
$ sudo apt dist-upgrade
Reading package lists... Done
Building dependency tree
Reading state information... Done
Calculating upgrade... Done
0 upgraded, 0 newly installed, 0 to remove and 0 not upgraded.
If you want to know the difference between apt upgrade and apt dist-upgrade, read this paragraph from apt's man page:
"dist-upgrade in addition to performing the function of upgrade, also intelligently handles changing dependencies with new versions of packages; apt-get has a "smart" conflict resolution system, and it will attempt to upgrade the most important packages at the expense of less important ones if necessary. So, dist-upgrade command may remove some packages. The /etc/apt/sources.list file contains a list of locations from which to retrieve desired package files. See also apt_preferences(5) for a mechanism for overriding the general settings for individual packages."
Clean any leftovers using the following commands:
$ sudo apt autoremove
Reading package lists... Done
Building dependency tree
Reading state information... Done
0 upgraded, 0 newly installed, 0 to remove and 0 not upgraded.

$ sudo apt autoclean
Reading package lists... Done
Building dependency tree
Reading state information... Done
Again, to learn why we are running these commands, read this from the man page:
- clean: clean clears out the local repository of retrieved package files. It removes everything but the lock file from /var/cache/apt/archives/ and /var/cache/apt/archives/partial/. When APT is used as a dselect(1) method, clean is run automatically. Those who do not use dselect will likely want to run apt-get clean from time to time to free up disk space.
- autoclean: Like clean, autoclean clears out the local repository of retrieved package files. The difference is that it only removes package files that can no longer be downloaded, and are largely useless. This allows a cache to be maintained over a long period without it growing out of control. The configuration option APT::Clean-Installed will prevent installed packages from being erased if it is set to off.
- autoremove: is used to remove packages that were automatically installed to satisfy dependencies for some package and that are no longer needed.
Edit & Update software repos
Before making any changes to the /etc/apt/sources.list file, back it up in a different directory. Do the same for anything in the /etc/apt/sources.list.d folder. This will copy the file to your home directory under the name sources.list.bak
$ cp /etc/apt/sources.list ~/sources.list.bakUse your favorite editor or sed to replace all "buster" references with "bullseye", without quotes of course.
The problem is, the sources.list can be set up differently based on your needs. For example, this is the sources.list on my VPS now.
# Generated by distrobuilder
deb http://deb.debian.org/debian buster main
deb http://security.debian.org/debian-security buster/updates main
deb http://deb.debian.org/debian buster-backports main

# Official Nginx repo
deb https://nginx.org/packages/mainline/debian/ buster nginx
Meanwhile the full sources.list (with official Debian repos only) can look like this:
deb http://deb.debian.org/debian buster main contrib non-free
deb-src http://deb.debian.org/debian buster main contrib non-free

deb http://deb.debian.org/debian buster-updates main contrib non-free
deb-src http://deb.debian.org/debian buster-updates main contrib non-free

deb http://deb.debian.org/debian buster-backports main contrib non-free
deb-src http://deb.debian.org/debian buster-backports main contrib non-free

deb http://security.debian.org/debian-security/ buster/updates main contrib non-free
deb-src http://security.debian.org/debian-security/ buster/updates main contrib non-free
Let me explain what each of these mean. Feel free to skip this part or read it from the official source and continue the migration process.
- deb or deb-src indicate the type of archive. deb consists of binary (=already compiled) packages, while deb-src contains the source code and other necessary files for building applications from source. Unless you plan to build official packages from source on the system, you can completely leave out the deb-src lines.
- http://deb.debian.org/debian and http://security.debian.org/debian-security/ are URLs that point to mirrors which contain the actual packages. There are hundreds of mirrors and it is generaly recommended to use the closest one to you with the smallest latency (you can find the list here). The two mentioned above are actually just pointers to CDN network which should redirect you to the fastest official mirror (as explained here).
- buster – this part refers to the codename of the distribution (e.g. buster, bullseye, etc.) The first refers to the base Debian repository, while the others to the updates, backports and security respectively. The backports repository is used in cases you want a stable system (use the stable branch), and have newer versions of software available through the official repository. However, you must be careful and don't mess with fundamental libraries and other core packages, which could result in a broken system due to mismatched versions of important packages.
- main, contrib and non-free – these are called components and specify which kinds of packages you would like to have access to. Some users won't need non-free packages, because they support the idea of libre software, while others might need them to install additional firmware to make their devices work properly.
Finally change the sources.list file accordingly. I won't be building from source and I don't need any packages outside of main. I will be adding new line with debian updates, which wasn't there for some reason before.
# Generated by distrobuilder
deb http://deb.debian.org/debian bullseye main

deb http://security.debian.org/debian-security bullseye-security main

deb http://deb.debian.org/debian bullseye-updates main

deb http://deb.debian.org/debian bullseye-backports main

# Official Nginx repo
deb https://nginx.org/packages/mainline/debian/ bullseye nginx
Be careful, syntax of the security repository was changed from the previous release. Instead of buster/updates, it is now bullseye-security.
Now run apt to make it aware of configuration changes
$ sudo apt update
Get:1 http://security.debian.org/debian-security bullseye-security InRelease [44.1 kB]
Get:2 http://deb.debian.org/debian bullseye InRelease [113 kB]
Get:3 http://deb.debian.org/debian bullseye-updates InRelease [36.8 kB]
Get:4 http://deb.debian.org/debian bullseye-backports InRelease [39.3 kB]
Get:5 http://security.debian.org/debian-security bullseye-security/main amd64 Packages [29.6 kB]
Get:6 http://security.debian.org/debian-security bullseye-security/main Translation-en [16.0 kB]
Get:7 http://deb.debian.org/debian bullseye/main amd64 Packages [8,178 kB]
Get:8 http://deb.debian.org/debian bullseye/main Translation-en [6,241 kB]
Get:9 http://deb.debian.org/debian bullseye-backports/main amd64 Packages [56.8 kB]
Get:10 http://deb.debian.org/debian bullseye-backports/main Translation-en [42.9 kB]
Get:11 https://nginx.org/packages/mainline/debian bullseye InRelease [2,860 B]
Get:12 https://nginx.org/packages/mainline/debian bullseye/nginx amd64 Packages [7,716 B]
Fetched 14.8 MB in 10s (1,415 kB/s)
Reading package lists... Done
Building dependency tree
Reading state information... Done
384 packages can be upgraded. Run 'apt list --upgradable' to see them.
Upgrade the packages and distro
Upgrade existing packages only
384 packages can be upgraded. Run 'apt list --upgradable' to see them.As you can see, a lot of packages will be upgraded. In order to avoid major breaks, we need to run apt upgrade --without-new-pkgs. This will only upgrade existing packages, but won't remove or add any new. The reason we are doing this is to prevent the system from breaking down due to missing packages after the upgrade.
$ sudo apt upgrade --without-new-pkgsYou may see the following line somewhere in the output:
The following packages have been kept back:This is the result of --without-new-pkgs. The reason for these kept back packages is the following:
"If the dependencies have changed on one of the packages you have installed so that a new package must be installed to perform the upgrade then that will be listed as "kept-back"."
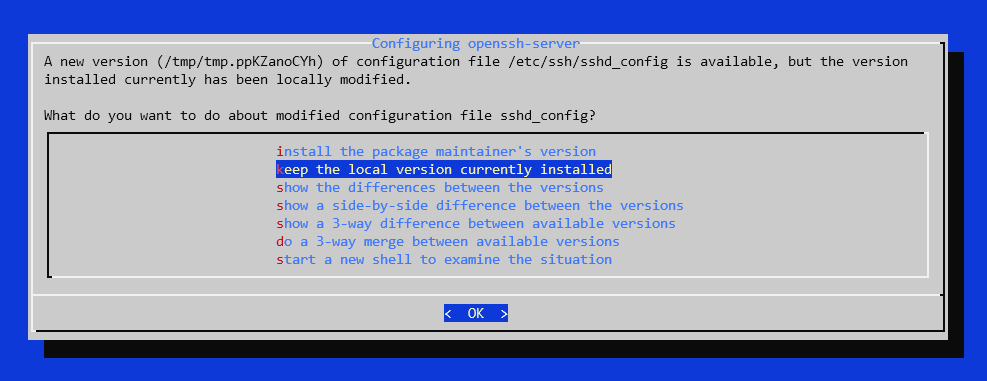
Carefully watch the upgrade process! In case a service needs to be restarted or the system doesn't know what to do with new configuration files (e.g. you have custom config file and the upgrade brings a new one, should it overwrite, keep original or let you compare and merge manually?) You might be asked these kinds of questions.
It is not strictly necessary to reboot now, but I just want to make sure nothing broke during this process and the system can safely boot.
Perform full upgrade – remove old, install new
Fortunately, in my case the system booted successfully. Now it's time to perform a full upgrade. This command can actually cause issue, since it does install new packages and removes old ones. Again, watch the screen carefully.
$ sudo apt full-upgrade
...
...
...
149 upgraded, 90 newly installed, 19 to remove and 0 not upgraded.
Need to get 276 MB of archives.
After this operation, 625 MB of additional disk space will be used.
Do you want to continue? [Y/n]
This is an example question you might get. I have previously edited the sysctl.conf file to fix some performance issues with the service I was running. I pressed D to get the list of changes and after concluding that I want to keep my file, I pressed N.
Configuration file '/etc/sysctl.conf'
 ==> Modified (by you or by a script) since installation.
 ==> Package distributor has shipped an updated version.
   What would you like to do about it ?  Your options are:
    Y or I  : install the package maintainer's version
    N or O  : keep your currently-installed version
      D     : show the differences between the versions
      Z     : start a shell to examine the situation
 The default action is to keep your current version.
*** sysctl.conf (Y/I/N/O/D/Z) [default=N] ?
or sshd_config changes
Now reboot and pray :)
$ sudo rebootWell, since I was using a 5.4 kernel from Debian 10 backports, instead of the default 4.19, I had to explicitly confirm something during the boot process. Unfortunately, my VPS provider doesn't provide me with access to the pre-boot environment and GRUB, therefore I wasn't able to boot. Took them about a day to get the VPS up and running and even though I am now running Debian 11 which comes with 5.10, I still have the 5.4. Unless you have also installed backported kernel, you should be already running Debian 11 with 5.10 without any troubles.
$ cat /etc/debian_version
11.0
If we run sudo apt upgrade again, we can see a number of unused packages that can be remove.
The following packages were automatically installed and are no longer required:
  cpp-8 dh-python gir1.2-glib-2.0 golang-1.11 golang-1.11-doc golang-1.11-go golang-1.11-src libasan5 libdns-export1104
  libfl2 libgirepository-1.0-1 libicu63 libidn11 libip4tc0 libip6tc0 libiptc0 libisc-export1100 libisl19 libjson-c3
  liblua5.2-0 libmatheval1 libmpdec2 libmpx2 libnftables0 libperl5.28 libpgm-5.2-0 libprocps7 libpython2-stdlib
  libpython2.7-minimal libpython2.7-stdlib libpython3.7 libpython3.7-dev libpython3.7-minimal libpython3.7-stdlib
  libreadline7 perl-modules-5.28 python2 python2-minimal python2.7 python2.7-minimal python3-asn1crypto python3-dbus
  python3-entrypoints python3-future python3-gi python3-jeepney python3-keyring python3-keyrings.alt python3-mock
  python3-pbr python3-pycryptodome python3-secretstorage python3-xdg python3.7-minimal
Use 'sudo apt autoremove' to remove them.
0 upgraded, 0 newly installed, 0 to remove and 0 not upgraded.
In order to do so, run
$ sudo apt autoremoveor use the purge option to remove configuration files of these packages as well
$ sudo apt --purge autoremoveThat's it. Now make sure that everything works as expected, especially the services and apps you are running. Again, in my case, both of the applications that I am running are unable to start, guess that will take some more troubleshooting :) That's why you never try this on production without prior testing.
Upgrading Debian kernel (5.4 to 5.10)
I have recently upgraded one of my Debian servers from 10 to 11. The main issue I ran into was the fact that the kernel was backported. This meant that when running Debian 10, the kernel was newer than original (5.4 vs 4.19), but now that I have upgraded to Debian 11, which ships with 5.10 by default, I am now running older version than default. This is nothing to worry about, since the 5.4 is the 20th LTS (Long-Term-Support) release, meaning it will be supported up until December 2025. The sole reason why am I even doing this is to have the default and newest Debian kernel and avoid having a FrankenDebian.
Check current version
First, check the current version of your kernel.
$ uname -r

5.4.0-74-generic
Update and upgrade
It is always recommended to update apt repositories and upgrade any pending packages.
$ sudo apt update
$ sudo apt upgrade
Search apt
Issue a search query to apt to see which kernel versions are available in the default repository.
$ apt-cache search linux-image | grep amd64

linux-headers-5.10.0-8-amd64 - Header files for Linux 5.10.0-8-amd64
linux-headers-5.10.0-8-cloud-amd64 - Header files for Linux 5.10.0-8-cloud-amd64
linux-headers-5.10.0-8-rt-amd64 - Header files for Linux 5.10.0-8-rt-amd64
linux-image-5.10.0-8-amd64-dbg - Debug symbols for linux-image-5.10.0-8-amd64
linux-image-5.10.0-8-amd64-unsigned - Linux 5.10 for 64-bit PCs
linux-image-5.10.0-8-cloud-amd64-dbg - Debug symbols for linux-image-5.10.0-8-cloud-amd64
linux-image-5.10.0-8-cloud-amd64-unsigned - Linux 5.10 for x86-64 cloud
linux-image-5.10.0-8-rt-amd64-dbg - Debug symbols for linux-image-5.10.0-8-rt-amd64
linux-image-5.10.0-8-rt-amd64-unsigned - Linux 5.10 for 64-bit PCs, PREEMPT_RT
linux-image-amd64-dbg - Debugging symbols for Linux amd64 configuration (meta-package)
linux-image-amd64-signed-template - Template for signed linux-image packages for amd64
linux-image-cloud-amd64-dbg - Debugging symbols for Linux cloud-amd64 configuration (meta-package)
linux-image-rt-amd64-dbg - Debugging symbols for Linux rt-amd64 configuration (meta-package)
linux-image-5.10.0-8-amd64 - Linux 5.10 for 64-bit PCs (signed)
linux-image-5.10.0-8-cloud-amd64 - Linux 5.10 for x86-64 cloud (signed)
linux-image-5.10.0-8-rt-amd64 - Linux 5.10 for 64-bit PCs, PREEMPT_RT (signed)
linux-image-amd64 - Linux for 64-bit PCs (meta-package)
linux-image-cloud-amd64 - Linux for x86-64 cloud (meta-package)
linux-image-rt-amd64 - Linux for 64-bit PCs (meta-package)
Pick the right image and headers for you. In my case it is the linux-image-5.10.0-8-amd64 and linux-headers-5.10.0-8-amd64
Install new kernel packages
$ sudo apt install linux-image-5.10.0-8-amd64 linux-headers-5.10.0-8-amd64In my case the system wanted/needed to install some additional packages as well, don't worry about that too much right now, we can check what was installed later and possibly uninstall if we want to.
The last lines of the installation should look like this:
Setting up linux-headers-5.10.0-8-amd64 (5.10.46-4) ...
Setting up initramfs-tools-core (0.140) ...
Setting up initramfs-tools (0.140) ...
update-initramfs: deferring update (trigger activated)
Setting up linux-image-5.10.0-8-amd64 (5.10.46-4) ...
I: /vmlinuz.old is now a symlink to boot/vmlinuz-5.10.0-8-amd64
I: /initrd.img.old is now a symlink to boot/initrd.img-5.10.0-8-amd64
I: /vmlinuz is now a symlink to boot/vmlinuz-5.10.0-8-amd64
I: /initrd.img is now a symlink to boot/initrd.img-5.10.0-8-amd64
/etc/kernel/postinst.d/initramfs-tools:
update-initramfs: Generating /boot/initrd.img-5.10.0-8-amd64
Processing triggers for initramfs-tools (0.140) ...
update-initramfs: Generating /boot/initrd.img-5.10.0-8-amd64
Reboot to apply changes
Such a big change as upgrading the kernel requires the system to be rebooted. Until then, the system will use the old kernel. Even in case the new kernel doesn't boot, you can still use the old one, because the new was just installed alongside with the old.
$ sudo rebootIt is recommended to have access to the booloader (recovery) in case something goes wrong. Procceed with caution if you have SSH access only.
You system should now reboot with the newest kernel. In my case, the VPS booted back to the old kernel, probably because the provider has hard set it to boot only that specific kernel. Consult your provider in case you have a VPS.
Upgrade Debian 10 to 11 (speedrun)
This is not supposed to be a quide, just a semi-public documentation of an update I performed on one of my servers.
Update and upgrade existing
First update repos and upgrade any pending packages:
$ sudo apt update
$ sudo apt upgrade
I had one pending Nginx update, so I will install it (I have done the same on another server already, so I know the version is safe and doesn't break anything.) After the upgrade, Nginx has been restarted automatically. You can check the current version with sudo nginx -v
Edit sources.list
Go to /etc/apt and edit sources.list (with elevated privileges).
Remove deb-src
I removed lines with deb-src, because I simply don't need them.
Change server location
Decided I wanted to change to a closer Debian mirror, so I replaced the old servers.
Update from new repos
$ sudo apt updateAutoremove some packages
$ sudo apt autoremoveAdd bullseye to sources.list
Replace all occurances of buster in /etc/apt/sources.list with bullseye. Don't forget new syntax on debian-security line, which is now bullseye-security
Add Nginx
On this server, I have Nginx repo in /etc/apt/sources.list.d in nginx.list file. Again, replace buster with bullseye.
Update and upgrade fully
$ sudo apt update$ sudo apt upgrade --without-new-pkgs$ sudo reboot$ sudo apt full-upgrade$ sudo apt autoremoveThis server had a default Debian 10 kernel, so the upgrade went smoothly. Unfortunately, it usually isn't the system itself that breaks during the upgrade, but the services running on it. This time, it was PHP. For whatever reason, the following happened:
- PHP-FPM7.3 service got masked by systemd.
- PHP commands in the command line stopped working.
- Even though Debian 11's PHP version is 7.4, I still only had PHP 7.3 installed, but not working.
Fixed by installing PHP 7.4 from scratch and reinstalling the application depending on it.
Apt
Enable backports in Debian 11
Sometimes the packages in Debian stable are way too old. In that case, you can use the backported repository to install packages in newer versions. It is not recommended to install every single package from the backported repo to keep your distro stable in the long term.
Instead only pick packages you need. Use the -t option with apt to force installation from the backported repo.
Enable backports in Debian
Open /etc/apt/sources.list in your favorite editor.
$ sudo vi /etc/apt/sources.listAdd a line containing the following:
deb http://deb.debian.org/debian bullseye-backports mainUpdate apt configuration
$ sudo apt updateCheck apt pritority configuration and make sure the backports repo has lower priority than the other repositories.
$ apt-cache policy

Package files:
 100 /var/lib/dpkg/status
     release a=now
 500 https://nginx.org/packages/mainline/debian bullseye/nginx amd64 Packages
     release v=11.0,o=nginx,a=stable,n=bullseye,l=nginx,c=nginx,b=amd64
     origin nginx.org
 100 http://deb.debian.org/debian bullseye-backports/main amd64 Packages
     release o=Debian Backports,a=bullseye-backports,n=bullseye-backports,l=Debian Backports,c=main,b=amd64
     origin deb.debian.org
 500 http://security.debian.org/debian-security bullseye-security/main amd64 Packages
     release v=11,o=Debian,a=stable-security,n=bullseye-security,l=Debian-Security,c=main,b=amd64
     origin security.debian.org
 500 http://deb.debian.org/debian bullseye/main amd64 Packages
     release v=11.0,o=Debian,a=stable,n=bullseye,l=Debian,c=main,b=amd64
     origin deb.debian.org
Pinned packages:
As you can see, the backported repo has lower number than the rest. It is a bit more complicated than that (you can check apt's man page), but for the purposes of this, let's just say that lower means lower priority.
Enable testing repo in stable Debian 11
You want to keep a stable Debian 11 distro (install and upgrade all packages from stable by default), but there's a few packages you want to use that are in another repo (testing or unstable). Here's how to do it (probably correctly).
Enable testing in Debian
Adding backports is easy, it's just another line in /etc/apt/sources.list. Unfortunately, it is not as simple as that with testing or unstable. For these to work properly (and not change all packages to unstable), we need to play a bit with repository priorities.
We will use something called Apt-Pinning, which you can read more about in the Debian Handbook.
Edit apt preferences file
Create apt preferences file (if it doesn't exist already) and open it with your favorite file editor.
$ sudo vi /etc/apt/preferencesNow add the following content into it:
Package: *
Pin: release a=stable
Pin-Priority: 900

Package: *
Pin: release o=Debian
Pin-Priority: -10
This should give the stable repository high enough priority that all packages will be installed and upgraded from stable by default. To install package from other repo (testing or unstable), it has to be explicitly specified with -t option of apt.
Replace bullseye with stable in sources.list
This is how my sources.list in /etc/apt looks like now:
# Generated by distrobuilder
deb http://deb.debian.org/debian bullseye main

deb http://security.debian.org/debian-security bullseye-security main

deb http://deb.debian.org/debian bullseye-updates main

# Official Nginx repo
deb https://nginx.org/packages/mainline/debian/ bullseye nginx
We can see that each line contains a reference to the release codename bullseye.
$ sudo vi /etc/apt/sources.listReplace all references to bullseye with stable (except for Nginx) like this:
# Generated by distrobuilder
deb http://deb.debian.org/debian stable main

deb http://security.debian.org/debian-security stable-security main

deb http://deb.debian.org/debian stable-updates main

# Official Nginx repo
deb https://nginx.org/packages/mainline/debian/ bullseye nginx
WARNING – It is not recommended to use stable in the sources.list. Stable always refers to the stable repository of the current Debian version. Once the next Debian version is released in a few years and you upgrade your system, it will break stuff, because everything will suddenly update to the newest version. Keep that in mind.
Avoid using stable in your sources.list as that results in nasty surprises and broken systems when the next release is made; upgrading to a new release should be a deliberate, careful action and editing a file once every two years is not a burden.
Update your system
$ sudo apt update

Get:1 http://security.debian.org/debian-security stable-security InRelease [44.1 kB]
Get:2 http://deb.debian.org/debian stable InRelease [113 kB]
Get:3 http://deb.debian.org/debian stable-updates InRelease [36.8 kB]
Get:4 http://security.debian.org/debian-security stable-security/main amd64 Packages [31.1 kB]
Get:5 http://security.debian.org/debian-security stable-security/main Translation-en [16.8 kB]
Get:6 http://deb.debian.org/debian stable/main amd64 Packages [8,178 kB]
Get:7 http://deb.debian.org/debian stable/main Translation-en [6,241 kB]
Hit:8 https://nginx.org/packages/mainline/debian bullseye InRelease
Fetched 14.7 MB in 7s (2,254 kB/s)
Reading package lists... Done
Building dependency tree... Done
Reading state information... Done
All packages are up to date.
Add testing lines to sources.list
$ sudo vi /etc/apt/sources.listCopy the 3 lines with stable in them like this:
# Generated by distrobuilder
deb http://deb.debian.org/debian stable main
deb http://deb.debian.org/debian stable main

deb http://security.debian.org/debian-security stable-security main
deb http://security.debian.org/debian-security stable-security main

deb http://deb.debian.org/debian stable-updates main
deb http://deb.debian.org/debian stable-updates main

# Official Nginx repo
deb https://nginx.org/packages/mainline/debian/ bullseye nginx
and add testing to each of the other lines, like this:
# Generated by distrobuilder
deb http://deb.debian.org/debian stable main
deb http://deb.debian.org/debian testing main

deb http://security.debian.org/debian-security stable-security main
deb http://security.debian.org/debian-security testing-security main

deb http://deb.debian.org/debian stable-updates main
deb http://deb.debian.org/debian testing-updates main

# Official Nginx repo
deb https://nginx.org/packages/mainline/debian/ bullseye nginx
Update your system again
$ sudo apt updateConfirm the testing repo is working
Query search for a package that has different versions across stable and testing, e.g wireguard
$ apt-cache show wireguardYou can see that there are now 2 packages available, each at different version.
Package: wireguard
Version: 1.0.20210424-1
Installed-Size: 17
Maintainer: Daniel Kahn Gillmor <dkg@fifthhorseman.net>
Architecture: all
Depends: wireguard-modules (>= 0.0.20191219) | wireguard-dkms (>= 0.0.20200121-2), wireguard-tools (>= 1.0.20210424-1)
Description-en: fast, modern, secure kernel VPN tunnel (metapackage)
 WireGuard is a novel VPN that runs inside the Linux Kernel and uses
 state-of-the-art cryptography (the "Noise" protocol). It aims to be
 faster, simpler, leaner, and more useful than IPSec, while avoiding
 the massive headache. It intends to be considerably more performant
 than OpenVPN. WireGuard is designed as a general purpose VPN for
 running on embedded interfaces and super computers alike, fit for
 many different circumstances. It runs over UDP.
 .
 This metapackage explicitly depends on both the kernel module and the
 userspace tooling.
Description-md5: bd6dd7a30cf34800a40219e3d2df9dc3
Homepage: https://www.wireguard.com
Section: net
Priority: optional
Filename: pool/main/w/wireguard/wireguard_1.0.20210424-1_all.deb
Size: 8196
MD5sum: fcf9917e3a6cc6c2588d4d0310d631be
SHA256: 4b19f03e77c3ab82e9510ef9b7abe1b35c39d509ba0a792328fd3b6f6e060adc

Package: wireguard
Version: 1.0.20210223-1
Installed-Size: 17
Maintainer: Daniel Kahn Gillmor <dkg@fifthhorseman.net>
Architecture: all
Depends: wireguard-modules (>= 0.0.20191219) | wireguard-dkms (>= 0.0.20200121-2), wireguard-tools (>= 1.0.20210223-1)
Description-en: fast, modern, secure kernel VPN tunnel (metapackage)
 WireGuard is a novel VPN that runs inside the Linux Kernel and uses
 state-of-the-art cryptography (the "Noise" protocol). It aims to be
 faster, simpler, leaner, and more useful than IPSec, while avoiding
 the massive headache. It intends to be considerably more performant
 than OpenVPN. WireGuard is designed as a general purpose VPN for
 running on embedded interfaces and super computers alike, fit for
 many different circumstances. It runs over UDP.
 .
 This metapackage explicitly depends on both the kernel module and the
 userspace tooling.
Description-md5: bd6dd7a30cf34800a40219e3d2df9dc3
Homepage: https://www.wireguard.com
Section: net
Priority: optional
Filename: pool/main/w/wireguard/wireguard_1.0.20210223-1_all.deb
Size: 8164
MD5sum: fa92e03f62c6d6528cc770a9e97a141a
SHA256: d07b7f466a90a232f7a8a1750bbf7e5872555d41854789fc0eb6b4f0538b6ebf
Confirm the correct apt priorities
We should also check if apt pulls the correct (stable) package by default and only installs from testing when explicitly requested. Run apt with --dry-run to show what would be installed without installing anything.
$ sudo apt install wireguard --dry-runComparing the output from apt-cache show wireguard to this confirms that apt is trying to install the stable version (20210223-1)
Reading package lists... Done
Building dependency tree... Done
Reading state information... Done
The following additional packages will be installed:
  wireguard-tools
Suggested packages:
  openresolv | resolvconf
The following NEW packages will be installed:
  wireguard wireguard-tools
0 upgraded, 2 newly installed, 0 to remove and 0 not upgraded.
Inst wireguard-tools (1.0.20210223-1 Debian:11.0/stable [amd64])
Inst wireguard (1.0.20210223-1 Debian:11.0/stable [all])
Conf wireguard-tools (1.0.20210223-1 Debian:11.0/stable [amd64])
Conf wireguard (1.0.20210223-1 Debian:11.0/stable [all])
Try installing package from testing
Now install the same package from testing, by specifying the -t option and the name of the testing repository.
sudo apt install -t testing wireguard --dry-runReading package lists... Done
Building dependency tree... Done
Reading state information... Done
The following additional packages will be installed:
wireguard-tools
Suggested packages:
openresolv | resolvconf
The following NEW packages will be installed:
wireguard wireguard-tools
0 upgraded, 2 newly installed, 0 to remove and 163 not upgraded.
Inst wireguard-tools (1.0.20210424-1 Debian:testing [amd64])
Inst wireguard (1.0.20210424-1 Debian:testing [all])
Conf wireguard-tools (1.0.20210424-1 Debian:testing [amd64])
Conf wireguard (1.0.20210424-1 Debian:testing [all])This would install version 20210424-1 from testing.
Nginx
Collection of Nginx-related posts on my Debian server, might create a separate Book for Nginx in the future.
Missing /etc/nginx folder
Not entirely sure how this might have happened, but I once SSHed into one of my servers to find out that the entire /etc/nginx folder has dissapeared. I tried looking elsewhere or using locate, but the configuration folder was nowhere to be found. Just like that the /var/log/nginx folder has dissapeared as well. It might have happened during an upgrade, but after some thorough searching, I still couldn't figure out when or why it happened.
Strangely, all services (websites) using Nginx were running fine and the entire service was active and running as well, still happily pointing to the non-existent config file:
$ systemctl status nginx
● nginx.service - nginx - high performance web server
     Loaded: loaded (/lib/systemd/system/nginx.service; disabled; vendor preset: enabled)
    Drop-In: /etc/systemd/system/nginx.service.d
             └─override.conf
     Active: active (running) since Wed 2021-09-15 21:40:43 CEST; 3 days ago
       Docs: https://nginx.org/en/docs/
   Main PID: 98 (nginx)
        CPU: 20.643s
     CGroup: /system.slice/nginx.service
             ├─ 98 nginx: master process /usr/sbin/nginx -c /etc/nginx/nginx.conf
             └─101 nginx: worker process

Sep 15 21:40:43 hostname systemd[1]: Starting nginx - high performance web server...
Sep 15 21:40:43 hostname systemd[1]: Started nginx - high performance web server.
$ cd /etc/nginx
-bash: cd: /etc/nginx: No such file or directoryHowever, if the server or Nginx randomly restarted, it wouldn't be able to start again and all hell would break loose.
Fortunately, I have backed up my config file, which is really the only thing that matters, the rest can be rebuilt.
Stop Nginx
$ sudo systemctl stop nginxTry to restart it, and just like I expected:
$ sudo systemctl restart nginx
Job for nginx.service failed because the control process exited with error code.
See "systemctl status nginx.service" and "journalctl -xe" for details.

$ sudo systemctl status nginx
● nginx.service - nginx - high performance web server
     Loaded: loaded (/lib/systemd/system/nginx.service; disabled; vendor preset: enabled)
    Drop-In: /etc/systemd/system/nginx.service.d
             └─override.conf
     Active: failed (Result: exit-code) since Sun 2021-09-19 16:25:01 CEST; 5s ago
       Docs: https://nginx.org/en/docs/
    Process: 22419 ExecStart=/usr/sbin/nginx -c /etc/nginx/nginx.conf (code=exited, status=1/FAILURE)
        CPU: 11ms

Sep 19 16:25:01 hostname systemd[1]: Starting nginx - high performance web server...
Sep 19 16:25:01 hostname nginx[22419]: nginx: [alert] could not open error log file: open() "/var/log/nginx/error.log" fa>
Sep 19 16:25:01 hostname nginx[22419]: 2021/09/19 16:25:01 [emerg] 22419#22419: open() "/etc/nginx/nginx.conf" failed (2:>
Sep 19 16:25:01 hostname systemd[1]: nginx.service: Control process exited, code=exited, status=1/FAILURE
Sep 19 16:25:01 hostname systemd[1]: nginx.service: Failed with result 'exit-code'.
Sep 19 16:25:01 hostname systemd[1]: Failed to start nginx - high performance web server.
Uninstall and reinstall Nginx
$ sudo apt purge nginx*$ sudo apt install nginxFix configuration
$ cd /etc/nginx/conf.d
$ sudo mv default.conf proxy.conf
I'm copying the config through SSH session, so just $ sudo vi proxy.conf and Shift+Ins and Esc and ZZ to save and quit.
Test config, final fixes
Test the configuration:
$ sudo nginx -t

nginx: [emerg] BIO_new_file("/etc/nginx/dhparam.pem") failed (SSL: error:02001002:system library:fopen:No such file or directory:fopen('/etc/nginx/dhparam.pem','r') error:2006D080:BIO routines:BIO_new_file:no such file)
nginx: configuration file /etc/nginx/nginx.conf test failed
Together with the config folder, my dhparam.pem file was also deleted, so we have to generate it again.
Generate secure dhparam.pem. This will take a loooooong time, especially on VPSes with a single core like in my case.
$ openssl dhparam -out dhparam.pem 4096Test config again, it should be fine now:
$ sudo nginx -t
nginx: the configuration file /etc/nginx/nginx.conf syntax is ok
nginx: configuration file /etc/nginx/nginx.conf test is successful
Restart the service and check status to see if everything is working.
$ sudo systemctl restart nginxMoral of the story – always backup at least your config files
Hide Nginx version
Test if your website sends Server header
When you make a request to a Nginx-powered website, by default, every response will contain Nginx's server version in a Server header. You can test this by opening developer options in your browser (F12 in Firefox) and looking at the requests in the Network tab.

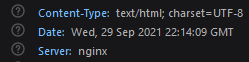
Other method is to use curl:
$ curl -IL https://selfhostedfuture.xyzThe output shows a similar result:
HTTP/1.1 200 OK
Server: nginx/1.21.3
Content-Type: text/html; charset=UTF-8
...
Hide Nginx version from Server header
Even though exposing the server's Nginx version isn't a huge security threat, it makes it easier for attackers to find exploits and vulnerabilities specifically for the given version. This is especially important if you forget updating your server for a while.
Hiding Nginx's version is Security Through Obscurity, since more advanced attackers are able to find what they want anyway
Edit Nginx configuration
Open the Nginx configuration file in /etc/nginx/nginx.conf:
$ sudo vi /etc/nginx/nginx.confBy default, your config will look something like this (settings here can be overwritten by configuration in /etc/nginx/conf.d):
user  nginx;
worker_processes  auto;

error_log  /var/log/nginx/error.log notice;
pid        /var/run/nginx.pid;


events {
    worker_connections  1024;
}


http {
    include       /etc/nginx/mime.types;
    default_type  application/octet-stream;

    log_format  main  '$remote_addr - $remote_user [$time_local] "$request" '
                      '$status $body_bytes_sent "$http_referer" '
                      '"$http_user_agent" "$http_x_forwarded_for"';

    access_log  /var/log/nginx/access.log  main;

    sendfile        on;
    #tcp_nopush     on;

    keepalive_timeout  65;

    #gzip  on;

    include /etc/nginx/conf.d/*.conf;
}
Focus on the http server block and add the server_tokens directive and set it to off:
server_tokens off;Like this:
http {
    include       /etc/nginx/mime.types;
    default_type  application/octet-stream;

    server_tokens off;
    ....
Test configuration
Before restarting, check that you haven't made a mistake in the configuration:
$ sudo nginx -tProceed if the output looks like this:
nginx: the configuration file /etc/nginx/nginx.conf syntax is ok
nginx: configuration file /etc/nginx/nginx.conf test is successful
Restart Nginx
Restart Nginx for the changes to take effect:
$ sudo systemctl restart nginxConfirm the change
Look into the Network tab again, or use curl to see whether Nginx still reports the version. It is also possible to completely hide the fact that the website is Nginx powered, but that is for another post.
$ curl -IL https://selfhostedfuture.xyzHTTP/1.1 200 OK
Server: nginx
Content-Type: text/html; charset=UTF-8Generate DH parameters (dhparam.pem)
One of the things we can do to improve the security of our website is to generate our own DH parameters. What these parameters mean is decently explained HERE.
Genreate dhparam.pem
$ openssl dhparam -out dhparam.pem 4096If you are generating directly into the /etc/nginx directory (only writable by root), you can use sudo, or if you don't want to elevate openssl for no reason, just generate the file to a writable location and copy it to /etc/nginx later on.
$ sudo openssl dhparam -out dhparam.pem 4096Heads up – This will take a long time, especially on less powerful servers/VMs.
Add it to Nginx config
Open Nginx configuration file and add the path to dhparam.pem file under the server block.
$ sudo vi /etc/nginx/conf.d/your_config_file.conf...
ssl_dhparam /etc/nginx/dhparam.pem;
...Test the configuration to avoid mistakes (like forgetting ;) etc.
$ sudo nginx -tRestart Nginx to apply the change:
$ sudo systemctl restart nginxTips and tools
Edit /etc/passwd correctly
In my recent guides, you might have noticed that I sometimes edit /etc/passwd directly with vi or nano. This is not advised behavior. The main reason being the possibility of file corruption and other users making changes to their account while you are editing. The latter is not very likely to happen as I am the only user on the system. In any case, here's how to do it more properly.
Use vipw
vipw is a command line utility designed to make edits to the /etc/passwd file and prevents corruption by setting appropriate locks. You will need elevated privileges to edit /etc/passwd.
$ sudo vipwIt might ask you to pick an editor you want to use, usually nano or vi. Choose which one you prefer and the file will open, ready to be edited. I usually do this to edit shell for a service user, but do whatever you like.
Create multiple parent directories with mkdir
You have a directory /home/mydir and you want to create two new directories like this: /home/mydir/backup/something
When you run mkdir /home/mydir/backup/something you will get an error:
mkdir: cannot create directory ‘/home/mydir/backup/something’: No such file or directoryNormally, you would have to make both directories separately like mkdir /home/mydir/backup /home/mydir/backup/something
Add the -p flag (make parent directories along the way if needed) to fix it:
mkdir -p /home/mydir/backup/somethingmkdir created both backup and something directory in the same path
Make a Linux VM template unique
If you have ever worked with Virtual Machines (VMs), you are most likely familiar with the term "VM cloning" or VM templates in general. It's a process of taking an existing VM with the operating system installed and cloning it to create a new identical VM. This comes in handy when you are tasked with creating multiple VMs for the same purpose or you want to achieve consistency across your environment (same OS settings, FS layout etc.). All of this is possible without having to install X number of VMs manually - you can just do it once and then clone the VM in a few clicks.
The problem with this time saving feature is that each VM is really identical. This may not seem like a problem at a first glance - we wanted to make the VMs identical, right? Well, that's true, but there's certain things that should not be kept the same. One of them is e.g SSH host keys - without any further modification, you would have the same SSH host keys on all of your systems, which is certainly not a good thing for security.
There's a couple of ways we can solve this - most commonly through Guest OS Customization features of different hypervisors or with automation (cloud-init, ansible...). Most of the automation stuff requires quite a bit of preparation and takes time. Guest OS customization is a great option, if it's available, but doesn't solve everything either. Today, I'm going to show you a couple of things that you should definitely do on each cloned system to make it "unique". The list may not include everything ever, but has worked for me for quite some time.
This example is based on Debian 12. The configuration may be different on other systems
Change hostname
Use the hostnamectl to change the hostname. The command may not return the new hostname until reboot.
sudo hostnamectl set-hostname new_hostname.domain

hostnamectl
 Static hostname: new_hostname.domain
       Icon name: computer-vm
         Chassis: vm 🖴
      Machine ID: XXXXXXXXXXXXXXXXXXXXXXXXXX
         Boot ID: XXXXXXXXXXXXXXXXXXXXXXXXXX
  Virtualization: kvm
Operating System: Debian GNU/Linux 12 (bookworm)
          Kernel: Linux 6.1.0-22-amd64
    Architecture: x86-64
 Hardware Vendor: QEMU
  Hardware Model: Standard PC _i440FX + PIIX, 1996_
Firmware Version: rel-1.16.2-0-prebuilt.qemu.org
Fix /etc/hosts
Sometimes people forget that the hostname also lives in the hosts file and won't change on its own.
vim /etc/hosts
127.0.0.1       localhost
192.168.0.20    new_hostname.domain       new_hostname

# The following lines are desirable for IPv6 capable hosts
::1     localhost ip6-localhost ip6-loopback
ff02::1 ip6-allnodes
ff02::2 ip6-allrouters
Edit IP
You don't want to cause an IP collision on your network, so don't forget to give each system a different IP and apply correct settings in the OS.
sudo vim /etc/network/interfaces
# This file describes the network interfaces available on your system
# and how to activate them. For more information, see interfaces(5).

source /etc/network/interfaces.d/*

# The loopback network interface
auto lo
iface lo inet loopback

# The primary network interface
allow-hotplug ens18
iface ens18 inet static
        address 192.168.0.20/24
        gateway 192.168.0.1
        # dns-* options are implemented by the resolvconf package, if installed
        dns-nameservers 8.8.8.8
        dns-search domain
Change ID
This is the "Machine ID" you saw when running the hostnamectl command. You only want to change the Machine ID, but not the Boot ID - that is usually assigned from the virtualization side and is already unique (happens during cloning)
sudo rm /etc/machine-id
sudo rm /var/lib/dbus/machine-id
sudo dbus-uuidgen --ensure=/etc/machine-id
sudo dbus-uuidgen --ensure
Change SSH keys
I found that the easiest way to do this is actually just reinstalling the whole SSH deamon using purge (deletes all config). Or you can just not include SSH in the template and install it on each system later.
sudo apt purge openssh-server openssh-client
sudo apt install openssh-server openssh-client
Perform a reboot after all the changes above